
Desserts
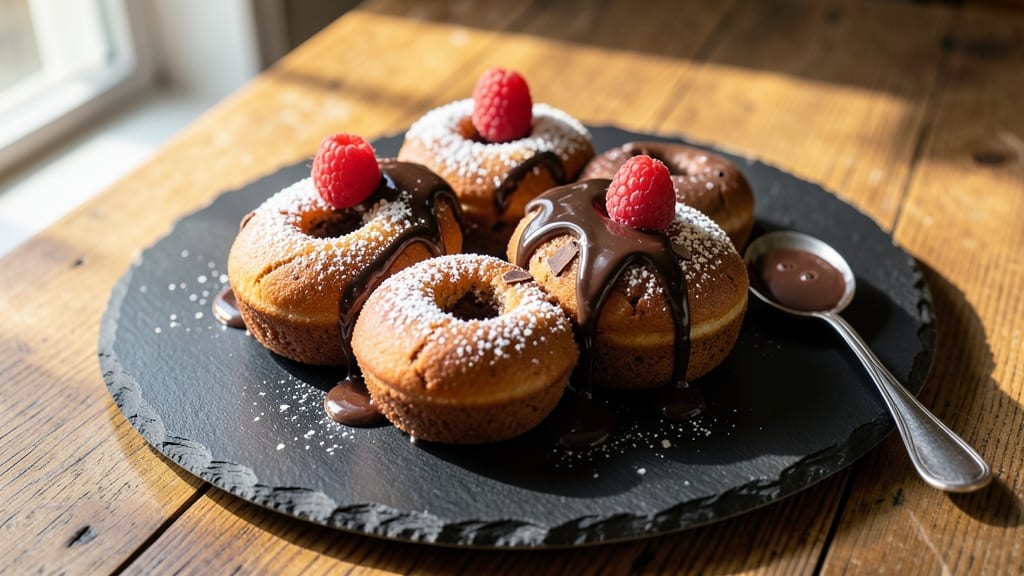
This baked chocolate donut hole recipe delivers the perfect balance of crispy shells and fudgy cocoa cores without deep-frying. 💛 After years of experimenting with textures, I've perfected a method that yields golden, airy bites with a rich chocolate flavor in every bite—ideal for parties, gifts, or satisfying a sweet tooth.
The secret lies in the batter's composition: a precise ratio of all-purpose flour, cocoa powder, and sugar creates that signature tender-yet-crispy texture. Unlike traditional donut holes, these are baked at 375°F for 10-12 minutes, ensuring a foolproof method that delivers consistent results every time.
No special equipment required—just a standard muffin tin and a little patience.
By the time they emerge from the oven, you'll have mini chocolate bites with crackly edges and a molten center that practically melts in your mouth. The aroma alone will have everyone gathering around the kitchen, and the rich cocoa flavor makes them irresistible.
These are perfect for decorating with sprinkles, dipping in chocolate glaze, or serving plain for a classic treat.
Whether you're hosting a holiday gathering or simply craving a nostalgic dessert, this recipe delivers restaurant-quality donut holes with minimal effort. The best part? They stay fresh for days, making them perfect for meal prep or gifting. Let's get baking!
Ingredients for baked chocolate donut hole
Golden, airy bites with molten centers—just 13 ingredients transform your kitchen into a donut hole haven.
| Ingredient | Amount | Notes |
|---|---|---|
| All-Purpose Flour 🌾 | 2 ½ cups | Lightly spooned, not packed |
| Unsweetened Cocoa Powder 🍫 | ¾ cup | Natural or Dutch-processed |
| Granulated Sugar 🍚 | 1 ½ cups | Superfine preferred for smooth texture |
| Baking Powder 🍞 | 1 tsp | Aluminum-free recommended |
| Salt 🧂 | ½ tsp | Fine sea salt preferred |
| Instant Espresso Powder ☕ | 1 tsp | For deep chocolate flavor |
| Vanilla Extract 🌸 | 1 tsp | Pure, high-quality extract |
| Large Eggs 🥚 | 2 whole | Room temperature for even mixing |
| Milk 🥛 | 1 cup | Whole milk for richness |
| Vegetable Oil 🫒 | ½ cup | Light, neutral flavor |
| White Chocolate Chips 🍫 | 1 cup | High-quality, 30% cocoa |
| Powdered Sugar 🍚 | 1 cup | For coating, sifted |
| Colorful Sprinkles 🎉 | ½ cup | Optional, for decoration |
The cocoa powder is non-negotiable here. Hershey's Special Dark or Valrhona make all the difference—avoid the cheap stuff that tastes like dust. For the flour, King Arthur or Gold Medal brands are your best bet; they're finely milled and consistent. The white chocolate chips? Ghirardelli or Lindt melt beautifully and add that signature richness. Pro tip: toast the cocoa powder in a dry pan for 30 seconds to deepen its flavor—trust me, it's worth the extra minute.
No instant espresso? Skip it or use 1 tsp strong brewed coffee—it's all about that deep chocolate note. Running low on vanilla extract? Vanilla bean paste works too, though it'll make your batter slightly thicker. The milk can be swapped for oat or almond milk if you prefer dairy-free, but whole milk gives the best texture. Prefer dark chocolate? Swap the white chocolate chips for chopped dark chocolate (60% cocoa or higher), but reduce the amount to 0.75 cup to avoid overpowering the batter.
These stay fresh for 5 days in an airtight container at room temperature, though they're best enjoyed within 2 days for maximum crispiness. For longer storage, freeze them for up to 3 months—thaw at room temperature before serving. I like to portion them into small jars or tins for gifting. The sprinkles? Only add them after baking—if you toss them in the batter, they'll sink to the bottom and ruin the presentation.
Why You'll Love This Recipe
- No Mixer Needed: I swear by this recipe when I’m too tired to knead dough. Just whisk the flour, cocoa, sugar, and baking powder—no standing over a bowl, no sticky fingers. The batter’s thick but forgiving, and it bakes up light and airy without a single lick of oil.
- Rich Without Fuss: That first spoonful of cocoa powder? Pure chocolate magic. It’s deep, not bitter, and the sugar caramelizes just enough to give them a subtle toasted edge. Honestly, they taste like a bakery’s donut holes—except I’m the one who made them.
- Party in a Pan: These are my go-to for game days, book club gatherings, or even a lazy Sunday. Bake a batch, dip half in melted chocolate, and the other half in cinnamon sugar. No one will guess they’re baked, not fried—just pure, crowd-pleasing satisfaction.
- Budget-Friendly Indulgence: Five ingredients, zero specialty items. The cocoa powder does the heavy lifting, and the sugar’s job is simple: make them irresistible. I make a double batch, freeze half, and pull them out whenever I crave something sweet without breaking the bank.
Step-by-step instructions for baked chocolate donut holes
Here's how to create perfectly crispy shells with fudgy, decadent centers—every bite delivers!
👨🍳 Step 1: Mix Dry Ingredients for Maximum Fluffiness
In a large mixing bowl, whisk together the 2.5 cups all-purpose flour, 0.75 cup unsweetened cocoa powder, 1.5 cups granulated sugar, 1 tsp baking powder, 0.5 tsp salt, 1 tsp instant espresso powder, and 1 tsp vanilla extract. Sift the dry ingredients through a fine-mesh sieve as you whisk to eliminate any lumps and ensure even distribution of the cocoa powder.
This step is crucial for creating that signature crispy shell. The espresso powder deepens the chocolate flavor while the baking powder ensures proper rise. Whisk until the mixture is completely smooth—you should see no visible flour streaks when you lift the whisk.
🍳 Step 2: Combine Wet Ingredients for Silky Smoothness
In a separate bowl, beat the 2 whole large eggs until frothy. Then add the 1 cup milk and 0.5 cup vegetable oil, whisking until fully combined. The mixture should be smooth and slightly thickened—this ensures your donut holes will hold their shape during baking.
Here's the thing—room temperature eggs and milk incorporate better, preventing any separation in the batter. If your eggs are cold, let them sit at room temperature for 15 minutes before mixing. Pour the wet ingredients into the dry mixture and stir just until combined—overmixing develops gluten, which can make your donut holes tough.
🥘 Step 3: Fold in White Chocolate Chips for Rich, Melty Centers
Using a rubber spatula, gently fold in the 1 cup white chocolate chips until evenly distributed throughout the batter. The key here is to keep the mixing gentle—you're just combining, not developing gluten. The white chocolate will melt during baking, creating those luscious, gooey pockets in each donut hole.
Don't worry if the batter looks thick—it should hold its shape when dropped from a spoon. If it seems too stiff, add 1-2 tablespoons of milk to loosen it slightly. The batter should be smooth enough to pipe but thick enough to hold its form when dropped into the baking pan.
🔥 Step 4: Bake Until Golden and Crispy
Preheat your oven to 350°F and line two baking sheets with parchment paper. Using a piping bag fitted with a small round tip (or a zip-top bag with a corner snipped off), pipe 1-inch diameter circles of batter onto the prepared baking sheets, spacing them about 2 inches apart. This gives them room to expand and develop that perfect crispy shell.
Bake for 12-14 minutes until the edges are deep golden brown and the tops look slightly cracked. The centers should still appear slightly underdone—they'll firm up as they cool. Here's where patience pays off: don't overbake. You want a crispy exterior with a fudgy, molten center, not a completely set donut hole.
🍽️ Step 5: Coat and Decorate for Irresistible Appeal
While still warm, transfer the baked donut holes to a wire rack to cool slightly. In a shallow bowl, whisk together the 1 cup powdered sugar with 1-2 tablespoons of milk to create a smooth glaze. Dip the tops of each donut hole into the glaze, allowing any excess to drip off.
Immediately roll the glazed donut holes in the 0.5 cup colorful sprinkles, pressing gently to adhere. Work quickly—the glaze sets fast! Let them cool completely on the rack before serving. The contrast of the crispy shell, fudgy center, and colorful sprinkles makes these mini bites impossible to resist.
Pro Tips For Making Baked Chocolate Donut Hole
- Sift the Cocoa: I learned this the hard way—lumpy cocoa powder makes for dense, uneven donut holes. Sift it with the flour and baking powder before mixing; it distributes better and cuts down on clumps. (Yes, even if you’re impatient like me, take the 30 seconds.)
- Don’t Overmix the Batter: The moment your dough turns tough, you’ve gone too far. Mix just until the dry ingredients disappear—about 10-12 strokes with a spatula. Overworking it makes the donut holes dry and rubbery, and nobody wants that.
- Use a Toothpick Test: Bake until a toothpick comes out clean and the edges are just set. I used to pull them too soon, thinking they’d keep baking, but they end up gummy inside. Aim for 10-12 minutes at 350°F—watch them like a hawk after 8.
- Chill the Dough: Sounds weird, but it works: let the dough rest 15-20 minutes before baking. My grandmother swore by this, and she was right—it prevents cracking and gives you a more even rise. (Your future self will thank you.)
Storing and reheating this recipe
Room Temperature Storage
Store your baked chocolate donut holes in an airtight container at room temperature for up to 5 days. I like using glass jars with tight-sealing lids because they keep the donut holes fresh longer than plastic containers.
Place them in a single layer to maintain that perfect crispy texture—stacking can make them soggy. 💛
Freezer Preservation
For longer storage, freeze them for up to 3 months—they’re perfect for meal prep or holiday gifts. Let them cool completely first, then arrange in a single layer on a baking sheet before transferring to a freezer-safe bag or container.
This prevents them from sticking together. Thaw at room temperature for 30-60 minutes before serving to restore crispiness.
Reheating for Maximum Crisp
If your donut holes lose their crunch, revive them by placing them on a baking sheet and warming in a 350°F oven for 3-5 minutes. This restores that golden, crispy shell without making the centers rubbery.
For a quick fix, microwave for 10-15 seconds (covered with a damp paper towel) to soften slightly while keeping the texture intact. 🔥
Gifting and Transport
Pack donut holes in small jars or tins lined with parchment paper to keep them fresh during transport. Add a ribbon for a festive touch! For extra protection, place a paper towel between layers to absorb moisture.
These make thoughtful gifts for teachers, neighbors, or coworkers—just add a handwritten note. ✨
Reviving Stale Donut Holes
If your donut holes lose their crispiness after a few days, don’t toss them! Toss them in a 350°F oven for 3-5 minutes to restore that perfect crunch.
You can also dip them in melted chocolate or caramel sauce for a quick flavor boost. The fudgy centers stay delicious even after reheating. 💡
Frequently asked questions about baked chocolate donut holes
Can I make these without white chocolate chips?
Swap the white chocolate for dark chocolate chunks (60-70% cocoa) or even chocolate chips—just reduce the amount to 0.75 cup to avoid overpowering the batter. For a nutty twist, try chopped walnuts or pecans instead. The key is keeping the texture contrast between crispy shell and fudgy center.
Why did my donut holes turn out dense instead of crispy?
Overmixing the batter develops gluten, making them tough. Stir just until combined and avoid overbaking—pull them when edges are golden but centers still look slightly soft. Also ensure your oven is properly calibrated (use an oven thermometer) and don't skip the 350°F baking temperature. The white chocolate chips should create pockets of gooeyness when melted.
How can I make these gluten-free?
Replace the all-purpose flour with a 1:1 gluten-free baking flour blend (like Bob's Red Mill) and add 0.5 tsp xanthan gum to improve texture. For the cocoa powder, use a dedicated gluten-free brand. Expect slightly denser results—these will be more cake-like than crispy. The baking powder and espresso powder ratios stay the same.
Can I use a muffin tin instead of piping?
Yes! Drop 1 tablespoon batter per muffin cup and bake for 10-12 minutes at 350°F. The results will be slightly larger but still crispy. For even baking, rotate the tin halfway through. Just be prepared for more cleanup—these won't come out as neatly as piped versions.
What's the best way to decorate them beyond sprinkles?
Try dipping in melted white chocolate and rolling in crushed nuts, or drizzle with chocolate ganache before sprinkles. For a festive touch, use edible gold leaf or colorful sanding sugar. Keep decorations light—the crispy shell should still be the star! The powdered sugar glaze is classic but works perfectly with any topping.