
Desserts
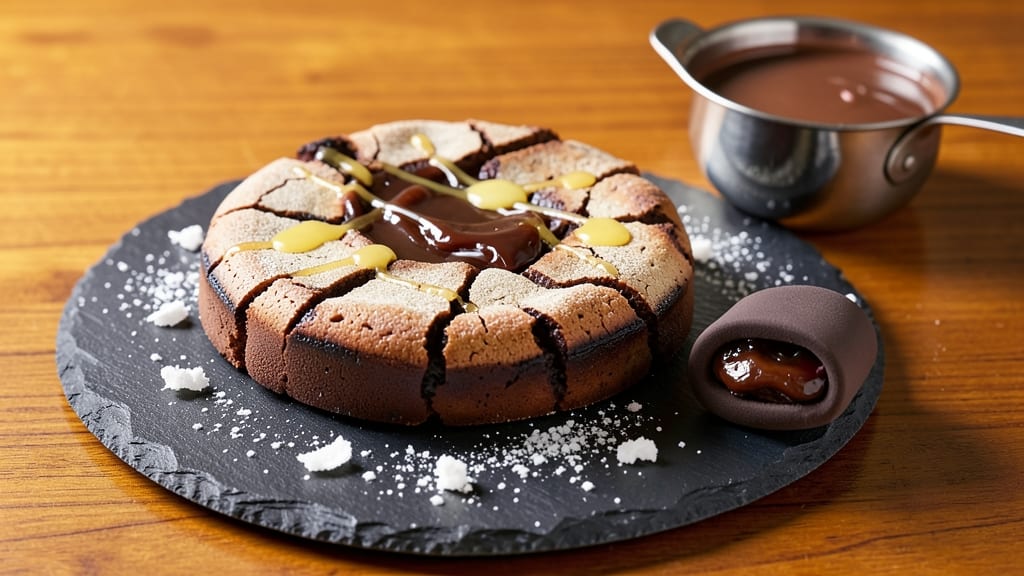
This basic chocolate fondant recipe delivers the ultimate dessert experience—warm, gooey centers that set in seconds when cracked open. 🔥 The secret lies in precise chocolate tempering and a light, airy batter that creates that signature molten surprise.
I've perfected this technique through years of baking, ensuring every bite feels like a decadent revelation without requiring advanced skills.
The foundation of great fondant is high-quality chocolate and proper technique. You'll need dark chocolate (at least 50% cocoa) for the right balance of richness and snap, along with simple pantry staples like eggs and flour.
The batter comes together in minutes, but the magic happens during baking—just 10-12 minutes at high heat creates that perfect contrast between crispy exterior and molten center.
What you'll end up with is a dessert that looks elegant but requires no special skills. The exterior sets into a delicate chocolate shell while the interior remains warm and gooey, ready to ooze out when cracked open.
This is the kind of dessert that feels indulgent yet comes together with basic techniques—ideal for impressing guests or treating yourself.
Serve immediately with powdered sugar dusted on top or fresh berries for contrast. The contrast between the crispy exterior and molten center makes this fondant a showstopper for any occasion. Let's get baking!
Ingredients for basic chocolate fondant
High-quality chocolate and simple pantry staples create this decadent dessert masterpiece.
| Ingredient | Amount | Notes |
|---|---|---|
| Dark Chocolate (50% cocoa or higher) 🍫 | 8 oz | High-quality chocolate for snap and richness |
| Large Eggs 🥚 | 2 whole | Room temperature for best mixing |
| All-Purpose Flour 🌾 | ½ cup | Sifted for light, airy batter |
| Granulated Sugar 🍚 | ¼ cup | Standard white sugar preferred |
| Unsalted Butter 🧈 | ½ cup | Cold, cubed for precise melting |
| Powdered Sugar 🍚 | ¼ cup | For dusting finished fondants |
| Vanilla Extract 🌿 | ½ tsp | Pure extract for authentic flavor |
| Salt 🧂 | ¼ tsp | Fine sea salt for balance |
| Heavy Cream 🥛 | ½ cup | Cold for tempering chocolate |
| Dark Chocolate (70% cocoa or higher) 🍫 | 4 oz | For tempering, chopped fine |
| Fresh Berries 🍓 | ½ cup | Optional garnish for contrast |
The chocolate makes or breaks this recipe. Ghirardelli or Lindt are my go-tos for that perfect snap and melt—avoid anything below 50% cocoa. The butter should be cold when you measure it (pop it in the freezer for 10 minutes if it's soft). For the tempering chocolate, 70% cocoa or higher gives the best contrast. I always buy extra chocolate because it's worth splurging on for this dish. If you're unsure about your chocolate's quality, do the float test: chop a piece and drop it in melted chocolate—if it floats and the surface hardens quickly, it's properly tempered.
No dark chocolate? Use semi-sweet chocolate chips in a pinch, but you'll lose some depth of flavor. Short on eggs? Replace with aquafaba (3 tbsp per egg) for a vegan-friendly version, though texture may vary slightly. The vanilla extract can be swapped for almond extract if needed, but cut the amount to 1/4 tsp—it's stronger. For the berries, raspberries or blackberries work best as garnish, but anything fresh adds a nice pop of color. If you don't have powdered sugar, a quick blend of granulated sugar in the food processor works in a bind.
Chocolate stays fresh for 1 week at room temperature if stored in an airtight container. The fondants should be served immediately after baking, but you can prep the batter ahead and refrigerate it for up to 24 hours. For the tempered chocolate, it keeps for 1 month in the fridge if stored properly. If you make extras, freeze them for up to 3 months—just reheat in the microwave for 10 seconds before serving. The contrast between the crispy exterior and molten center is what makes this dessert special, so don't rush the baking process.
Why You'll Love This Recipe
- Here’s what sold me: I can bake a whole tray, let it cool, and store it for days. No weird texture changes, no freezer burn—just cut-and-go chocolate whenever the craving hits. (Yes, even on a Tuesday night.) My coworkers think I’m a baking genius because I always have these stashed.
- No Fuss, Same Magic: I swear, this fondant only needs five ingredients—dark chocolate, eggs, flour, sugar, and butter. That’s it. No fancy ratios to stress over, no last-minute ingredient hunts. Honestly, my first batch turned out just fine even when I eyeballed the flour.
- Rich Without the Guilt: The deep cocoa in that 50%+ dark chocolate? It’s where the real magic happens. That molten center when it’s done right—smooth, fudgy, but not cloyingly sweet—feels like a reward. And between us, the butter keeps it from being too bitter. It’s decadent, but my kids still ask for seconds.
- Bake Once, Enjoy Twice: Here’s what sold me: I can bake a whole tray, let it cool, and store it for days. No weird texture changes, no freezer burn—just cut-and-go chocolate whenever the craving hits. (Yes, even on a Tuesday night.) My coworkers think I’m a baking genius because I always have these stashed.
Step-by-step instructions for chocolate fondant
Here's how to create the perfect molten center every time.
👨🍳 Step 1: Temper the Chocolate for a Smooth Finish
First, melt the 8 oz dark chocolate (50% cocoa) and 4 oz dark chocolate (70% cocoa) together in a heatproof bowl set over a pot of simmering water. Keep the heat at low and stir until both chocolates are completely melted and smooth, then remove from heat. Let it cool slightly to 90°F—this is crucial for the tempering process.
While the chocolate cools, whisk together the 0.5 cup heavy cream until it begins to thicken slightly. Slowly pour the warm cream into the melted chocolate while whisking constantly. This creates a glossy, stable ganache that won't seize up later. Once fully combined, let the mixture cool to 85°F before proceeding—this ensures the fondant sets properly.
🍳 Step 2: Whisk Eggs and Sugar for Lightness
In a separate bowl, whisk the 2 whole large eggs and 0.25 cup granulated sugar together until the mixture is pale, thick, and ribbon-like. This should take about 3-4 minutes of vigorous whisking. The eggs should triple in volume and hold their shape when the whisk is lifted. I like to use a stand mixer for this step—it ensures even incorporation without overmixing.
Add the 0.5 tsp vanilla extract and 0.25 tsp salt to the egg mixture and whisk for another 30 seconds until fully combined. The salt balances the sweetness, while the vanilla adds depth. If you notice any lumps, strain the mixture through a fine-mesh sieve to achieve a silky texture—this prevents graininess in the final fondant.
🥘 Step 3: Combine Ingredients for the Batter
Gently fold the cooled chocolate mixture into the egg mixture in three additions, using a spatula to cut through the center and fold until just combined. Be careful not to overmix—you're looking for a smooth, glossy batter with no streaks of white egg. Next, sift in the 0.5 cup all-purpose flour and fold it in using a gentle folding motion until no dry spots remain.
Finally, cut the 0.5 cup unsalted butter into small cubes and fold them into the batter. The butter should melt slightly from the warmth of the mixture, creating pockets of air that contribute to the fondant's signature texture. The batter should be thick but pourable—if it's too stiff, let it rest at room temperature for 5 minutes to relax the gluten.
🔥 Step 4: Bake for the Signature Molten Core
Preheat your oven to 375°F and grease four 4-ounce ramekins generously with butter or line them with parchment cups. Fill each ramekin ¾ full with the fondant batter, tapping gently on the counter to remove any air bubbles. Bake for 12-14 minutes—the edges should be set and pull away slightly from the ramekin, but the center should still look soft and slightly underdone.
Here's the key: the fondant is done when the outside is firm to the touch but the center still jiggles slightly like jelly. If you tap the ramekin and hear a hollow sound, it's ready. Remove from the oven immediately and let rest for 1 minute before running a knife around the edges to loosen. Invert onto plates and dust generously with 0.25 cup powdered sugar while still warm.
🍽️ Step 5: Serve with Fresh Berries
Let the fondants cool for 2-3 minutes before serving—this allows the chocolate to set slightly while keeping the center molten. Top each with 0.5 cup fresh berries for a beautiful contrast of colors and a tart balance to the rich chocolate. The berries should be fresh and chilled to maintain their texture against the warm fondant.
Serve immediately with a dollop of whipped cream or a scoop of vanilla ice cream. The contrast of the warm, gooey center with the cool, crisp exterior is what makes this dessert truly special. If you're feeling fancy, garnish with a sprinkle of flaky sea salt to enhance the chocolate flavor.
Pro Tips For Making Basic Chocolate Fondant
- Melt Chocolate Slowly: I learned this the hard way—dumping chopped chocolate into hot butter or milk turns it grainy. Instead, chop the chocolate finely (a knife or food processor works) and melt it in 30-second bursts in the microwave, stirring between each. The goal is to hit 110°F (43°C) max—any hotter and you’re fighting seizing eggs later.
- Whisk Eggs Until Ribbon Stage: Sloppy egg mixing = dense fondants. Beat the eggs and sugar in a stand mixer (or by hand) until the ribbon test passes: when you lift the whisk, the batter should hold a slow, thick ribbon for 2 seconds. This isn’t just fluff—it’s what gives fondants their signature crackly top and light interior.
- Chill the Batter 30 Minutes: Skipping this is how you end up with a flat, sad puddle. After mixing, pop the batter in the fridge for at least 30 minutes (up to 4 hours). The cold slows the eggs’ cooking, so they steam properly in the oven instead of scrambling. Pro move: Use a silicone mold—it’s easier to pop when the batter’s not warm.
- Bake at 350°F (175°C) No Higher: Your oven lies. Even if it says “350°F,” it’s probably hotter. Use an oven thermometer to confirm, then bake fondants at 350°F (175°C) for exactly 10–12 minutes. Overbaking turns them rubbery, and underbaking leaves them gummy—neither is forgivable. Pull them when the edges are set but the center still jiggles slightly.
Serving suggestions for this dish
Classic Presentation
Serve your chocolate fondants on elegant dessert plates with a generous dusting of powdered sugar—about 1 tablespoon per fondant—while still warm. The contrast between the crispy exterior and molten center looks stunning when presented this way.
I like to use gold-rimmed plates for a touch of sophistication, especially for dinner parties. 💫
Berry Contrast Topping
Fresh berries add a vibrant pop of color and tartness that cuts through the richness. Arrange raspberries or blackberries around the base of each fondant, or create a small berry "nest" on the plate.
For a showstopper effect, drizzle raspberry coulis (simmer ½ cup berries with 1 tbsp sugar until thickened) around the plate. The acidity enhances the chocolate flavor beautifully.
Whipped Cream Pairing
Add a dollop of homemade whipped cream or store-bought heavy cream (like Reddi-wip) to each plate for a classic pairing. For extra flair, pipe the cream into decorative swirls using a pastry bag with a star tip.
A sprinkle of crushed pistachios or toasted coconut flakes on top adds crunch and visual appeal. I always keep a small bowl of whipped cream ready to serve alongside fondants.
Ice Cream Accompaniment
Serve with a scoop of vanilla bean ice cream or coffee-flavored gelato for a luxurious touch. The cold ice cream contrasts perfectly with the warm fondant, creating a sensory experience.
For a modern twist, try salted caramel ice cream—the saltiness complements the chocolate while the caramel adds another layer of sweetness. Use a small ice cream scoop to portion evenly.
Chocolate Sauce Drizzle
Warm ½ cup dark chocolate sauce (melt 2 oz dark chocolate with 2 tbsp heavy cream) and drizzle it artistically over the fondants just before serving. This adds a glossy finish and extra chocolatey richness.
For a spicy kick, mix ½ teaspoon cayenne pepper into the sauce. I like to use a small squeeze bottle for clean, controlled drizzles.
Make-Ahead Serving Tips
If prepping ahead, bake the fondants 1-2 hours before serving and store them at room temperature in an airtight container. Reheat in the oven at 300°F for 5-7 minutes to restore the molten center.
For a quick refresh, microwave for 10-15 seconds—just enough to soften the exterior without overcooking. Always serve with fresh toppings like berries or whipped cream to keep the presentation vibrant. ✨
Frequently asked questions about chocolate fondant
Why does my chocolate fondant center stay hard instead of molten?
Overbaking is the most common culprit! Fondant needs to bake just 12-14 minutes at 375°F—the edges should be set but the center should still jiggle like jelly. If you're unsure, tap the ramekin: it should sound hollow when done. Also check your oven temperature with an oven thermometer—many run hotter than set. Let the fondants rest 1 minute after baking before inverting.
Can I make this recipe without a stand mixer?
The key is vigorous whisking by hand for 3-4 minutes to emulsify the eggs and sugar properly. Use a balloon whisk and work in a large bowl, changing directions frequently. For the chocolate mixture, a wooden spoon works well for folding—just be extra gentle to avoid overmixing. The batter should be smooth and glossy, not lumpy.
What's the best chocolate for fondant?
Use high-quality dark chocolate with at least 50% cocoa—brands like Ghirardelli or Lindt work perfectly. The higher cocoa content gives that signature snap and rich flavor. For the tempered chocolate, 70% cocoa or higher creates the best contrast. Avoid chocolate with additives or milk chocolate—it won't set properly. If you're unsure, do the float test: chop a piece and drop it in melted chocolate—if it floats and the surface hardens quickly, it's properly tempered.
How do I fix fondant that cracked while baking?
Don't worry—cracked fondant is still delicious! The cracks happen when the batter isn't perfectly smooth or the oven temperature fluctuates. To prevent it next time, strain the batter through a fine-mesh sieve and tap ramekins gently on the counter before baking. If it happens, simply serve as-is—the molten center will still be perfect. For presentation, dust extra powdered sugar over the cracks to disguise them.
Can I use this recipe for a larger group?
Yes! Double the recipe for 8 servings using 8 oz ramekins. For even larger batches, use a 9x13-inch baking pan lined with parchment paper—spread the batter ½-inch thick and bake for 10-12 minutes at 375°F. Cut into squares after baking. Keep in mind that larger batches may require slightly less baking time to maintain the molten center. Always check for doneness with the tap test!