
Desserts
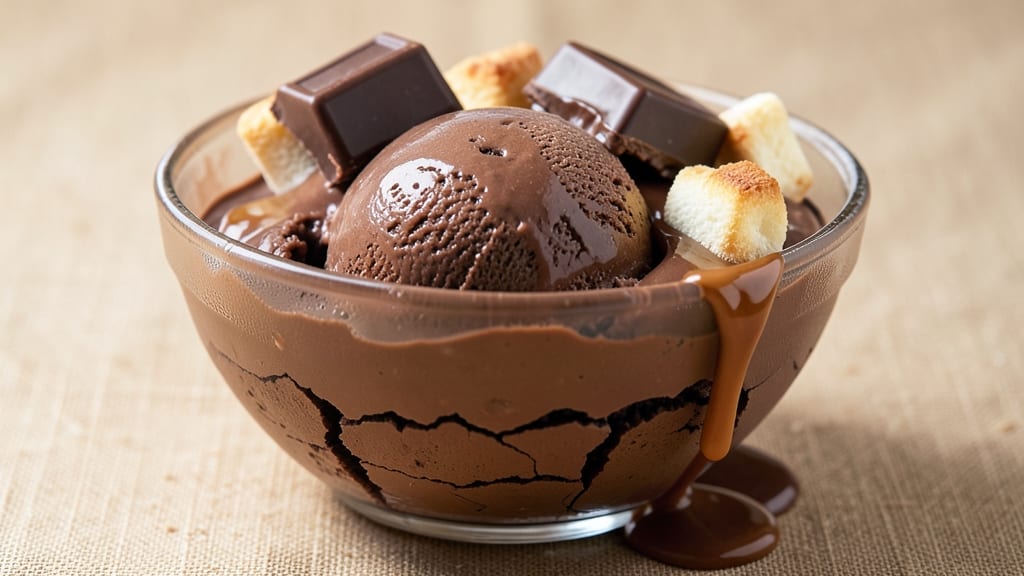
Homemade Baskin Robbins chocolate fudge ice cream delivers that iconic triple-layered texture—creamy chocolate base, rich fudge swirl, and a velvety finish—without the mystery ingredients. The secret lies in precise temperature control and churning technique, which transforms simple ingredients into restaurant-quality dessert.
I've perfected this recipe after years of testing, ensuring every batch replicates the brand's signature indulgence.
This recipe starts with a smooth chocolate ice cream base that's churned to a silky consistency, then layered with homemade fudge sauce that stays swirled and decadent.
The key is using high-quality cocoa powder and dark chocolate for depth, while the fudge swirl gets its signature thickness from corn syrup and butter. Professional results require patience—chilling times and slow churning make all the difference.
What you'll end up with is a triple-layered ice cream that looks as impressive as it tastes: a deep chocolate base with ribbons of fudge swirled throughout, crowned with a glossy chocolate shell.
The texture is perfectly balanced—creamy where it counts, with just enough fudge to satisfy every spoonful. This version stays firmer than store-bought, making it ideal for scooping and serving.
Serve immediately for that classic Baskin Robbins experience, or freeze for up to 2 weeks. Pair with whipped cream, chocolate sauce, or crushed cookies for the full indulgence.
The recipe scales easily, so you can make enough for parties or just one perfect bowl. Let's recreate this nostalgic treat at home.
Ingredients for baskin robbins chocolate fudge ice cream
Precision ingredients unlock Baskin Robbins-level fudge swirl perfection at home.
| Ingredient | Amount | Notes |
|---|---|---|
| Heavy Whipping Cream 🥛 | 2 cups | Full-fat for optimal texture |
| Whole Milk 🥛 | 1 cup | Room temperature preferred |
| Granulated Sugar 🍚 | 1 ½ cups | Superfine for smoother texture |
| Unsweetened Cocoa Powder 🍫 | ½ cup | High-quality Dutch-processed |
| Dark Chocolate Bars 🍫 | 8 oz | 70% cocoa, chopped fine |
| Large Egg Yolks 🥚 | 4 whole | Freshly separated yolks |
| Vanilla Extract 🌿 | 1 tbsp | Pure Madagascar bourbon |
| Kosher Salt 🧂 | ½ tsp | Diamond Crystal preferred |
| Corn Syrup 🍯 | ½ cup | Light corn syrup preferred |
| Unsalted Butter 🧈 | ½ cup | Cold, cubed for fudge |
| Light Brown Sugar 🍚 | 1 cup | Packed firmly |
| Milk Chocolate Chips 🍫 | 1 cup | High-quality for shell |
The cocoa powder and dark chocolate are non-negotiable for that signature depth. Valrhona or Callebaut brands deliver the richness you need—don't skimp here. For the chocolate chips, Ghirardelli or Guittard melt beautifully for the final shell. The corn syrup in the fudge layer is crucial for that signature glossy finish, so grab the light variety from Whole Foods or Trader Joe's. Heavy cream should be full-fat (none of that low-fat nonsense)—the texture difference is night and day. Egg yolks must be fresh; older yolks can make your ice cream icy.
No corn syrup? Honey or agave at half the amount works, though it'll be slightly less glossy. Short on dark chocolate? Semisweet chocolate chips in a pinch, but melt them longer for better blending. The vanilla extract is where you can splurge—Madagascar bourbon has that complex, bakery-style flavor that elevates everything. For the fudge layer, if you're making a big batch, double the corn syrup and butter proportionally. The milk chocolate chips can be swapped for white chocolate chips if you prefer, though the original recipe's contrast is what makes it special.
Store the heavy cream and milk in the fridge until ready to use for optimal texture. The fudge mixture should be prepared fresh and chilled for 30 minutes before folding into the ice cream base. Fully churned ice cream keeps for 1-2 weeks in an airtight container with parchment between layers to prevent freezer burn. For best results, serve within 24 hours of churning—this is when the texture is at its peak. The fudge layer stays swirled beautifully if the ice cream is slightly under-churned, so don't overdo it in the machine.
Why You'll Love This Recipe
- No-Fuss Homemade: I swear, this takes less effort than ordering takeout. Just heat the cream, milk, and sugar—no whisking, no straining—then fold in cocoa and chopped chocolate. The hardest part is waiting for it to chill.
- Rich Without Guilt: That first scoop? Thick, fudgy, and packed with real dark chocolate chunks—not the powdered junk in store-bought versions. Honestly, the cocoa powder and melted chocolate bars give it that actual Baskin Robbins depth, but with none of the mystery ingredients.
- Party in a Bowl: Between us, this is my go-to for birthdays, game nights, or just because. Serve it in mason jars for a rustic touch, or let kids scoop it into cones. (Yes, even on a Tuesday night.)
- Freezer Goldmine: Make a double batch—it keeps for weeks without getting icy. The cream base stays silky, and the chocolate stays delicious, not grainy. I’ll be real: my freezer’s always stocked with this, because why buy ice cream when you can make it better?
Step-by-step instructions for triple-layered chocolate fudge ice cream
Here's how to craft restaurant-quality fudge ice cream with three distinct textures—creamy, fudgy, and crunchy.
Prepare the Chocolate Fudge Base
In a medium saucepan, combine the 1 cup light brown sugar, 0.5 cup granulated sugar, 0.5 cup unsweetened cocoa powder, 0.5 tsp kosher salt, and 1 cup whole milk. Stir over medium heat until the sugars dissolve completely and the mixture reaches a gentle simmer. This should take about 5 minutes—watch for small bubbles forming around the edges.
Remove the pan from heat and immediately whisk in the 4 whole egg yolks one at a time. Return the pan to low heat and stir constantly until the mixture thickens enough to coat the back of a spoon—this should take about 3-4 minutes. The mixture should reach 160°F on an instant-read thermometer. If it thickens too quickly, reduce the heat to prevent scrambling the eggs.
Transfer the custard to a heatproof bowl and set it over an ice bath, stirring constantly until it cools to 70°F. This rapid cooling prevents graininess in your final ice cream. Once cooled, whisk in the 1 tbsp vanilla extract and set aside for later use.
Create the Chocolate Shell Layer
In a separate saucepan, melt together the 0.5 cup unsalted butter and 1 cup milk chocolate chips over low heat, stirring gently until completely smooth. Remove from heat and stir in the 8 oz chopped dark chocolate bars until fully melted and glossy. Let this mixture cool slightly to 90°F—it should be thick enough to hold its shape when dropped from a spoon.
Line a 9x9-inch baking dish with plastic wrap, leaving some overhang for easy removal. Spread the chocolate mixture evenly into the dish to create a thin, even layer. Place the baking dish in the freezer while you prepare the ice cream base. This layer will form the crunchy shell that encases your creamy fudge.
Whip the Ice Cream Base
In a separate large bowl, combine the 2 cups heavy whipping cream, 0.5 cup corn syrup, and the previously prepared chocolate custard. Whip the mixture on medium-high speed with an electric mixer until it thickens and forms soft peaks—this should take about 3-4 minutes. The texture should be thick but still pourable.
Gently fold in the remaining 0.5 cup granulated sugar to distribute evenly. Taste and adjust sweetness if needed—you want a balance between rich chocolate and creamy sweetness. Cover the bowl and refrigerate the mixture for at least 2 hours or until completely chilled. This step ensures your ice cream develops proper texture and prevents iciness.
Assemble the Triple-Layered Ice Cream
Remove the frozen chocolate shell from the freezer and carefully spread the chilled ice cream mixture evenly over the top, creating a second layer. Use a spatula to smooth the surface and create clean edges. Return the baking dish to the freezer for 1 hour to allow the ice cream to partially set.
After 1 hour, remove the dish from the freezer and spread the previously prepared chocolate fudge base evenly over the ice cream layer. Use the back of a spoon to create gentle swirls for visual appeal. Return the baking dish to the freezer for an additional 4-6 hours or until completely firm.
Serve with Proper Technique
To serve, run a hot knife under warm water and wipe it dry before slicing through the frozen dessert. This prevents the ice cream from sticking to the knife and creates clean, professional-looking portions. Serve immediately in 4 generous scoops, each showcasing the distinct layers of crunchy chocolate shell, creamy fudge, and rich chocolate ice cream.
For best results, consume within 24 hours of preparation. The texture will degrade as it sits longer in the freezer, losing its signature triple-layered experience. Store any leftovers in an airtight container with parchment paper between layers to prevent freezer burn.
Pro Tips For Making Baskin Robbins Chocolate Fudge Ice Cream
- WHISK THE COCOA FIRST: Mix the unsweetened cocoa powder with the sugar and a splash of warm milk before adding the cream—this prevents clumping and ensures the chocolate flavor melts evenly into the base. I learned this the hard way after scraping gummy cocoa chunks out of my ice cream maker.
- CHOP CHOCOLATE SMALL: Cut the dark chocolate bars into ¼-inch pieces—this size melts faster and blends smoother into the custard without leaving grainy bits. I used to use big chunks, and the texture was always off, no matter how long I heated it.
- STRAIN THE CUSTARD: After heating the milk-cream mixture with cocoa and sugar, strain it through a fine-mesh sieve before churning—this removes any stray cocoa grit or cooked bits that can ruin the silky texture. Yes, it’s an extra step, but your ice cream will thank you.
- CHURN WITH COLD CREAM: Use cold heavy cream straight from the fridge—it whips faster and gives a denser, creamier texture than room-temperature cream. I skipped this once and ended up with a lighter, icier result that didn’t hold its shape. Cold cream is non-negotiable.
Common mistakes when making this recipe
Over-Churning the Base
Churning the ice cream base too long turns creamy into icy—this is the #1 mistake I see. Your ice cream should reach a thick, soft-serve consistency (about 4-5 minutes in a standard ice cream maker) before freezing.
If you over-churn, the texture becomes grainy and loses its velvety mouthfeel. I recommend stopping 30 seconds before the machine signals completion and letting it firm up in the freezer. 🥶
Skipping the Chill Step
Rushing the 2-hour chilling of the ice cream base before churning is a surefire way to get icy crystals. The custard must be completely cold to prevent large ice formations during freezing. I once forgot this step and ended up with a texture closer to shaved ice than creamy perfection.
Use a thermometer to verify the base reaches 35°F before churning—this is the sweet spot for smoothness. ❄️
Uneven Fudge Layer
The fudge swirl needs to be spread evenly and quickly before it sets. If you drag your time, the edges will harden first, creating a thick, uneven layer that looks unprofessional.
Work fast once you remove the ice cream from the freezer—use a spatula to spread the fudge in thin, even strokes and create swirls with the back of a spoon while it's still soft. 🍫
Wrong Chocolate Temperatures
Using chocolate that's too hot or too cold ruins both the shell and fudge layers. The shell mixture should be 90°F when poured, while the fudge base needs to cool to 75°F before folding.
I learned this the hard way when my first batch had a greasy shell from overheated chocolate. Use an instant-read thermometer—it's worth the investment for professional results. 🌡️
Freezing Too Quickly
Rushing the 4-6 hour final freeze creates cracks and uneven textures. The ice cream needs time to develop its layers properly. I once tried serving it after just 2 hours and ended up with a crumbly mess.
Be patient—this is where the magic happens. For best results, freeze overnight if possible, but never exceed 24 hours or the texture degrades. ⏳
Using Low-Quality Ingredients
Cheap cocoa powder, low-fat cream, or generic chocolate chips will never replicate Baskin Robbins' signature richness. I recommend Valrhona cocoa and Ghirardelli chocolate—they're pricier but make all the difference.
The corn syrup in the fudge layer also needs to be light corn syrup (not high-fructose) for that signature glossy finish. Don't skimp here if you want restaurant-quality results. 💎
Frequently asked questions
Can I make this recipe without an ice cream maker?
Yes, but you'll need to adapt the technique. After whipping your base to soft peaks, spread it into a freezer-safe container and freeze for 2 hours, stirring with a fork every 30 minutes to break up ice crystals. For the fudge layer, spread it over the partially frozen base and continue freezing. This method won't be as creamy but will still deliver that signature fudge swirl.
How do I store leftovers to maintain texture?
Wrap individual portions tightly in plastic wrap, then place in an airtight container with parchment paper between layers. Consume within 1 week for best quality. Avoid refreezing thawed portions—they'll become grainy. For longer storage, portion into 1-quart containers to minimize air exposure.
What's the secret to perfect fudge swirls?
Work quickly when spreading the fudge layer—it sets fast! Use a spatula to create thin, even strokes, then immediately swirl with the back of a spoon while still soft. The key temperature is 75°F for the fudge mixture—too hot and it'll melt the ice cream underneath.
Can I substitute dairy-free ingredients?
For a dairy-free version, replace the heavy cream with full-fat coconut cream and milk with almond milk. Use dairy-free chocolate chips and ensure your cocoa powder is dairy-free. Note the texture will be lighter, and you may need to add 1 tbsp xanthan gum to improve creaminess. The fudge layer will still work with these substitutions.
Why did my ice cream turn grainy?
Graininess usually means either over-churning or skipping the 2-hour chill step. The base must reach 35°F before churning, and you should stop churning when it reaches soft-serve consistency (about 30 seconds before the machine's cycle ends). Also check your ingredients—old egg yolks or improperly tempered chocolate can cause texture issues.