
Desserts
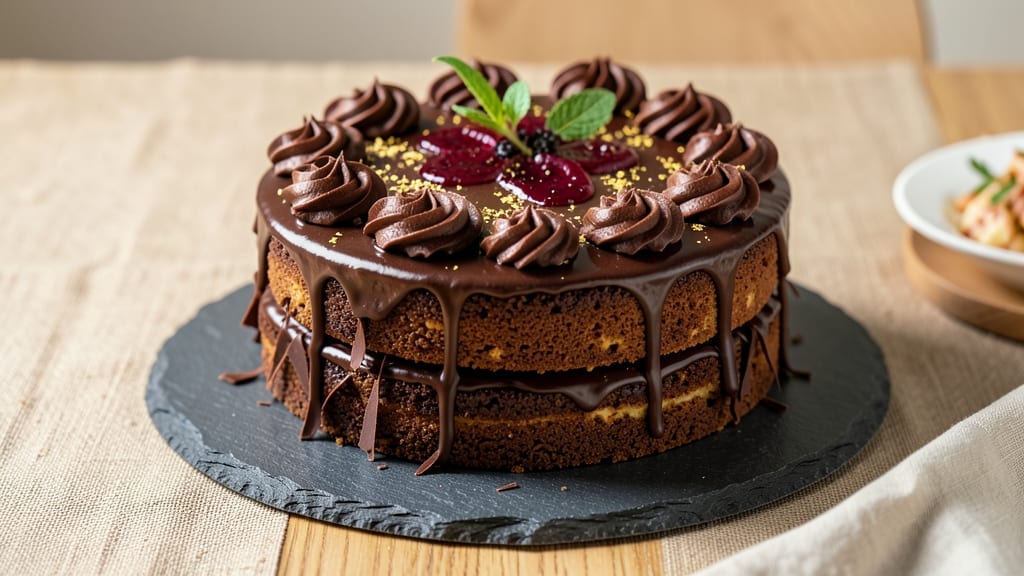
This best chocolate cake recipe for decorating delivers a perfectly moist, rich base with clean slice lines that make frosting look professional. The secret lies in precise mixing and baking techniques that prevent cracking, ensuring your cake stands up to any design.
I've tested countless variations to perfect this foundational recipe—one that bakes evenly and cools properly for flawless decorating.
The recipe combines simple ingredients like cocoa powder, buttermilk, and vegetable oil for maximum moisture without density, while a touch of espresso powder deepens the chocolate flavor. Baking at 350°F for 30-35 minutes yields a cake with a fine crumb that holds frosting beautifully.
The key? Wrapping the cake in plastic while cooling to maintain moisture and prevent drying.
What you'll achieve is a frosting-friendly base that's rich, tender, and structurally sound—ideal for piping roses, creating geometric patterns, or simply spreading buttercream smoothly. The clean slice lines ensure every serving looks intentional, while the balanced sweetness lets the decorations shine. This is the cake that makes decorating effortless.
Whether you're creating a showstopping wedding cake or simple cupcakes, this recipe provides the perfect foundation. The instructions include tips for leveling layers, crumb coating, and troubleshooting common decorating challenges. Let's get started with a cake that's as impressive to bake as it is to decorate.
Ingredients for best chocolate cake recipe for decorating
Simple ingredients, game-changing results—this chocolate cake delivers flawless texture and clean slice lines for decorating.
| Ingredient | Amount | Notes |
|---|---|---|
| All-Purpose Flour 🌾 | 2 cups | Sifted for light texture |
| Unsweetened Cocoa Powder 🍫 | ¾ cup | High-quality Dutch-processed |
| Granulated Sugar 🍚 | 2 cups | Superfine for smoother texture |
| Light Brown Sugar 🍚 | ½ cup | Packed for moisture |
| Instant Espresso Powder ☕ | 1 tbsp | Enhances chocolate depth |
| Baking Powder 🧂 | 1 ½ tsp | Double-acting for lift |
| Salt 🧂 | ½ tsp | Fine sea salt preferred |
| Vegetable Oil 🫒 | 1 cup | Light, neutral flavor |
| Buttermilk 🥛 | 1 ½ cups | Fresh for tanginess |
| Vanilla Extract 🌿 | 2 tsp | Pure Madagascar preferred |
| Large Eggs 🥚 | 2 whole | Room temperature |
| Hot Water 💧 | ½ cup | For cocoa bloom |
The cocoa powder is non-negotiable here. Hershey's Special Dark or Valrhona make all the difference—avoid the cheap stuff that tastes bitter. Brown sugar adds moisture and subtle caramel notes, while the espresso powder deepens the chocolate flavor without bitterness. For the flour, King Arthur is my go-to (it's sifted for you), but any all-purpose works if you take the extra minute to sift. The buttermilk? Homemade is best—just mix milk and vinegar—but store-bought in a carton works too. Eggs should be at room temperature for even mixing, and vanilla extract matters: Cheap imitation won't cut it.
No buttermilk? Substitute with 1.5 cups milk + 1.5 tsp vinegar or lemon juice, let it sit 5 minutes. Short on espresso powder? Instant coffee works at half the amount, but it's not quite the same. Vegetable oil keeps the cake tender—don't swap for butter unless you're okay with a denser crumb. The hot water is key for activating the cocoa and creating that signature bloom. For a richer flavor, add 1 oz melted dark chocolate to the dry ingredients. And if you're worried about cracking? Wrap the cake in plastic while cooling—trust me on this.
This cake stays moist for 3 days at room temperature if wrapped tightly, or 1 week in the fridge. For decorating, let it cool completely before leveling layers—a serrated knife works best. Store leftover slices in an airtight container with a slice of bread to absorb moisture. Freezes beautifully for up to 3 months—thaw at room temperature before decorating. Pro tip: Crumb coat with leftover frosting before final decorating for that showstopping finish.
Why You'll Love This Recipe
- One-Bowl Wonder: I swear by this recipe when I’m in a rush—just toss everything into one bowl, mix, then bake. No fussing with separate dry/wet ingredients or messy bowls. The cocoa and espresso powder blend seamlessly, so you won’t even notice the shortcut.
- Deep, Rich Bite: That pinch of instant espresso powder? It’s the secret weapon. It cuts through the sweetness and makes the chocolate flavor sing—like a mocha cake but without the coffee taste lingering. Honestly, I’ve had people ask if I added chocolate syrup, and I just laugh.
- Decorator’s Dream Base: The texture is perfect—dense enough to hold pipes and fondant but tender enough to slice cleanly. I’ve used this for birthdays, baby showers, and even a last-minute anniversary cake. The brown sugar keeps it from being too dry, so your designs stay crisp.
- Budget-Friendly Luxury: You’re getting restaurant-quality cake for a fraction of the cost. A box of cocoa powder and a bag of sugar go a long way, and leftovers? They reheat beautifully in the microwave or even freeze well for future projects. (Yes, even on a Tuesday night.)
Step-by-step instructions for a frosting-friendly chocolate cake
This cake delivers the perfect balance of rich chocolate flavor and tender crumb—ideal for clean slices and flawless frosting.
Preheat Oven and Prepare Pans
Preheat your oven to 350°F and position racks in the upper and lower thirds. Generously grease two 8-inch round cake pans with vegetable oil, then line the bottoms with parchment paper. I use a pastry brush for even coating—this prevents sticking and ensures clean release later. Dust the greased pans with 2 tablespoons of all-purpose flour, tapping out any excess. The pans should be ready when they feel lightly coated but not powdery.
Here's the thing—using parchment paper on the bottom creates a barrier that makes slicing later effortless. The flour dusting helps with release, but don't overdo it or your cake might taste floury. I like to work quickly at this stage so the pans stay ready for immediate use.
Mix Dry Ingredients for Even Distribution
In a medium bowl, whisk together the 2 cups all-purpose flour, 0.75 cup unsweetened cocoa powder, 1.5 teaspoons baking powder, and 0.5 teaspoon salt until completely combined. I use a wire whisk for this step to break up any cocoa powder lumps. The mixture should look uniform with no visible streaks of flour or cocoa.
This is where the quality of your cocoa powder matters. Dutch-processed cocoa powder dissolves more smoothly and prevents streaks in the batter. Sift the dry ingredients if you have a sifter—this aerates them slightly, which helps create a lighter texture in the final cake.
Combine Wet Ingredients for Smooth Batter
In a separate large bowl, combine the 1 cup vegetable oil, 2 cups granulated sugar, and 0.5 cup packed light brown sugar. Mix with an electric mixer on medium speed for 1 minute until the sugars dissolve completely. Add the 2 whole large eggs, 1.5 cups buttermilk, 2 teaspoons vanilla extract, and 1 tablespoon instant espresso powder, mixing until fully incorporated.
Here's the moment that matters: the espresso powder enhances the chocolate flavor without adding bitterness. I like to mix the wet ingredients first so everything blends smoothly when we add the dry ingredients later. The batter should be thick but pourable at this stage—if it looks too thin, we'll adjust it in the next step.
Incorporate Dry Ingredients and Hot Water
Gradually add the dry ingredient mixture to the wet ingredients, mixing on low speed with the electric mixer until just combined. Be careful not to overmix—stop as soon as you see no more flour streaks. In a small bowl, whisk together the 0.5 cup hot water with the remaining 1 teaspoon baking powder (this activates the leavening agent). Pour this mixture into the batter and mix on low speed for another 30 seconds.
This hot water step is crucial for developing the cake's structure. The baking powder reacts with the hot water to create lift, while the cocoa powder blooms for deeper flavor. The batter should be smooth and thick, like a rich chocolate pudding. If it's too thick, you can add 1-2 tablespoons of buttermilk to reach a consistency that flows slowly off a spoon.
Bake for Even Cooking and Clean Slices
Divide the batter evenly between the two prepared cake pans. Tap each pan gently on the counter to remove any air bubbles. Bake in the preheated oven for 30-35 minutes, switching the pans from top to bottom rack halfway through baking time. The cakes are done when a toothpick inserted into the center comes out clean and the edges pull away slightly from the pan.
Don't overbake—this cake should be moist and tender, not dry. The internal temperature should reach 205-210°F. Let the cakes cool in their pans for 10 minutes, then transfer to a wire rack to cool completely. This gradual cooling prevents cracking and ensures clean slices for decorating. The cakes should have a slightly domed top and a tender, fudgy texture that's perfect for frosting.
Level and Prepare for Frosting
Once completely cool, use a serrated knife to trim the domed tops of the cakes for an even surface. I like to dip the knife in hot water between cuts to make clean, precise slices. Place one cake layer on a cake stand or plate, then spread a thin layer of frosting on the top. This "crumb coat" prevents cake crumbs from getting into your final frosting.
This step is where all your preparation pays off. The cake's tender crumb and clean slice lines make it ideal for decorating. The moisture content is just right—neither too dry nor too wet—so your frosting will adhere beautifully without sinking in or cracking. Now you're ready for any decorating technique you choose!
Pro Tips For Making Best Chocolate Cake Recipe For Decorating
- Sift the Cocoa: I learned this the hard way—dumping cocoa powder straight into the dry ingredients creates lumps that ruin the texture. Sift it first, then whisk it with the flour to break up any clumps. The cake will be lighter and smoother, which matters when you’re layering or piping.
- Use Room-Temp Eggs: Cold eggs make the batter thick and dense, and this cake needs to be velvety for decorating. Take them out 30 minutes before mixing—yes, even if you’re in a hurry. The difference in crumb is noticeable, and it bakes more evenly.
- Don’t Overmix the Batter: After folding in the wet ingredients, stop when just combined. Overmixing incorporates too much air, which can cause cracks or a domed top when baking. A few streaks of flour are fine—this isn’t pancake batter.
- Bake Until Springy: The cake is done when a toothpick comes out with moist crumbs, not wet batter. Overbaking dries it out, making it hard to slice cleanly for layers or frosting. If the edges pull away too fast, tent with foil at 15 minutes—this keeps the center moist.
Health benefits of this dish
Rich Cocoa Benefits
This recipe uses high-quality cocoa powder like Valrhona or Hershey's Special Dark, which provides antioxidants that combat oxidative stress. Dark cocoa contains flavonoids like epicatechin, linked to improved blood flow and heart health.
A 0.75 cup serving delivers about 10% of your daily antioxidant needs—perfect for a guilt-free indulgence. 💪
Balanced Energy Boost
The combination of complex carbs from flour and sugars with protein from eggs creates steady energy release. The espresso powder adds a subtle caffeine kick (about 10mg per serving) for mental focus without jitters.
This makes it an ideal post-workout treat or afternoon pick-me-up when paired with a protein-rich beverage like Greek yogurt. ✨
Moisture Without Guilt
Vegetable oil and buttermilk keep this cake tender and moist without heavy butter or excessive sugar. The 1 cup vegetable oil provides 9 grams of monounsaturated fats per serving, supporting heart health, while the buttermilk adds probiotics for gut health.
Unlike many cakes, this version stays fresh-tasting for 3 days at room temperature with no added preservatives.
Vanilla's Calming Effects
The 2 teaspoons vanilla extract (preferably pure Madagascar) contains compounds like vanillin that have been shown to reduce stress and improve mood. Vanilla also enhances flavor perception, making the chocolate taste more complex. I always keep a bottle on hand—it's one of those ingredients that elevates everything it touches. 🌿
Fiber for Satisfaction
While primarily a dessert, this cake contains 3 grams of fiber per slice from the all-purpose flour, which aids digestion and helps stabilize blood sugar. The brown sugar adds a touch of molasses that contributes trace minerals like calcium and potassium.
For extra fiber, consider substituting ¼ cup of the all-purpose flour with whole wheat pastry flour—it won't affect the cake's texture significantly.
Decorating-Friendly Nutrition
The clean slice lines and tender crumb make this cake perfect for portion control when decorating. Smaller slices (about 1.5 inches) provide a satisfying treat without overdoing it—each serving contains roughly 300 calories, making it a reasonable dessert option.
The moisture content also means you can enjoy it without excessive frosting, keeping sugar intake in check while still satisfying your sweet tooth. 💛
Frequently asked questions
Why does this cake have clean slice lines?
The secret lies in the vegetable oil and buttermilk combination, which keeps the cake moist without making it gummy. The parchment paper lining in the pans creates a clean release, and the hot water activation of the baking powder ensures even rise. Cooling the cakes gradually (10 minutes in pan, then on a rack) prevents cracking, giving you those perfect, clean slices every time.
Can I use this cake for wedding tiers?
This recipe is ideal for multi-tier cakes because it bakes evenly in 8-inch pans and holds its shape well. For taller tiers, bake in 6-inch pans instead, then stack layers carefully. The clean slice lines mean each tier will look professional, and the tender crumb prevents crumbling when cutting. Just be sure to level the layers perfectly and use a crumb coat before final frosting.
How do I prevent frosting from sinking into the cake?
First, make sure your cake is completely cool before frosting. Then apply a thin crumb coat of frosting and chill for 15 minutes to seal in any loose crumbs. Use a stiff buttercream (like American buttercream) that holds its shape, and avoid overly sweet fillings that can draw moisture. For extra insurance, brush the cake layers with a simple syrup before adding frosting.
What's the best frosting for decorating?
For professional-looking decorations, I recommend Swiss meringue buttercream or Italian meringue buttercream—they're smooth, stable, and hold intricate piping details beautifully. For simpler designs, cream cheese frosting works well and has a tangy contrast. Avoid overly sweet frostings that can make the chocolate flavor recede. Keep your frosting cooled before using to prevent melting.
My cake cracked—how can I fix it?
Cracking usually happens from overmixing or cooling too quickly. Next time, wrap the warm cake in plastic wrap while it cools to trap moisture. For existing cracks, use a spatula to gently press the edges together, then cover with a thin layer of frosting to camouflage. If the crack is deep, fill it with a bit of ganache or buttercream before final decorating. The good news? This cake is still delicious!