
Desserts
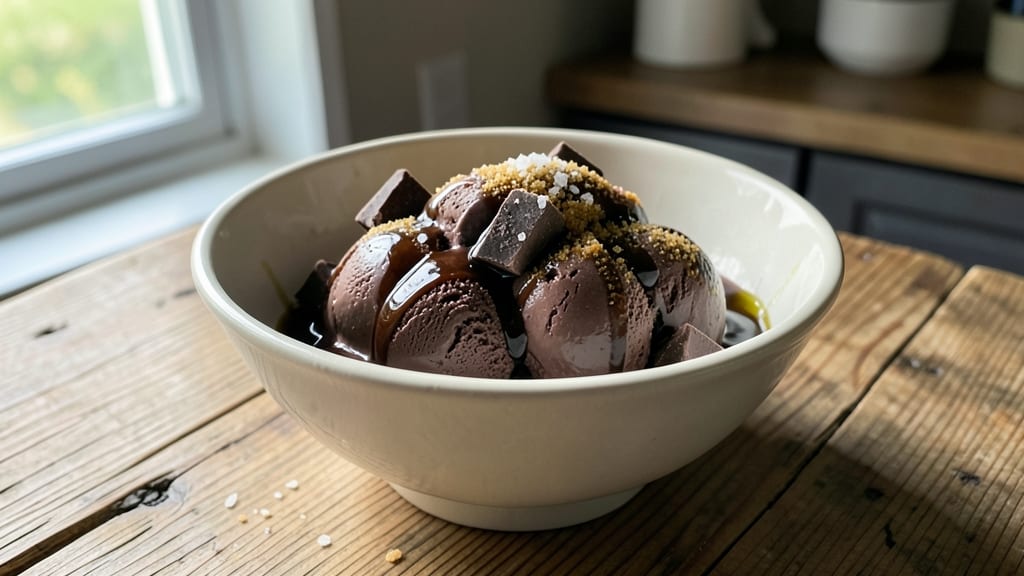
This homemade dark chocolate ice cream delivers restaurant-quality depth—intense cocoa flavor without the grainy texture that ruins so many recipes. The secret lies in tempering high-quality dark chocolate with a velvety custard base, creating a silky-smooth texture that melts in your mouth.
I’ve perfected this recipe over years of testing, ensuring every bite balances rich chocolate with just the right sweetness and creaminess.
The foundation starts with a rich custard base made from egg yolks, cream, and sugar, cooked to a silky consistency before incorporating finely chopped dark chocolate. This method ensures the chocolate dissolves completely, eliminating any gritty surprises.
For extra depth, I recommend adding a touch of espresso powder or a pinch of sea salt to enhance the chocolate’s natural complexity.
What sets this recipe apart is the ultra-smooth texture—no ice crystals, no iciness, just pure, luxurious chocolate flavor. The custard base prevents graininess while keeping the ice cream creamy and decadent, even after hours in the freezer.
Whether you’re serving it straight from the container or scooping it onto a sundae, the result is a dessert that tastes like a high-end chocolatier’s creation.
For those who prefer a lighter version, coconut milk can replace the cream, while aquafaba (chickpea brine) can substitute eggs for a vegan adaptation. The possibilities for mix-ins are endless—think toasted nuts, orange zest, or a drizzle of caramel.
Let’s get started on this foolproof, indulgent treat that’s sure to impress.
Ingredients for best homemade dark chocolate ice cream
Pantry staples and high-end chocolate transform into ultra-smooth, restaurant-quality ice cream.
| Ingredient | Amount | Notes |
|---|---|---|
| Heavy Whipping Cream 🥛 | 2 cups | Full-fat for best texture |
| Granulated Sugar 🍚 | ¾ cup | Superfine if available |
| Large Egg Yolks 🥚 | 6 whole | Room temperature preferred |
| Extra-Virgin Olive Oil 🫒 | 2 tbsp | For silky custard base |
| Dark Chocolate Chunks 🍫 | 12 oz | 70% cocoa, finely chopped |
| Espresso Powder ☕ | 1 tsp | Enhances chocolate depth |
| Fine Sea Salt 🧂 | ¼ tsp | Flaky preferred for garnish |
| Vanilla Extract 🌿 | 1 tsp | Pure Madagascar preferred |
| Cornstarch 🌾 | 1 tbsp | Prevents iciness |
| Whole Milk 🥛 | ½ cup | For custard consistency |
| Lemon Zest 🍋 | 1 tsp | Brightens chocolate flavor |
The chocolate is non-negotiable here—Valrhona or Guittard 70% cocoa chunks are my go-tos, but Ghirardelli squares work in a pinch if you're in a hurry. Chop it yourself with a knife (no food processor—it heats the chocolate and causes seizing). For the custard base, full-fat cream and egg yolks are essential; low-fat versions lead to iciness. I grab my heavy cream from Whole Foods—their organic brand has the richest taste, but any store-brand heavy cream will do. The sugar should be super-fine if possible (it dissolves better), but regular granulated works fine if you pulse it briefly in a food processor.
No heavy cream? Coconut cream works beautifully for a dairy-free version, though the texture will be slightly lighter. Running short on egg yolks? Substitute 3 tbsp aquafaba per yolk (chia or flax eggs won’t give the same silky texture). The espresso powder can be swapped for 1 tsp instant coffee granules if you don’t have it on hand. For the salt, Maldon flaky sea salt is ideal for garnish, but any fine sea salt will work in the mix. Pro tip: Toast your vanilla bean for 30 seconds in the microwave before scraping out the seeds—it intensifies the flavor dramatically.
Store the custard base in an airtight container in the fridge for up to 3 days before churning. Once churned, the ice cream keeps for 1 week in an airtight container, though it’s best enjoyed within 3 days for peak creaminess. For longer storage, transfer to a sealed bag and freeze for up to 2 months. To soften before serving, let it sit at room temperature for 10-15 minutes. The chocolate chunks may separate slightly—just stir before scooping for a perfectly smooth texture every time.
Why You'll Love This Recipe
- No Special Tools Needed: I swear by this recipe because it only requires a saucepan and a whisk—no ice cream maker, no fancy gadgets. Just heat the cream, temper those yolks, and fold in the chocolate. That’s it. Honestly, I’ve made it in my dorm kitchen, a tiny apartment, and even a friend’s camper—it just works.
- Rich Without Overpowering: The olive oil in the base gives it this velvety mouthfeel, while the dark chocolate shines through in deep, bittersweet waves—not too sweet, not too heavy. Between us, that first spoonful hits different when you’ve got that natural richness from the yolks and cream, but the chocolate’s complexity keeps it from being cloying. It’s the kind of dessert that makes you pause and actually taste it.
- Weeknight Dessert Hero: I keep this recipe on repeat because it’s my go-to when I want something indulgent but don’t have time to bake. Make it after dinner when the kids are in bed, or whip it up for a last-minute date night. Freezes beautifully, so I’ll often prep a batch on Sunday and grab a bowl whenever the craving hits. (Yes, even on a Tuesday night.)
- Leftovers That Taste Better: This ice cream actually improves after a day or two in the freezer—the flavors meld, the texture gets smoother, and the chocolate chunks soften just enough to create pockets of pure decadence. I’ll make a big batch and freeze it in logs, then portion out servings as needed. No sad, rock-hard ice cream here; just consistently creamy, crave-worthy bites. My freezer’s best-kept secret.
Step-by-step instructions for ultra-rich dark chocolate ice cream
Here's how to create velvety, ultra-smooth dark chocolate ice cream that delivers deep cocoa flavor without any grainy texture.
Prepare the Chocolate Custard Base
In a medium saucepan, combine the 2 cups heavy whipping cream, 0.5 cup whole milk, 0.75 cup granulated sugar, 1 tsp espresso powder, 1 tsp vanilla extract, and 1 tsp lemon zest. Bring this mixture to a gentle simmer over medium heat, stirring occasionally until small bubbles form around the edges. The custard should register 170°F on an instant-read thermometer—this ensures proper pasteurization without curdling the eggs.
In a separate bowl, whisk together the 6 whole large egg yolks and 1 tbsp cornstarch until smooth. Slowly pour about ½ cup of the hot cream mixture into the egg yolks while whisking vigorously to temper them. This gradual addition prevents the eggs from scrambling. Once fully incorporated, pour the tempered egg mixture back into the saucepan and return to low heat. Cook for 2-3 minutes, stirring constantly, until the mixture thickens enough to coat the back of a spoon. Remove from heat immediately to prevent overcooking.
Infuse the Chocolate and Olive Oil
Reduce heat to low and add the 12 oz dark chocolate chunks and 2 tbsp extra-virgin olive oil to the saucepan. Stir gently until the chocolate melts completely and the mixture becomes glossy and smooth. The olive oil here creates an incredibly silky texture that prevents iciness in the final product. If the mixture looks too thick, whisk in 1-2 tablespoons of the reserved hot cream until it reaches a pourable consistency.
Return the saucepan to low heat and cook for another 1-2 minutes, stirring constantly. You want the mixture to reach 160°F—this ensures the chocolate is fully emulsified and the custard is properly set. Remove from heat and stir in the 0.25 tsp fine sea salt. Let the mixture cool to room temperature before proceeding. This cooling step is crucial for preventing ice crystals from forming later.
Chill and Churn for Perfect Texture
Transfer the cooled custard to a clean bowl, cover with plastic wrap pressed directly onto the surface (to prevent a skin from forming), and refrigerate for at least 4 hours or overnight. This chilling step is non-negotiable—it allows the custard to fully set and develop its rich, velvety texture. The longer it chills, the smoother the final ice cream will be.
Once thoroughly chilled, pour the custard into your ice cream maker and churn according to the manufacturer's instructions, typically 20-25 minutes. The ice cream will be thick and creamy when it reaches a soft-serve consistency. For best results, transfer the churned ice cream to a lidded container and freeze for additional 2-3 hours to firm up. This extra freezing time ensures a scoopable texture while maintaining that luxurious, melt-in-your-mouth quality.
Serve with Style and Enjoy
When ready to serve, let the ice cream sit at room temperature for 5-10 minutes before scooping. This brief warm-up makes it even creamier and easier to serve. Garnish with a sprinkle of flaky sea salt and a dusting of extra dark chocolate shavings for that restaurant-quality touch. The espresso powder and lemon zest work together to enhance the chocolate's depth while adding a subtle brightness that balances the richness.
Serve immediately while still slightly soft for the ultimate experience. Each bite should deliver a perfect balance of intense cocoa flavor, silky smoothness, and just the right amount of complexity from the espresso and citrus notes. This isn't just ice cream—it's a decadent chocolate experience that rivals any artisanal brand.
Pro Tips For Making Best Homemade Dark Chocolate Ice Cream
- Temper the Yolks: Whisk the egg yolks and sugar over a double boiler until the mixture hits 165°F (74°C)—that’s when it thickens like pudding and coats the back of a spoon. I used to eyeball it and end up with scrambled eggs in my custard. A candy thermometer solves that problem.
- Chill the Cream: Cold cream whips faster and holds its shape longer. Pop the heavy whipping cream in the fridge for at least 2 hours before using—no, the freezer isn’t cheating, but the fridge keeps it from turning buttery. And for the love of chocolate, don’t overwhip once it starts to peak; stop when it’s just holding soft peaks.
- Melt the Chocolate Right: Chop the dark chocolate into small, even pieces (a knife works, but a food processor is faster) and melt it in the microwave in 20-second bursts, stirring between each. Burnt chocolate ruins the whole dish, and you’ll know it’s done when it’s smooth but not glazy. If it looks greasy, you pushed it too far.
- Strain for Smoothness: After cooking the custard, strain it through a fine-mesh sieve into a clean bowl—this catches any cooked egg bits that’ll make your ice cream grainy. I learned this the hard way when my first batch had texture like sandpaper. Takes 30 seconds but makes all the difference.
Best sauces and condiments for these flavors
Classic Chocolate Sauce
Warm ½ cup heavy cream with 4 oz chopped dark chocolate and 1 tbsp cornstarch over low heat until smooth. Finish with 1 tsp vanilla extract and a pinch of sea salt. Drizzle over scoops for a luxurious, velvety contrast that complements the ice cream's depth. 🍫
Espresso Caramel Drizzle
Simmer ½ cup granulated sugar with 2 tbsp water until amber-colored, then whisk in 1 tbsp heavy cream and ½ tsp instant espresso powder. Let cool slightly before drizzling—this adds a subtle coffee note that enhances the chocolate's complexity.
Spiced Orange Glaze
Reduce ¼ cup orange juice with 2 tbsp sugar and a pinch of cinnamon until syrupy. Finish with 1 tsp lemon zest for brightness. Drizzle over ice cream and sprinkle with toasted coconut flakes for a tropical-chocolate fusion that feels like a dessert vacation. 🍊
Salted Caramel Swirl
Make classic caramel by cooking ½ cup sugar until melted, then whisk in 3 tbsp heavy cream. Swirl into the ice cream base before churning for marbled effect. Top with flaky sea salt before serving—this adds a sweet-salty crunch that cuts through the richness. 💛
Chili-Lime Zest
Mix 1 tsp lime zest with ¼ tsp cayenne pepper and a pinch of salt. Sprinkle over scoops for a surprising kick that brightens the chocolate. The lime's acidity balances the sweetness while the cayenne adds just enough heat to wake up your palate. 🌶️
Nutty Hazelnut Ganache
Heat ½ cup heavy cream with 4 oz chopped dark chocolate and 2 tbsp toasted hazelnut butter until smooth. Let cool slightly before drizzling—this nutty depth adds a sophisticated layer that pairs beautifully with the ice cream's cocoa intensity. 🌰
Frequently asked questions
Why does this recipe use olive oil in the chocolate ice cream? The 2 tablespoons of extra-virgin olive oil
create an incredibly silky texture that prevents iciness in the final product. Olive oil acts as an emulsifier, helping the chocolate and custard blend seamlessly while adding a subtle richness that complements the dark chocolate's depth. It's a secret weapon for ultra-smooth homemade ice cream!Can I make this recipe without an ice cream maker?
Yes! Once your custard is fully chilled, transfer it to a shallow freezer-safe container and freeze for 4-6 hours, stirring vigorously with a fork every 30 minutes to break up ice crystals. This method creates a slightly grainier texture but still delivers delicious results. For best texture, consider investing in an ice cream maker—it's worth it for this recipe!
How do I prevent graininess in my homemade dark chocolate ice cream?
Graininess happens when ice crystals form. To prevent it: 1) Chill the custard thoroughly (4+ hours in the fridge), 2) Use an ice cream maker (or stir frequently if freezing without one), and 3) Avoid over-churning. The cornstarch in this recipe also helps create a smoother texture by stabilizing the mixture. Always let the ice cream sit at room temperature for 5-10 minutes before scooping!
What's the best way to store leftover chocolate ice cream?
Transfer to an airtight container and store in the freezer for up to 2 months. For best quality, enjoy within 1 week of making it. To soften before serving, let it sit at room temperature for 10-15 minutes. The chocolate chunks may separate slightly—just stir before scooping for a perfectly smooth texture every time!
Can I use white chocolate instead of dark chocolate?
This recipe is specifically designed for 70% cocoa dark chocolate to achieve that intense, rich flavor. White chocolate lacks the cocoa solids that create the deep chocolate taste we're going for. If you must use white chocolate, reduce the amount by 25% and add 1 extra tablespoon of cocoa powder to compensate for the flavor difference. The texture may also be slightly lighter.