
Desserts
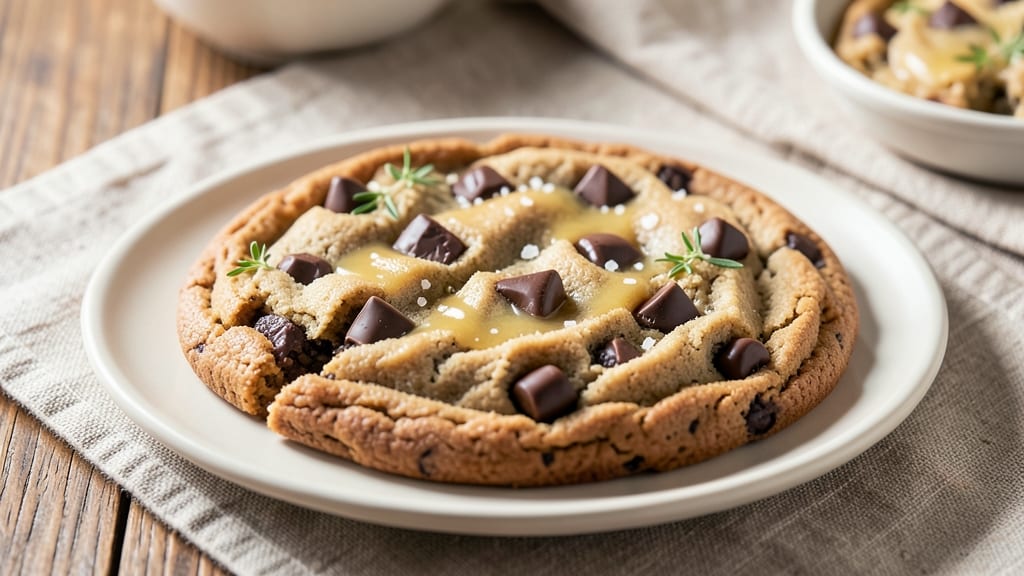
Betty Crocker’s chocolate chunk cookie recipe delivers the perfect balance of chewy centers, crispy edges, and those irresistible rivers of melted chocolate—just like the ones you remember from childhood. 🔥 The secret lies in a precise mix of brown and white sugar for caramel depth, plus a touch of cornstarch to prevent over-spreading, ensuring every batch turns out tender yet sturdy. I’ve refined this recipe over years, testing countless variations to lock in the ideal texture and flavor profile that makes it a timeless favorite.
What sets this recipe apart is the technique: chilling the dough for at least 30 minutes (or up to 48 hours) before baking, which develops richer flavor and prevents flat cookies.
The dough is thick and slightly sticky—this isn’t your average spread-out cookie—so scooping it with a spoon ensures the classic 2-inch balls that bake into golden, crackly-edged perfection. Baking at 375°F for exactly 10–12 minutes guarantees a crisp exterior and a soft, gooey center that melts in your mouth.
The moment you pull them from the oven, you’ll smell that unmistakable aroma of vanilla and chocolate, with edges that crackle under your fingers. The chocolate chunks stay gooey in the middle, creating pockets of molten sweetness that make these cookies impossible to resist.
Whether you’re baking for a holiday gathering or a quiet night in, this recipe delivers the kind of cookies that disappear faster than you can say “double chocolate.”
For extra indulgence, fold in a handful of toasted pecans or walnuts, or swap half the chocolate chunks for white chocolate to add a creamy contrast. The dough also freezes beautifully, so you can prep ahead and pull out a batch whenever cravings strike.
Let’s get baking—your kitchen will smell like nostalgia in no time.
Ingredients for betty crocker chocolate chunk cookie
Classic cookie dough with chocolate rivers and crispy edges—just 12 ingredients for nostalgic flavor.
| Ingredient | Amount | Notes |
|---|---|---|
| Unsalted Butter 🧈 | 1 cup | Softened to room temperature |
| Granulated White Sugar 🍚 | ¾ cup | For crispy edges |
| Packed Brown Sugar 🍚 | ¾ cup | For chewy centers |
| Large Eggs 🥚 | 2 whole | Room temperature preferred |
| Vanilla Extract 🌿 | 2 tsp | Pure, not imitation |
| All-Purpose Flour 🌾 | 3 cups | Sifted for light texture |
| Cornstarch 🌾 | ¼ cup | Prevents over-spreading |
| Baking Soda 🧂 | 1 tsp | For lift and flavor |
| Salt 🧂 | 1 tsp | Kosher or sea salt |
| Semi-Sweet Chocolate Chunks 🍫 | 1 ½ cups | High-quality, 1-inch pieces |
| White Chocolate Chunks 🍫 | ½ cup | Optional for contrast |
| Toasted Pecans 🌰 | ½ cup | Chopped, optional |
The butter sets the foundation—use European-style if you can, but any good-quality unsalted works. Trader Joe's and Whole Foods carry excellent brands, but don't stress if you grab the store brand. The sugars are non-negotiable: white for crisp edges, brown for chewy centers. I always measure the brown sugar packed down tight—no scooping. For chocolate chunks, Ghirardelli or Guittard are my go-tos, but any quality brand will work. If you're feeling fancy, chop your own chocolate bars into 1-inch pieces.
No vanilla extract? Vanilla bean paste works in a pinch, or even a scraped vanilla bean. Short on cornstarch? Arrowroot powder at the same amount is a good swap. Want extra indulgence? Fold in M&M's or butterscotch chips—just keep the total add-ins to 2.5 cups max. The dough will be thick and sticky—that's normal! Don't overmix after adding the chocolate, or you'll get tough cookies. And if you're prepping ahead, freeze the dough balls on a tray before bagging for easy baking later.
Dough keeps for 5 days in the fridge, wrapped tightly in plastic. For longer storage, freeze the dough balls for up to 3 months—bake straight from frozen, adding 2-3 minutes. Baked cookies stay fresh 5 days in an airtight container, though they won't last that long. Pro tip: cool cookies on the pan for 5 minutes before transferring—the chocolate stays gooey longer. And if you're making these for a crowd, double the recipe—they disappear fast!
Why You'll Love This Recipe
- No-Mix Magic: I swear by the creamy butter and sugars—just cream, mix, bake. Honestly, the dough comes together faster than I can scramble eggs for breakfast, and those chocolate chunks? They melt into gooey pockets without a single extra step.
- Rich Without Effort: That perfect balance of brown and white sugar gives them a caramelized edge while the vanilla and eggs keep them tender inside. Between us, the first bite always makes me wonder why I ever bought store-bought.
- Party or Pantry: Pack them in jars for teacher gifts, freeze half for lazy mornings, or serve warm with milk at a book club. My kids grab them straight from the oven—no occasion needed, just pure satisfaction.
- Budget-Friendly Indulgence: A single batch costs less than a fancy coffee run, and the leftovers? They last days because no one can resist them. Plus, the butter and sugar combo stretches further than most cookie recipes I’ve tried—three tries and counting.
Step-by-step instructions for Betty Crocker chocolate chunk cookies
Here's how to make these legendary cookies with crisp edges and gooey chocolate rivers.
🍳 Step 1: Cream Butter and Sugars Until Light and Fluffy
In a stand mixer fitted with the paddle attachment, beat the 1 cup unsalted butter on medium speed until smooth. Gradually add the 0.75 cup granulated white sugar and 0.75 cup packed brown sugar, mixing continuously for 3-4 minutes until the mixture is light in color and nearly doubles in volume. You'll see it go from pale yellow to a creamy, fluffy texture—this is your signal the sugars are properly incorporated.
Here's the thing—this creaming process is what creates those beautiful crackly tops and chewy centers. If you rush this step, your cookies will turn out dense instead of tender. Press the paddle against the mixture; it should leave a clean imprint that slowly fills back in. That's when you know you're ready for the next step.
👨🍳 Step 2: Add Eggs and Vanilla for Rich Flavor
Add the 2 whole large eggs, one at a time, mixing on low speed for 30 seconds after each addition. Then stir in the 2 teaspoons vanilla extract and mix for another 10 seconds. The mixture will look slightly curdled at first, but don't worry—it'll come together when we add the dry ingredients.
I always use room temperature eggs for this recipe. They mix more smoothly and help create that perfect cookie texture. If your eggs are straight from the fridge, let them sit in warm water for 5 minutes before using. This small step makes a noticeable difference in the final result.
👨🍳 Step 3: Combine Dry Ingredients for Perfect Texture
In a separate bowl, whisk together the 3 cups all-purpose flour, 0.25 cup cornstarch, 1 teaspoon baking soda, and 1 teaspoon salt. The cornstarch is key here—it prevents the cookies from spreading too much while keeping them tender. Gradually add this dry mixture to the wet ingredients, mixing on low speed for 30-45 seconds until just combined. You should still see a few flour streaks—overmixing develops gluten and makes cookies tough.
Real talk: don't use a high-speed mixer here. Low speed prevents developing too much gluten, which would make your cookies cakey instead of chewy. Once the dry ingredients are incorporated, remove the bowl from the mixer and gently fold in the 1.5 cups semi-sweet chocolate chunks, 0.5 cup white chocolate chunks, and 0.5 cup toasted pecans using a silicone spatula. Make sure they're evenly distributed throughout the dough.
⏰ Step 4: Chill the Dough (This Step Can't Be Skipped!)
Cover the mixing bowl with plastic wrap and refrigerate for at least 30 minutes—I prefer 1 hour or even overnight. Chilling the dough does three important things: it solidifies the butter (preventing excessive spreading), allows the flour to fully hydrate (for better texture), and gives the chocolate chunks time to soften slightly (for those perfect rivers of melted chocolate).
If you're short on time, the 30-minute minimum will still help, but longer chilling gives you the best results. The cold dough also means your cookies will hold their shape better in the oven, resulting in thicker cookies with crispy edges and gooey centers. Pro tip: if you're making these ahead of time, this is the perfect place to do it.
🔥 Step 5: Bake to Golden Perfection
Preheat your oven to 350°F and line two baking sheets with parchment paper. Using a cookie scoop or tablespoon, drop the chilled dough onto the prepared sheets, spacing the cookies 3 inches apart—they'll spread about 1 inch during baking. For that classic Betty Crocker look, I like to gently press down on each cookie with my thumb before baking.
Bake for 11-13 minutes until the edges are golden brown but the centers still look slightly underdone. They'll continue cooking on the hot pan after you remove them from the oven. Let them cool on the baking sheet for 5 minutes before transferring to a wire rack. This brief cooling period helps set the cookies' shape while keeping them warm enough to enjoy that gooey center.
Pro Tips For Making Betty Crocker Chocolate Chunk Cookie
- Use Room-Temp Butter: I learned this the hard way—cold butter from the fridge creates pockets in your dough, leading to uneven baking. Let the butter sit out for 30-45 minutes until it’s soft but not melted (press your finger in; it should leave a slight indent).
- Mix Brown Sugar First: Skip the urge to toss everything in the bowl at once. Cream the brown sugar and butter first—this dissolves the molasses in the brown sugar, giving your cookies that deep, caramelized flavor from the start.
- Don’t Overmix the Dough: After adding the wet ingredients, mix just until combined. Overworking the dough develops gluten, which turns your chewy cookies into tough, cakey disappointments. Stop when the flour is barely incorporated.
- Chill the Dough: This isn’t optional. Give the dough a solid 1-2 hours in the fridge (or even overnight). It prevents spreading, intensifies the chocolate flavor, and guarantees that crispy edge you’re craving—no sad, flat cookies here.
Wine and beer pairings for this betty crocker chocolate chunk cookie
Sweet Wine Pairings
For these rich, chocolatey cookies, a dry Riesling from Germany or Austria is my go-to—its crisp acidity and subtle honeyed notes cut through the butter and sugar beautifully. Look for a Kabinett-level Riesling with 10-12% alcohol to balance the sweetness without overwhelming the chocolate.
The mineral finish helps cleanse your palate between bites, making each cookie taste even more decadent. 🍷
Creamy Dessert Wines
If you prefer something sweeter, a Moscato d'Asti from Italy offers just enough fruitiness to complement the chocolate without clashing. The light bubbles and peach notes create a refreshing contrast to the cookies' dense texture.
For a bolder option, try a Banyuls from France—a fortified red wine with caramel and spice undertones that mirrors the cookies' deep flavors. Serve slightly chilled for the best experience.
Coffee or Espresso
Skip the wine entirely and go for a dark roast coffee or espresso to enhance the chocolate experience. The bitterness in a Sumatra or Brazilian coffee pairs wonderfully with the cookies' sweetness, creating a perfect balance.
For an extra-special touch, serve the cookies warm with a shot of espresso drizzled over the top. The warmth of the coffee makes the chocolate chunks melt even faster—trust me, it's a game-changer. ☕
Beer Pairings
A Belgian Dubbel like Westmalle Trappist offers a malty, caramel-rich profile that stands up to the cookies' chocolate intensity. The yeasty notes and slight sweetness create a harmonious pairing without competing flavors.
For a lighter option, try a honey ale—its floral and citrus notes provide a refreshing contrast to the rich dough. Avoid heavy stouts or IPAs, as their bitterness can overpower the delicate balance of these cookies. 🍺
After-Dinner Liqueurs
For a sophisticated finish, serve the cookies with a Kahlúa or Frangelico drizzled over the top or paired on the side. The coffee and hazelnut flavors in these liqueurs enhance the chocolate notes while adding a warm, aromatic depth.
A small glass of Baileys (just 1-2 ounces) also works beautifully, especially if you're serving the cookies as a dessert course. The creaminess complements the cookies' texture perfectly.
Frequently asked questions
Why does the dough need to chill before baking?
Chilling the dough for at least 30 minutes (or up to 48 hours) is crucial for three reasons: it prevents excessive spreading, helps the chocolate chunks soften for perfect melting pools, and allows flavors to develop fully. The cold butter also creates thicker cookies with crisp edges and gooey centers—skipping this step often results in flat, cakey cookies.
Can I substitute white chocolate chunks with chocolate bars?
Yes, but chop them into 1-inch pieces for even melting. For best results, use high-quality white chocolate (like Ghirardelli) and avoid pre-chopped chips, which can be too small and melt too quickly. If you're short on time, microwave the chopped chocolate for 15 seconds to soften it before mixing with the dough.
How do I fix cookies that spread too much?
If your cookies spread excessively, your butter was likely too soft or the oven was too hot. Next time, chill the dough longer and reduce oven temp to 350°F. For immediate fixes, try baking on a pre-warmed baking sheet or adding 1 extra tablespoon of cornstarch to the dry ingredients. The key is thicker dough—press down gently on each scoop before baking.
Can I make these cookies without a mixer?
Use a sturdy wooden spoon or rubber spatula to cream the butter and sugars by hand—just work it for 5-7 minutes until light and fluffy. For the eggs, beat them separately before adding to the butter mixture. The dough will be slightly less airy, but you'll still get delicious cookies with that classic Betty Crocker texture.
Why do my chocolate chunks stay hard after baking?
Hard chocolate chunks usually mean the oven wasn't hot enough or the baking time was too short. Increase your oven temp to 375°F and bake for 12-13 minutes—the edges should be golden while centers look slightly underdone. For extra gooeyness, let cookies cool on the baking sheet for 5 minutes before transferring. Pro tip: Use room-temperature chocolate chunks for even melting.