
Desserts
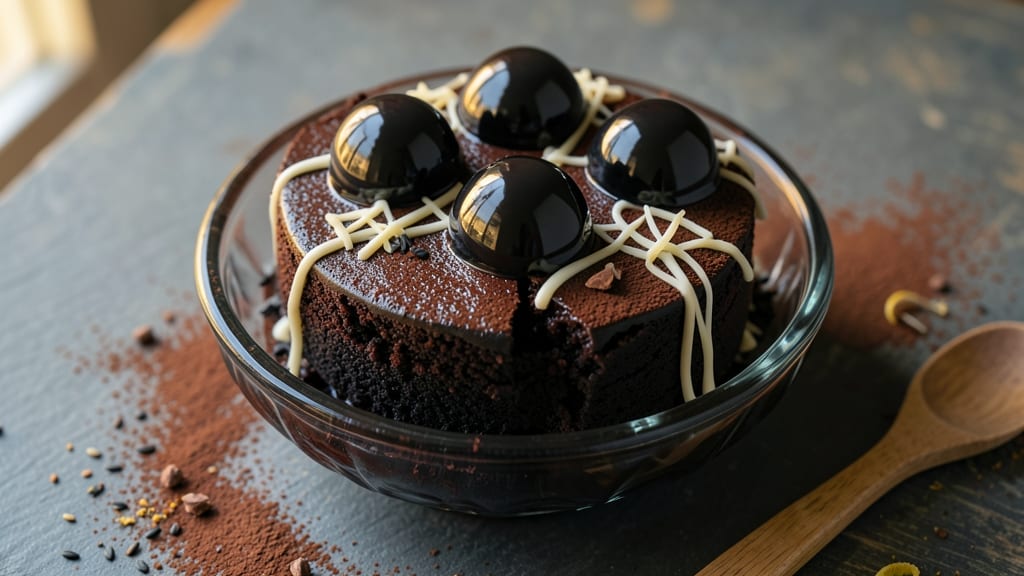
This black velvet chocolate cake recipe delivers layers of deep red velvet cake with a secret coffee boost that enhances the chocolate flavor. The signature velvet texture and striking color make it perfect for special occasions or anyone who loves a showstopping dessert.
Achieving that rich, velvety consistency and vibrant hue is easier than you think with the right techniques.
The secret lies in the combination of black food coloring or activated charcoal for the dramatic color, while coffee powder deepens the chocolate flavor without overpowering it. Each layer is moist and tender, with a perfect crumb that holds up beautifully when sliced.
This cake isn't just visually stunning—it's packed with rich chocolate notes that satisfy any chocolate lover's cravings.
What sets this recipe apart is the foolproof method for achieving that signature black velvet effect while maintaining a perfect bake every time. The cake layers are light and airy, not dense, and the chocolate buttercream filling ties everything together with its velvety smoothness.
Whether you're baking for a celebration or simply treating yourself, this cake will impress with its striking appearance and delicious taste.
The assembly process is straightforward, allowing you to create a cake that looks as impressive as it tastes. With just a few simple steps, you'll have a cake that's ready to slice and serve, complete with a smooth finish that's almost too pretty to cut into.
This is the kind of dessert that elevates any occasion with its bold flavor and dramatic presentation.
Ingredients for black velvet chocolate cake
The secret to this showstopping cake lies in these 12 ingredients—rich cocoa, bold coffee, and velvety buttercream.
| Ingredient | Amount | Notes |
|---|---|---|
| All-Purpose Flour 🌾 | 2 ½ cups | Sifted for light texture |
| Unsweetened Cocoa Powder 🍫 | ¾ cup | Natural or Dutch-processed |
| Granulated Sugar 🍚 | 2 cups | White or light brown |
| Instant Espresso Powder ☕ | 2 tbsp | For deep coffee flavor |
| Black Food Coloring 🎨 | ¼ tsp | Gel or liquid form |
| Baking Soda 🧪 | 1 tsp | Pure baking soda |
| Salt 🧂 | ½ tsp | Fine sea salt |
| Large Eggs 🥚 | 2 whole | Room temperature preferred |
| Unsalted Butter 🧈 | 1 cup | Softened to room temp |
| Buttermilk 🥛 | 1 cup | Fresh or cultured |
| Vanilla Extract 🌸 | 1 tbsp | Pure vanilla extract |
| Chocolate Buttercream Filling 🍰 | 2 cups | Store-bought or homemade |
The cocoa powder is your flavor foundation—Hershey's Special Dark or Dutch-processed brands work best for that deep chocolate punch. Instant espresso powder is non-negotiable for that signature coffee boost (the Starbucks or Nescafé brands are reliable). Black food coloring can be tricky—Wilton gel food coloring is my go-to because it doesn't thin the batter like liquid versions. For the butter, Land O'Lakes unsalted is my secret weapon—it's creamy but not overly rich, which keeps the cake tender. Grab the buttermilk fresh from the dairy section if you can, but the powdered kind works in a pinch.
No instant espresso powder? Strong brewed coffee cooled works in a bind (use 1/4 cup), but it'll make your batter thinner. Dutch-processed cocoa too bitter? Natural cocoa with 1/4 tsp baking soda balances it perfectly. Short on buttermilk? Mix 1 cup milk + 1 tbsp vinegar and let it sit for 5 minutes. The buttercream can be store-bought (I like Betty Crocker for convenience), but homemade with 2 cups softened butter + 4 cups powdered sugar + 1 cup cocoa powder takes it to the next level. Fresh vanilla extract is worth the splurge—McCormick or Nielsen-Massey brands have that real vanilla scent.
This cake keeps beautifully—3 days at room temperature covered with plastic wrap, or 1 week refrigerated in layers. The buttercream will firm up in the fridge, so bring it to room temp before assembling. For extra drama, dust the finished cake with powdered cocoa or edible gold leaf. Freeze unfrosted layers for up to 3 months—just thaw overnight before decorating. Trust me, the anticipation makes it even more special.
Why You'll Love This Recipe
- Here’s what sold me: the cocoa and sugar balance so well, but the instant espresso powder adds this subtle depth that makes it taste like a fancy bakery piece. Honestly, the black food coloring is just the cherry on top—it’s dramatic, but the flavor? Pure chocolate satisfaction.
- No Mixer Needed: I swear by this recipe when my mixer’s out of commission. Just whisk the dry ingredients—flour, cocoa, espresso powder—right in the bowl, then fold in melted butter and eggs. The espresso powder cuts through the richness, but it’s one of those rare cakes where you won’t taste the coffee if you’re not looking for it.
- Rich Without Overpowering: Here’s what sold me: the cocoa and sugar balance so well, but the instant espresso powder adds this subtle depth that makes it taste like a fancy bakery piece. Honestly, the black food coloring is just the cherry on top—it’s dramatic, but the flavor? Pure chocolate satisfaction.
- Birthday or Boredom: Between us, this cake is my go-to for any reason. Too fancy for a Tuesday night? The black velvet look makes it feel special, but it’s still easy enough to bake when you’re craving something sweet. My kid’s birthday or my own “I need a break” day—it works both times.
Step-by-step instructions for black velvet chocolate cake
Here's how to create that stunning deep red velvet cake with rich chocolate layers!
Prepare the Dry Ingredients
In a medium bowl, whisk together the 2.5 cups all-purpose flour, 0.75 cup unsweetened cocoa powder, 2 tbsp instant espresso powder, 1 tsp baking soda, and 0.5 tsp salt. Sift the mixture through a fine-mesh sieve directly into a large mixing bowl to aerate the ingredients and prevent lumps. This step is crucial for achieving a light, tender crumb in your cake.
In a separate small bowl, combine the 2 cups granulated sugar and 0.25 tsp black food coloring. Whisk vigorously until the coloring is fully dissolved and the sugar mixture takes on a deep red hue. This vibrant color will give your cake its signature black velvet appearance. Set aside until ready to use.
Cream Butter and Sugar
In a stand mixer fitted with the paddle attachment, beat the 1 cup softened unsalted butter on medium speed until smooth and creamy, about 2-3 minutes. Gradually add the colored sugar mixture and beat for another 3-5 minutes until the mixture is light and fluffy, nearly doubling in volume. This creaming process incorporates air, which helps create that tender cake texture.
I like to scrape down the sides of the bowl with a rubber spatula every minute or so to ensure even mixing. You'll know it's ready when the mixture is pale red and leaves clean streaks on the bowl when the beaters are lifted. This is the foundation of your cake's rich, moist texture.
Add Wet Ingredients
Add the 2 whole large eggs, one at a time, mixing on low speed after each addition until fully incorporated. Then add the 1 cup buttermilk and 1 tbsp vanilla extract, mixing just until combined. Be careful not to overmix at this stage—just until the wet ingredients are evenly distributed throughout the batter.
With the mixer running on low speed, gradually add about one-third of the sifted dry ingredients to the wet mixture. Mix just until combined, then add another third and mix again. Finish by adding the remaining dry ingredients and mixing on low speed just until the flour is incorporated and no streaks remain. This gentle folding prevents developing too much gluten, which would make the cake dense.
Divide and Bake the Layers
Preheat your oven to 350°F and grease two 9-inch round cake pans, lining the bottoms with parchment paper for easy removal. Divide the batter evenly between the prepared pans. Tap each pan gently on the counter to remove any air bubbles and ensure even distribution of the batter.
Bake for 25-30 minutes, or until a toothpick inserted into the center comes out clean. The edges should be set, but the center should still have a slight spring to it. Rotate the pans halfway through baking for even browning. Let the cakes cool in the pans for 10 minutes, then transfer to a wire rack to cool completely before assembling.
Assemble and Frost the Cake
Once the layers are completely cool, level the tops if needed using a serrated knife. Place the first layer on a cake stand or plate and spread 1 cup of the chocolate buttercream filling evenly over the top. This layer will be your base for building the cake.
Place the second layer on top of the buttercream and spread the remaining 1 cup chocolate buttercream filling evenly over the top and sides of the cake. Use an offset spatula to create a smooth finish. For extra flair, you can pipe additional buttercream around the edges or on top. The rich chocolate filling complements the deep red velvet layers beautifully, creating a stunning contrast.
Pro Tips For Making Black Velvet Chocolate Cake
- Sift the Cocoa: Mixing dry ingredients in a sieve first cuts out lumps in the cocoa powder—this cake’s dark, velvety texture depends on it. I learned this the hard way after serving a slice with gritty bits that ruined the whole bite.
- Whisk the Black Dye: Stir the black food coloring into the wet ingredients last and give it a full 30 seconds of vigorous whisking. Skipping this step leaves streaks of undyed batter, and you’ll end up with a cake that looks like it got a one-sided makeover.
- Check Internal Temp: The cake’s done when the center hits 210°F—hotter than you’d think for chocolate cake. I used to pull it out at 200°F and ended up with a gummy middle every time. A thermometer is your friend here.
- Use Cold Butter: Beat the butter and sugar until light and fluffy, but don’t overdo it—this isn’t shortbread. Cold butter creates a tender crumb, and the espresso powder needs that base to work its magic. (Yes, even if you’re impatient like me.)
Pro cooking tips for this recipe
Color Consistency
Achieving that signature deep red-black hue requires precision. I use Wilton gel food coloring because it disperses evenly without thinning the batter. Start with ¼ teaspoon and adjust in ⅛-teaspoon increments—too much makes the cake taste bitter.
For an even richer color, add ½ teaspoon activated charcoal powder (food-grade) to the dry ingredients. Mix it thoroughly with the cocoa powder first to prevent clumping. 🎨
Butter Temperature
The butter's temperature makes all the difference in texture. I always use Land O'Lakes unsalted butter softened to 65°F—just until it yields slightly when pressed but isn't greasy. Too soft, and your cake will be dense; too firm, and it won't cream properly.
Let it sit at room temperature for 1-2 hours before mixing. Pro tip: Place the butter in a bowl of warm water for 10 minutes if you're in a hurry.
Baking Time Precision
Oven temperature fluctuates, so I recommend baking at 350°F for 25 minutes, then checking with a toothpick. If it comes out clean but the center still jiggles slightly, that's perfect—overbaking dries out the layers. For even baking, rotate the pans halfway through.
I use Wilton 9-inch round pans with nonstick spray and parchment paper for foolproof release. A digital thermometer ensures accuracy—aim for an internal temp of 205-210°F at the center. ⏰
Layer Leveling
Uneven layers ruin the professional look. Use a serrated knife and a leveling guide (or a piece of cardboard) to trim the tops perfectly flat. Place the first layer on the stand, then chill the second layer for 10 minutes before adding—this prevents buttercream from sliding off.
Spread filling with a palette knife for smooth coverage. For extra stability, place a dollar-store cake board under the bottom layer before assembling. 💡
Buttercream Mastery
Store-bought buttercream works, but homemade elevates the cake. My go-to recipe is 2 cups softened butter + 4 cups powdered sugar + 1 cup cocoa powder + ¼ cup heavy cream, whipped until fluffy. For extra richness, add 1 tablespoon instant espresso powder to the dry ingredients.
Chill the buttercream for 30 minutes before piping to prevent melting. Use a Wilton 1M offset spatula for smooth sides and a Wilton 12A piping tip for decorative borders. ✨
Storage Secrets
This cake keeps beautifully for 3 days at room temperature in an airtight container with parchment between layers. For longer storage, refrigerate fully assembled for up to 1 week—just let it sit at room temp for 1 hour before serving.
Freeze unfrosted layers for 3 months by wrapping tightly in plastic wrap and aluminum foil. Thaw overnight in the fridge before assembling. To refresh stale buttercream, microwave it for 10-15 seconds and rewhip with a hand mixer. 💫
Frequently asked questions
Why does this cake use both coffee and cocoa powder?
The coffee enhances the chocolate flavor without overpowering it, creating a deeper, more complex taste profile. The instant espresso powder dissolves completely, while the cocoa provides that rich chocolate base. Together, they create a velvety texture with a satisfying depth of flavor that's more interesting than plain chocolate cake.
Can I make this cake without black food coloring?
Yes, but the color will be different. For a deep red velvet look, use ½ teaspoon activated charcoal powder mixed with the cocoa powder instead. Without any coloring, the cake will be a standard chocolate cake color. The black coloring is what gives this recipe its signature dramatic appearance.
How do I prevent my cake layers from cracking when assembling?
Let your cake layers cool completely before assembling, and chill them for 10 minutes before adding frosting. Use a serrated knife to level the tops perfectly flat. Also, spread frosting evenly and use a palette knife for smooth application. Chilling the cake for 15 minutes after frosting helps prevent cracks.
Can I substitute buttermilk with another ingredient?
Yes, you can make a substitute by mixing 1 cup milk + 1 tablespoon vinegar or lemon juice and letting it sit for 5 minutes until thickened. For a richer texture, use 1 cup plain yogurt instead. The acidity in buttermilk helps activate the baking soda for proper rise, so your substitute should mimic that acidity.
How can I make this cake gluten-free?
Replace the all-purpose flour with a 1:1 gluten-free flour blend like Bob's Red Mill or King Arthur. Add ½ teaspoon xanthan gum to help bind the cake. You may need to adjust the liquid slightly—start with ¾ cup buttermilk instead of 1 cup. Test the batter consistency and add more liquid if needed to reach a smooth, pourable texture.