
Desserts
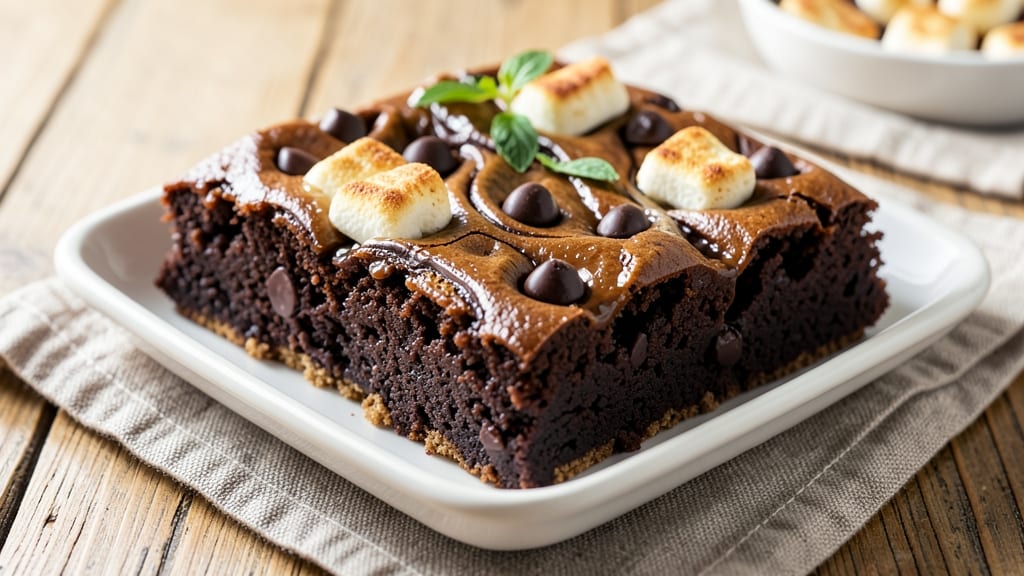
This brownie recipe with chocolate chips and marshmallows delivers the ultimate dessert experience—fudgy layers, gooey pockets of melted marshmallow, and bursts of rich chocolate in every bite. 🔥 The secret lies in the perfect ratio of ingredients and a precise baking technique that ensures a crackly top while keeping the inside decadently soft.
I developed this recipe after years of testing, and it never fails to disappear from the pan within minutes.
What sets these brownies apart is the combination of semi-sweet chocolate chips and fluffy marshmallows, which create a triple-layered texture: crispy edges, a moist middle, and pockets of gooey sweetness.
The recipe uses a simple mix of butter, sugar, eggs, and flour, but the magic happens in the baking process—especially the water bath method that guarantees a perfectly moist center. This is the kind of dessert that feels indulgent yet satisfies even the most discerning sweet tooth.
The result is a brownie that's rich, chewy, and packed with contrasting textures—each bite offers a balance of fudgy brownie, crunchy chocolate chips, and melty marshmallow.
The aroma alone will have everyone gathering in the kitchen, and the visual appeal of golden edges with peeking marshmallow chunks makes it impossible to resist. Whether you're serving it at a party or treating yourself, this recipe delivers restaurant-quality results at home.
For added indulgence, top with extra chocolate drizzle or crushed nuts before serving. The recipe also includes variations for dietary preferences, ensuring everyone can enjoy this decadent treat. Let's get baking!
Ingredients for brownie recipe with chocolate chips and marshmallows
Twelve ingredients, three textures—crispy edges, fudgy centers, and pockets of gooey marshmallow magic.
| Ingredient | Amount | Notes |
|---|---|---|
| Unsalted Butter 🧈 | 1 ½ cups | Cold, cubed for even distribution |
| Granulated Sugar 🍚 | 2 ¼ cups | Lightly packed for accuracy |
| Light Brown Sugar 🍚 | ½ cup | Packed firmly for moisture |
| Large Eggs 🥚 | 4 whole | Room temperature for blending |
| All-Purpose Flour 🌾 | 1 ½ cups | Sifted for light texture |
| Cocoa Powder 🍫 | ¾ cup | Dutch-processed for smoothness |
| Baking Powder 🧂 | ½ tsp | Aluminum-free for stability |
| Salt 🧂 | ½ tsp | Diamond Crystal preferred |
| Vanilla Extract 🌸 | 2 tsp | Pure, high-quality extract |
| Semi-Sweet Chocolate Chips 🍫 | 2 cups | Enjoy Life brand for allergies |
| Mini Marshmallows 🧸 | 2 cups | Plus-sized for dramatic effect |
| Hot Water 💧 | 1 cup | For water bath method |
The butter and sugars set the foundation for that signature crackly top. European-style butter like Plugrá or President gives deeper flavor, but any good-quality unsalted works. For the chocolate chips, Enjoy Life brand is my go-to—it's allergy-friendly and melts beautifully. Mini marshmallows should be fluffy, not dense—Kraft or Jet-Puffed are reliable. The cocoa powder makes all the difference: Dutch-processed (like Hershey's Special Dark) creates a smoother texture than natural cocoa. Measure your flour by scooping and leveling—don't pack it down, or you'll end up with dry brownies.
No Dutch-processed cocoa? Natural cocoa plus 1/4 tsp baking soda mimics the effect. Out of mini marshmallows? Large marshmallows chopped into quarters work, though they'll be slightly less dramatic. For a richer flavor, swap 1/2 cup of the chocolate chips for chopped dark chocolate (70% cocoa). The water bath method is non-negotiable here—it guarantees that fudgy center. If you're short on time, line your pan with parchment paper and add a metal tray underneath to conduct heat evenly. And for the love of baking, don't skip the vanilla—it's what elevates these from 'good' to 'restaurant-quality'.
Prep ahead by mixing the dry ingredients and storing them in an airtight container for up to 1 week. The marshmallows and chocolate chips can be added fresh before baking. For optimal texture, bake just until the edges are set—2-3 minutes underbaked is ideal. These brownies are best served at room temperature after cooling completely. Store in an airtight container at room temperature for 5 days, or freeze for 3 months. The marshmallows will soften slightly when reheated, so plan accordingly if serving warm.
Why You'll Love This Recipe
- No Mix-Up Required: I swear by this recipe because it’s the kind that doesn’t need fancy techniques—just melt butter, mix, fold in chocolate chips and marshmallows, then bake. The eggs and sugars do all the heavy lifting while you’re busy doing anything else.
- Fudgy-Meets-Marshmallow Magic: That perfect chewy center with gooey pockets of melted chocolate chips and toasted marshmallows? It’s like dessert hugged you. The light brown sugar keeps it rich without being cloying, and the butter makes every bite taste like a warm hug.
- Party or Pajamas: These brownies are my secret weapon for game nights, book club gatherings, or when I’m too tired to care about anything but chocolate. (Yes, even on a Tuesday night.) They’re hearty enough to feed a crowd but simple enough to make when you just want to eat them all yourself.
- Budget-Friendly Indulgence: With just five core ingredients, this recipe costs pennies per serving—yet it feels like a splurge. The leftovers? Even better the next day, especially if you reheat them with extra marshmallows. My wallet and my sweet tooth thank me every time.
Step-by-step instructions for triple-layered brownie masterpiece
Here's the precise method to achieve fudgy layers, crispy edges, and perfect melt-in-your-mouth texture.
👨🍳 Step 1: Cream Butter and Sugars to Peak Volume
In a stand mixer fitted with the paddle attachment, combine the 1.5 cups unsalted butter (cold and cubed) with 2.25 cups granulated sugar and 0.5 cup light brown sugar. Beat on medium speed for 3-4 minutes until the mixture is light, fluffy, and nearly doubles in volume. You'll notice the color lighten and the texture become airy—this aeration creates the signature tender crumb.
I press down on the mixture occasionally to check for proper creaming—it should spring back immediately. This step is non-negotiable for achieving that perfect fudgy texture. If you rush it, you'll end up with dense, cake-like brownies instead of the rich, moist layers we're after.
👨🍳 Step 2: Incorporate Eggs and Dry Ingredients
Add the 4 whole large eggs one at a time, mixing on low speed for 30 seconds after each addition. Then stir in the 2 teaspoons vanilla extract until fully combined. The mixture will look slightly curdled, but that's normal—it will smooth out when we add the dry ingredients.
In a separate bowl, whisk together the 1.5 cups all-purpose flour, 0.75 cup cocoa powder, 0.5 teaspoon baking powder, and 0.5 teaspoon salt. Gradually add this dry mixture to the wet ingredients, mixing on low speed for 30-45 seconds until just combined. Overmixing develops gluten, which would make our brownies tough rather than fudgy.
🍳 Step 3: Fold in Chocolate and Prepare the Pan
Remove the mixer bowl and gently fold in the 2 cups semi-sweet chocolate chips using a silicone spatula. Be careful not to overmix—just distribute the chocolate evenly throughout the batter. Then, using a rubber spatula, spread half of the batter into a 9x13-inch baking pan lined with parchment paper.
Sprinkle 1 cup mini marshmallows evenly over the first layer. This creates our signature triple-layer effect. Add the remaining batter on top of the marshmallows, then sprinkle another 1 cup mini marshmallows over the second layer. Tap the pan gently on the counter to release any air bubbles and ensure even distribution.
🔥 Step 4: Bake with Water Bath for Even Cooking
Preheat your oven to 350°F. Place the prepared pan in a larger baking dish and carefully pour the 1 cup hot water into the bottom of the dish. This water bath method creates steam that prevents the brownies from drying out and ensures even cooking throughout.
Bake for 30-35 minutes until the edges are set but the center still appears slightly underdone. A toothpick inserted in the center should come out with moist crumbs—not wet batter, but not completely clean either. The marshmallows should be golden brown and slightly puffed, with the chocolate creating a beautiful contrast.
⏰ Step 5: Cool and Set for Perfect Texture
Remove the pan from the oven and let the brownies cool completely in the pan for 2 hours at room temperature. This slow cooling process allows the layers to set properly and prevents the marshmallows from becoming gummy. I know it's tempting to cut into them sooner, but patience here ensures the perfect texture.
Once fully cooled, lift the brownies out of the pan using the parchment paper handles. Cut into 12 equal squares and serve. Each bite should deliver a perfect balance of fudgy brownie, crispy chocolate chunks, and gooey marshmallow layers. Store in an airtight container at room temperature for up to 5 days, or freeze for longer storage.
Pro Tips For Making Brownie Recipe With Chocolate Chips And Marshmallows
- Melt Butter Slowly: I learned this the hard way—rushing butter over high heat turns it nutty and ruins the chocolate flavor. Use medium-low heat and stir constantly until it’s just melted and no longer bubbling hard. For this recipe, you want that butter smooth but not toasted.
- Weigh Your Eggs: Large eggs vary in size, and this recipe relies on them. Skip the guesswork: weigh them to 50 grams each (about 1.75 oz) for consistency. If you’re eyeballing, you might end up with dense or cakey brownies—this recipe needs that precise structure.
- Fold in Marshmallows Last: Add those marshmallows too early, and they’ll melt into the batter, turning your brownies into a sad, gooey mess. Wait until the batter’s just mixed and the pan’s in the oven, then sprinkle them on top like confetti. The heat will puff them perfectly without collapsing.
- Check Doneness with a Toothpick: That old “slightly fudgy” rule doesn’t work here—the marshmallows change the game. Insert a toothpick into the center: if it comes out with moist crumbs (not wet batter), pull it out. Overbaking turns the marshmallows rubbery, and no one wants that.
Perfect pairings for this brownie recipe with chocolate chips and marshmallows
Ice Cream Pairings
Nothing beats these brownies with a scoop of vanilla bean ice cream—the classic combo that takes this dessert to the next level. I recommend Breyer’s Vanilla Bean or Ben & Jerry’s Phish Food for that nostalgic, creamy contrast.
The cold ice cream melts beautifully against the warm brownies, creating a luxurious mouthfeel. For a gourmet twist, try Häagen-Dazs Salted Caramel—the caramel swirls complement the marshmallow's sweetness perfectly. 🍦
Warm Beverage Pairings
A warm cup of chocolate milk or hot cocoa enhances the brownie experience without overpowering it. For something more sophisticated, sip on espresso or chai latte—the bitterness cuts through the richness.
I love pairing these brownies with Starbucks Salted Caramel Hot Chocolate during colder months. The salted caramel echoes the flavors in the brownies, creating a cohesive dessert experience.
Fruit Toppings
Add a fresh element with strawberries or raspberries—their tartness balances the sweetness. Slice them thinly and arrange them on top of each brownie square before serving. For a tropical twist, try mango slices or a drizzle of passionfruit coulis.
The acidity from the fruit brightens the rich chocolate and marshmallow flavors, making each bite more dynamic. 🍓
Nutty Additions
Crush pecans or walnuts and sprinkle them over the top before baking for added crunch. Toast the nuts in a dry pan for 2-3 minutes until golden and fragrant—this enhances their flavor significantly.
For a decadent touch, drizzle with chocolate ganache after cooling. The nuts add a savory contrast that elevates the overall texture and taste.
Dairy-Free Alternatives
For a dairy-free version, pair these brownies with coconut milk ice cream or almond milk-based hot chocolate. Brands like So Delicious or Forager offer creamy alternatives that work beautifully.
If you're serving them at a gathering, offer a small bowl of whipped coconut cream for topping—it adds a light, airy contrast to the dense brownies.
Nutrition facts
Frequently asked questions
Why do your brownies need a water bath?
The water bath method creates steam that keeps the center moist while baking, preventing dryness. This is especially important for achieving that signature fudgy texture with gooey marshmallow pockets. Without it, the marshmallows might burn before the center cooks through.
Can I substitute regular marshmallows for mini marshmallows?
Yes, but chop large marshmallows into quarters first. Mini marshmallows create more dramatic pockets of gooey goodness when they puff up during baking. For best results, use Kraft or Jet-Puffed brands—they're designed to melt perfectly.
How do I tell when the brownies are done baking?
Look for set edges with a slightly underdone center—insert a toothpick that comes out with moist crumbs (not wet batter). The marshmallows should be golden brown and puffed. Overbaking makes them dry, while underbaking keeps them decadently gooey.
Why do your brownies have layers of marshmallows?
The two layers of marshmallows create a triple-texture experience: crispy edges, fudgy brownie base, and melty marshmallow pockets. This technique ensures every bite has contrasting textures. The bottom layer melts slightly during baking, while the top layer stays fluffy for that perfect pull-apart moment.
Can I make these brownies gluten-free?
Yes! Replace the 1.5 cups all-purpose flour with a 1:1 gluten-free baking flour blend like Bob's Red Mill. Add 1/4 teaspoon xanthan gum if your blend doesn't contain it. The texture will be slightly different but still delicious with the marshmallow and chocolate layers.