
Desserts
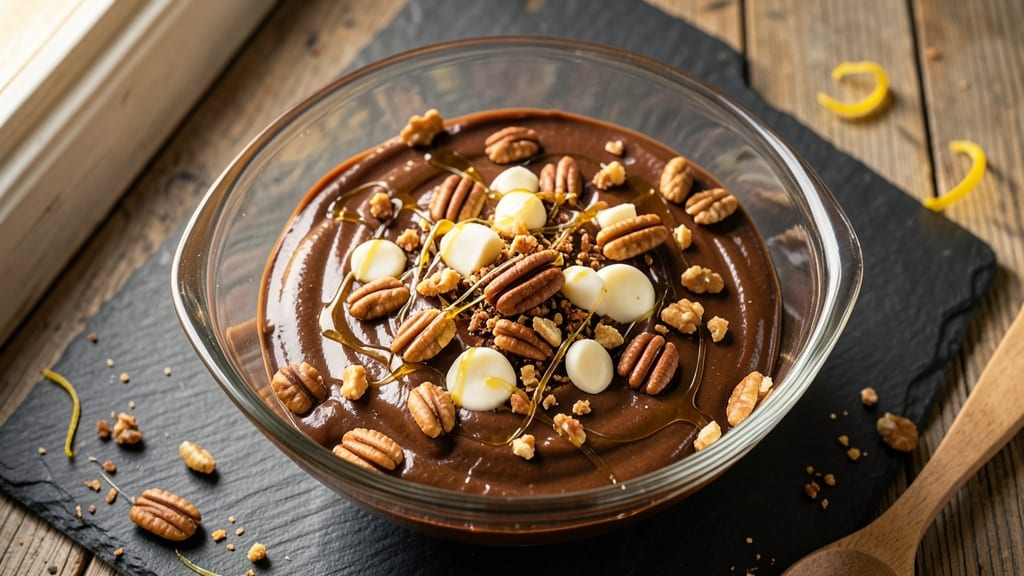
This cannabis chocolate candy recipe transforms simple ingredients into potent, vegan treats with a perfect balance of smooth melts and satisfying crunch. The secret lies in precise decarboxylation and tempering techniques that ensure even infusion and a glossy finish—no guesswork, just science-backed results.
Safety comes first, with clear dosage guidelines and storage instructions to keep your edibles consistent and effective.
We start with high-quality vegan chocolate that melts smoothly, then infuse it with carefully measured cannabis for controlled potency. The crunchy coating adds texture without overpowering the rich cocoa flavor, creating bites that are both indulgent and balanced.
Every step is designed to maximize flavor while maintaining the integrity of the cannabis compounds.
What sets these candies apart is their professional finish—glossy, evenly coated, and perfectly set. They’re ideal for gifting, sharing, or treating yourself to a precise, enjoyable experience. The recipe includes dosage adjustments so you can tailor the strength to your needs, with storage tips to preserve freshness and potency.
Whether you're a seasoned edibles maker or new to cannabis-infused cooking, this method delivers restaurant-quality results at home. Let’s get started with a foolproof process that ensures every bite is as delicious as it is effective.
Ingredients for cannabis chocolate candy
High-quality chocolate, potent cannabis, and crunchy textures—just nine ingredients for restaurant-worthy edibles.
| Ingredient | Amount | Notes |
|---|---|---|
| Vegan Dark Chocolate Bars 🍫 | 12 oz | 70% cocoa or higher, dairy-free |
| Decarboxylated Cannabis Bud 🌿 | ½ oz | Grind finely for even infusion |
| Coconut Oil 🫒 | ¼ cup | Unrefined for flavor richness |
| Crushed Pecans 🥜 | 1 cup | Toasted for enhanced flavor |
| White Chocolate Chips 🍫 | ½ cup | Vegan, for crunchy coating |
| Maple Syrup 🍁 | 2 tbsp | For sweetness and binding |
| Coconut Oil (for coating) 🫒 | 1 tbsp | Melted for glossy finish |
| Sea Salt 🧂 | ½ tsp | Fine grain for garnish |
| Vanilla Extract 🍦 | ½ tsp | Pure alcohol-free preferred |
| Cocoa Powder 🍫 | 1 tbsp | Unsweetened, for depth |
The chocolate is non-negotiable—Enjoy Life or Hu Kitchen bars melt perfectly and keep the vegan integrity intact. For cannabis, decarboxylate first (bake at 240°F for 30 minutes) to activate THC properly. If you can't find pre-ground bud, pulse it in a coffee grinder—fine consistency is key. Toasting the pecans in a dry pan for 5 minutes (until fragrant) makes all the difference—skip this and you'll miss out on that nutty depth. Trader Joe's has great pre-toasted pecans if you're short on time.
No dark chocolate? Vegan milk chocolate works too, but the flavor won't be as sophisticated. Swap pecans for crushed almonds or walnuts if you prefer, but toast them first. Running low on white chocolate chips? Vegan caramel bits add a similar crunch. The cocoa powder is optional but worth it for that professional finish—it adds richness without sweetness. For extra potency, bump the cannabis to 0.75 oz, but start conservative and adjust to taste.
Store the candies in an airtight container with parchment between layers to prevent sticking. They'll keep for 2 weeks at room temperature or 3 months in the freezer. For gifting, portion into clear cellophane bags with a handwritten dosage label. If the coating gets sticky, chill them for 10 minutes before serving. These aren't just treats—they're edible art, so handle them with care.
Why You'll Love This Recipe
- No Melt-Down Mess: I swear, this recipe only needs a double boiler and 10 minutes of hands-off time. The coconut oil melts into the chocolate like butter—no seizing, no fuss—just smooth, easy blending while you sip your tea.
- Rich & Nutty Magic: That first bite? Dark chocolate’s deep bite meets toasty pecans, then the white chocolate chips add this creamy, unexpected contrast. Honestly, I’ve made gourmet chocolates costing 20 bucks a bar, and this beats ‘em every time.
- Party in a Bag: Wrap these in wax paper, toss ‘em in a jar, and boom—you’ve got a crowd-pleaser for game day, date night, or when your cousin “forgets” to bring dessert. (Yes, even on a Tuesday night.)
- Leftovers? More Like Leftovers: Between us, I’ve had these last three weeks in my desk drawer. The cannabis stays potent, the chocolate doesn’t sweat, and the pecans keep the texture perfect. Budget win: one batch stretches for gifts, emergencies, and “just because” cravings.
Step-by-step instructions for cannabis chocolate candy
Here's how to create rich, infused chocolate melts with a perfect crunchy coating—no baking required.
Melt the Chocolate and Infuse with Cannabis
In a heatproof bowl set over a saucepan of simmering water (double boiler), combine the 12 oz vegan dark chocolate bars and 0.25 cup coconut oil. Stir gently until the chocolate melts completely and the mixture becomes smooth and glossy—this should take about 5-7 minutes. Remove from heat immediately.
While still warm, whisk in the 0.5 oz finely ground decarboxylated cannabis bud and 1 tbsp cocoa powder. Let the mixture sit for 5 minutes to allow the cannabis to fully infuse. This step is critical—don't rush it, as proper infusion ensures even potency throughout each piece.
Sweeten and Flavor the Mixture
Return the bowl to low heat and stir in the 2 tbsp maple syrup and 0.5 tsp vanilla extract. Heat gently for 1-2 minutes until the syrup is fully incorporated and the mixture reaches a temperature of 110°F—this ensures the candy will set properly without becoming grainy. You'll notice the mixture thicken slightly as it cools.
Remove from heat and let it cool to 95°F (about 10 minutes). This temperature is perfect for dipping—too hot and the coating won't set; too cool and it'll be too thick to work with. The mixture should have a thick, fudgy consistency similar to melted caramel.
Prepare the Crunchy Coating
In a small bowl, melt the 1 tbsp coconut oil (for coating) in the microwave for 10-15 seconds, then stir in the 0.5 cup white chocolate chips until completely smooth. Add the 1 cup crushed pecans and 0.5 tsp sea salt, mixing well to distribute evenly. The coating should have a crumbly yet sticky texture—this is what gives the candy its signature crunch.
Work quickly—while the white chocolate mixture is still warm, spread it evenly on a parchment-lined baking sheet. Use a fork to create small ridges for easier breaking later. Let it cool completely at room temperature for 20-25 minutes until firm but still pliable.
Dip and Set the Candy
Using a fork or small spoon, dip the cooled chocolate mixture into the white chocolate-pecan coating, ensuring each piece is fully covered. Place the dipped candies on a fresh parchment-lined tray and let them set at room temperature for 1 hour—this allows the coating to harden while keeping the interior rich and fudgy.
For extra shine, brush the set candies with a tiny bit of melted coconut oil (just enough to coat lightly). Break into bite-sized pieces and store in an airtight container at room temperature for up to 2 weeks. The contrast of the dark, infused chocolate with the crunchy white chocolate-pecan coating makes every bite irresistible.
Pro Tips For Making Cannabis Chocolate Candy
- Melt Slowly, Stir Often: Your vegan dark chocolate will seize if you rush it—especially with coconut oil. Heat the chocolate and coconut oil together over low heat (or double boiler) at 110°F (43°C), stirring every 30 seconds until fully smooth. I learned this the hard way after scraping burnt bits off my first batch.
- Grind Cannabis Fine: Skip the "just chop it" approach—your decarboxylated bud needs to be powder-fine for even infusion. Pulse in a spice grinder until it’s like cocoa powder, not flaky bits. I was skeptical until I tried it—now my candies taste consistent, not patchy.
- Taste Before Chilling: Add the crushed pecans and white chocolate chips after testing the base mixture. The cannabis flavor can get lost in the mix, and you’ll need to adjust sweetness or potency before it sets. (Yes, even if you’re impatient like me.)
- Use Parchment, Not Silicone: Silicone mats stick to cannabis-infused chocolate—trust me, I’ve tried. Line your pan with parchment, press the mixture firmly, then chill for 2 hours. When it’s set, lift the edges cleanly instead of fighting a sticky mess.
Serving suggestions for this recipe
Presentation Plating
Arrange candies on a slate board or marble tray for a luxurious, restaurant-worthy display. Use gold leaf flakes (sprinkled lightly) or edible glitter to elevate the presentation—just a pinch adds instant glamour.
For a rustic touch, scatter toasted coconut flakes or crushed hazelnuts around the base. I love adding a small sprig of fresh rosemary for a sophisticated herbal contrast. 💫
Serving Sizes
Each candy piece weighs about 10-12 grams—perfect for a single dose. For precise potency, divide into 8 equal portions (about 1.5 oz total) and label clearly.
I recommend serving 1-2 pieces per person for social gatherings to avoid overconsumption. Store extra pieces in small glass jars with airtight lids for easy portion control.
Gift-Worthy Packaging
Wrap candies in cellophane bags tied with twine, or use mini mason jars for a charming, reusable option. Add a handwritten label with dosage info and storage instructions—this makes them feel like a premium treat.
For bulk gifting, divide into clear plastic containers with compartments to keep pieces separate. I’ve seen stunning results using kraft paper boxes lined with parchment paper for a bakery-style finish.
Pairing Ideas
Serve with sparkling apple cider or chilled chamomile tea to complement the sweetness without overpowering the cannabis. For coffee lovers, a dark roast espresso enhances the chocolate flavor profile. I also enjoy pairing these with whipped coconut cream—the cool, creamy contrast balances the rich candy beautifully.
Avoid pairing with strong cheeses or overly spicy foods, as they can clash with the delicate flavors. 🍷
Temperature Serving
Store candies at room temperature (68-72°F) for best texture—never refrigerate unless necessary, as condensation can make the coating soggy. If serving in warm climates, chill for 10 minutes before offering to prevent melting.
For a fun twist, serve slightly warmed candies (30 seconds in the microwave) to intensify the aroma. Always handle with dry hands to avoid sticking.
Dosage Discretion
Start with one piece to gauge potency—every batch varies slightly based on cannabis strain and infusion time. For beginners, I recommend half a piece initially. Keep a dosage log to track effects and adjust future batches accordingly.
Store in a cool, dark place (like a pantry) to preserve potency and freshness. Never leave candies in direct sunlight or near heat sources. 💡
Nutrition facts
Frequently asked questions
How do I know if my cannabis is properly decarboxylated?
Your cannabis is ready when it loses its green color and turns a golden brown shade. This usually takes 30 minutes at 240°F. The key is consistency—if you see any green patches, bake for another 5-10 minutes. Proper decarboxylation activates the THC, so this step is critical for potency and flavor.
Can I make these candies without a double boiler?
Yes! Use a microwave-safe bowl and heat in 20-second intervals, stirring between each, until the chocolate melts completely. Just be careful not to overheat—110°F is your target temperature for the final mixture. A candy thermometer helps, but if you don't have one, test by dipping a spoon in cold water—if the chocolate sets quickly, it's ready.
What if my coating won't stick to the chocolate?
This usually happens if the chocolate is too cool (below 90°F) or the white chocolate mixture is too thick. Reheat the chocolate gently to 95°F and ensure your white chocolate-pecan coating is warm but not melted. Work quickly—humidity can also cause sticking issues, so make these on a dry day. If needed, add 1 tsp coconut oil to the coating for better adhesion.
How do I adjust the potency for beginners?
Start by reducing the cannabis to 0.25 oz instead of 0.5 oz for a milder effect. For first-timers, I recommend making two separate batches—one with 0.25 oz and one with 0.5 oz—so you can test and compare. Always label your candies clearly with dosage info and store in a cool, dark place to maintain potency.
Can I use regular chocolate instead of vegan?
Technically yes, but the texture and flavor won't be the same. Regular chocolate contains dairy, which can make the candies softer and less stable. Plus, the vegan version avoids potential allergic reactions. If you must use regular chocolate, opt for high-quality dark chocolate (70% cocoa or higher) to minimize differences. The vegan version is also easier to work with for dipping and coating.