
Desserts
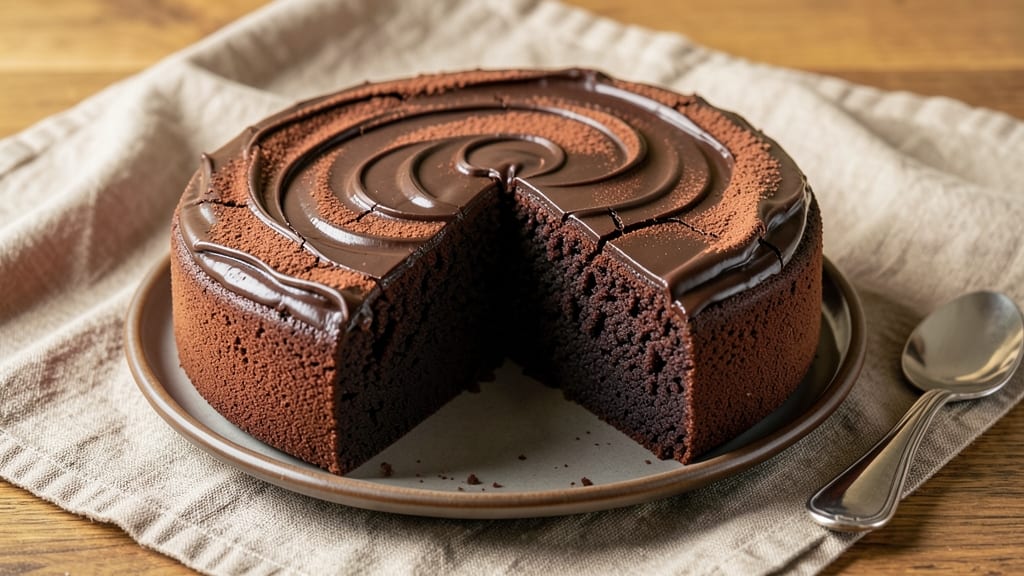
This chewy chocolate cake recipe delivers the perfect balance of fudgy texture and rich cocoa flavor—no dry crumbs in sight. The secret lies in a precise blend of ingredients and a foolproof baking technique that ensures every slice stays moist for days.
I've perfected this version after years of testing, and it consistently receives rave reviews for its tender crumb and deep chocolate taste.
The foundation of this cake is a combination of all-purpose flour, cocoa powder, and a touch of espresso powder for enhanced chocolate flavor. A simple syrup glaze adds that signature moisture boost, while a pinch of salt and baking soda create the ideal rise.
The cake bakes in just 35-40 minutes at 350°F, resulting in a golden-brown top with a perfectly chewy interior.
What sets this recipe apart is its ability to stay fresh-tasting even after a few days. The texture remains tender rather than dry, making it ideal for celebrations or satisfying cravings.
Each slice offers a perfect balance of chocolate intensity and subtle sweetness, with a moist crumb that melts in your mouth.
For an extra touch of indulgence, consider adding chocolate ganache drizzle or a dusting of powdered sugar. This cake serves beautifully as a standalone dessert or as part of a layered treat. Let's get baking—your taste buds will thank you!
Ingredients for chewy chocolate cake
Precision ingredients for a cake that stays moist for days and delivers perfect chewy texture.
| Ingredient | Amount | Notes |
|---|---|---|
| All-Purpose Flour 🌾 | 1 ½ cups | Sifted for even texture |
| Unsweetened Cocoa Powder 🍫 | ¾ cup | Dutch-processed preferred |
| Granulated Sugar 🍚 | 1 ½ cups | Light brown sugar for depth |
| Espresso Powder ☕ | 1 tbsp | Enhances chocolate flavor |
| Baking Soda 🧂 | ½ tsp | Ensures proper rise |
| Salt 🧂 | ½ tsp | Diamond Crystal preferred |
| Unsalted Butter 🧈 | 1 cup | Room temperature, full-fat |
| Large Eggs 🥚 | 2 whole | Room temperature, separated |
| Vanilla Extract 🌿 | 1 tbsp | Pure Madagascar preferred |
| Whole Milk 🥛 | ½ cup | Room temperature |
| Dark Chocolate Chunks 🍫 | 1 cup | 70% cacao minimum |
| Simple Syrup 🍯 | ¼ cup | For moisture boost |
| Powdered Sugar 🍚 | ½ cup | For glaze |
| Heavy Cream 🥛 | ¼ cup | For glaze |
The cocoa powder and espresso powder combination is non-negotiable for that deep, rich chocolate flavor. Dutch-processed cocoa from Valrhona or Ghirardelli elevates the taste, but store-brand works too if it's labeled 'natural' or 'Dutch-processed'. For the chocolate chunks, 70% cacao or higher ensures that fudgy texture—Ghirardelli or Lindt are reliable brands. The butter needs to be room temperature; if it's cold, let it sit out for 30 minutes before mixing. Room-temperature eggs also incorporate better for a lighter crumb.
No espresso powder? Instant coffee granules at half the amount work in a pinch, though the flavor won't be as refined. Swap brown sugar for white if needed, but the molasses in brown sugar adds moisture and depth. For a dairy-free option, replace the milk and butter with unsweetened almond milk and coconut oil, though texture may vary slightly. The simple syrup can be made ahead—just boil equal parts sugar and water, then cool completely. If you're short on time, store-bought glaze works, but homemade adds that extra moisture boost that sets this cake apart.
Store the cake in an airtight container at room temperature for up to 3 days—it actually tastes better the next day as the flavors meld. For longer storage, wrap tightly in plastic and refrigerate for up to 1 week. The glaze can be made a day ahead and reheated gently before serving. If you're planning to serve it chilled, let it sit at room temperature for 15-20 minutes first; the contrast between warm and cold makes it even more indulgent.
Why You'll Love This Recipe
- No Mixer Needed: Mixing this batter is just stirring—no electric mixer, no fuss. The cocoa and espresso powder dissolve right into the wet ingredients, so you’re basically folding a few things together while scrolling through your phone.
- Deep Chocolate Magic: That espresso powder isn’t just for coffee—it cuts through the sweetness and makes the cocoa taste richer, like a fancy bakery’s secret. Honestly, the first bite tastes like you spent hours layering flavors, but you didn’t.
- Weeknight to Party Star: Same batter, endless uses. Bake it for your kid’s school snack, slice it for a last-minute dessert, or freeze slices for lazy mornings. The texture holds up—no sad, crumbly cake here.
- Budget-Friendly Luxury: You’re using pantry staples here: flour, sugar, cocoa. No weird ingredients or pricey shortcuts. Yet it tastes like you splurged on a gourmet cake—because sometimes, a little espresso powder works wonders.
Step-by-step instructions for fudgy cocoa crunch cake
Here's how to achieve that signature chewy texture and deep chocolate flavor every time.
Cream Butter and Sugars for Maximum Moisture
In a stand mixer fitted with the paddle attachment, beat the 1 cup unsalted butter and 1.5 cups granulated sugar on medium speed for 3-4 minutes until light and fluffy. You're looking for a texture that nearly doubles in volume with a pale, creamy consistency. This step is critical—it incorporates air that creates that signature tender crumb.
The butter should be at room temperature (press your finger into it—it should leave a slight indent). If it's too cold, the mixture won't emulsify properly, leading to a denser cake. Scrape down the sides of the bowl with a rubber spatula every minute to ensure even mixing. Here's the thing—don't rush this step. Under-creaming leads to cakey results instead of the fudgy texture we're after.
Incorporate Wet Ingredients and Chocolate
Add the 2 whole large eggs one at a time, mixing on low speed for 30 seconds after each addition until fully incorporated. Then stir in the 1 tbsp vanilla extract and 0.5 cup whole milk. The mixture might look slightly curdled, but that's normal—it will smooth out when we add the dry ingredients.
In a separate bowl, whisk together the 1.5 cups all-purpose flour, 0.75 cup unsweetened cocoa powder, 1 tbsp espresso powder, 0.5 tsp baking soda, and 0.5 tsp salt. Sift the dry ingredients directly into the wet mixture and mix on low speed for 30-45 seconds until just combined. You should still see some flour streaks—overmixing develops gluten and makes the cake tough.
Remove the bowl from the mixer and gently fold in the 1 cup dark chocolate chunks using a silicone spatula. Make sure they're evenly distributed throughout the batter. The chocolate chunks will melt slightly during baking, creating pockets of molten chocolate that enhance the fudgy texture. Don't worry if they don't fully dissolve—they'll soften beautifully when baked.
Add the Moisture Boost and Prepare the Pan
Pour the 0.25 cup simple syrup into the batter and mix on low speed for 10 seconds until evenly distributed. This is our secret moisture boost—it keeps the cake tender and prevents dryness. Preheat your oven to 350°F while you prepare the pan.
Grease a 9-inch round cake pan with butter and line the bottom with parchment paper. The parchment prevents sticking and makes removal easier. Pour the batter into the prepared pan and smooth the top with a spatula. Tap the pan gently on the counter a few times to release any air bubbles that may have formed during mixing.
Bake for 30-35 minutes until a toothpick inserted into the center comes out with moist crumbs (not wet batter). The cake should spring back slowly when pressed gently in the center. Don't overbake—this is where many cakes go wrong. The edges should be set, but the center should still look slightly underdone. The cake will continue cooking slightly as it cools.
Create the Chocolate Glaze
While the cake bakes, prepare the glaze by combining the 0.5 cup powdered sugar and 0.25 cup heavy cream in a small bowl. Whisk until smooth and glossy. The glaze should be thick enough to coat the back of a spoon but still drizzle easily. If it's too thick, add 1-2 teaspoons of milk to loosen it.
This glaze serves a dual purpose—it adds a beautiful finish and provides an extra layer of moisture. The contrast between the fudgy cake and the smooth glaze is what makes this cake truly special. Let the glaze sit at room temperature for 5 minutes before using to ensure it's at the perfect consistency for pouring.
Glaze and Cool the Cake
Remove the cake from the oven and let it cool in the pan for 10 minutes. This brief cooling period prevents the glaze from melting when it comes into contact with the hot cake. Then, carefully transfer the cake to a wire rack and let it cool completely for 30 minutes. The cake will sink slightly as it cools—this is normal and actually enhances the fudgy texture.
Once the cake is completely cool, pour the glaze over the top and let it drip down the sides. Use a spatula to spread the glaze evenly, ensuring every inch of the cake is covered. Let the glaze set for 15 minutes before slicing. The cake should be moist, rich, and have that signature chewy texture that keeps it tender for days. Serve at room temperature for the best experience—this cake is even better the next day as the flavors meld together.
Pro Tips For Making Chewy Chocolate Cake
- Sift the Cocoa: Mixing cocoa powder directly into dry ingredients creates clumps that ruin texture. Sift it with the flour first—yes, even if you’re in a hurry—then whisk the wet ingredients into the center of the dry mix to avoid streaks.
- Bake Until Slightly Under: A toothpick with moist crumbs is perfect; pulling it out clean means overbaking. After 25-30 minutes, tent the cake with foil and check again—this keeps the center chewy while the edges stay firm.
- Use Cold Buttermilk: Room-temperature buttermilk makes the cake dense. Pour it into the mixing bowl last, then immediately fold just until combined—overmixing turns chewy cake into a brick.
- Skip the Extra Egg: This recipe doesn’t need it. The espresso powder and baking soda already add lift; an extra egg makes the texture cakey. If you’re nervous, crack one in, but don’t blame me if it’s less fudgy.
Dietary considerations for these flavors
Gluten-Free Adaptation
Replace the 1.5 cups all-purpose flour with a 1:1 gluten-free baking flour blend like King Arthur Measure for Measure or Bob's Red Mill. These blends contain xanthan gum, which mimics gluten's structure for proper rise.
For best results, add 1 tsp xanthan gum separately if your blend doesn't include it. The cake will still achieve that signature chewy texture, though it may be slightly denser. 💪
For extra moisture, increase the simple syrup to 0.35 cups and consider adding 2 tbsp applesauce to the wet ingredients. This helps compensate for the lack of gluten, which normally contributes to structure. Test your gluten-free flour blend first—some brands work better than others for dense baked goods.
Dairy-Free Options
Swap the 1 cup unsalted butter for 1 cup coconut oil (refined for neutral flavor) or 1 cup dairy-free butter like Miyoko's. For the 0.5 cup whole milk, use 0.5 cup unsweetened almond milk or oat milk—avoid soy milk as it can make the cake taste beany.
The heavy cream in the glaze can be replaced with full-fat coconut cream, though the texture will be slightly lighter. 🥛
To maintain the cake's moisture, reduce the baking time by 2-3 minutes—dairy-free fats can cause faster browning. Let the cake cool completely before glazing, as coconut-based substitutes may behave differently when hot. The flavor will still be rich and chocolate-forward, just with a subtle coconut undertone.
Vegan Modifications
For a fully vegan version, replace the 2 large eggs with 2 flax eggs (2 tbsp ground flaxseed + 6 tbsp water, mixed and rested for 5 minutes). The baking soda should be increased to 1 tsp to help with rise.
Use 1 cup dairy-free chocolate chunks (ensure they're vegan-certified) and 1 cup vegan dark chocolate for the glaze instead of powdered sugar and heavy cream. 🌱
The simple syrup can remain the same, but add 1 tsp apple cider vinegar to the wet ingredients to enhance browning. Bake at 325°F instead of 350°F for 40-45 minutes—vegan cakes often need a lower temperature to prevent over-browning.
The texture will be slightly denser but still chewy and decadent.
Lower-Sugar Version
Reduce the 1.5 cups granulated sugar to 1 cup and replace 0.5 cups with unsweetened applesauce or mashed banana. Use a sugar substitute blend like Swerve for the remaining 0.5 cups if needed, though I find the applesauce swap works best for moisture.
The espresso powder can be increased to 1.5 tbsp to deepen the chocolate flavor without added sweetness. 🍚
Cut the simple syrup to 0.15 cups and consider adding 1 tsp vanilla bean paste for extra flavor depth. The cake will still be rich and satisfying, just with a more balanced sweetness. Let it cool completely before glazing—lower-sugar cakes can dry out faster when hot.
Nut-Free Considerations
If you're avoiding nuts but still want that fudgy texture, skip the chocolate chunks and add 1 cup dairy-free chocolate chips (like Enjoy Life brand) instead.
For extra richness, fold in 0.5 cup dairy-free white chocolate chips in the final step. These alternatives provide the same melting pockets without nut risks. 🍫
The glaze can remain the same, but if you're avoiding dairy entirely, use a vegan powdered sugar glaze (like Confectioners' Sugar with Coconut Cream). The cake will still be moist and delicious, just with a slightly different finish.
Always check labels on chocolate chips for hidden nut traces if allergies are a concern.
Nutrition facts
Frequently asked questions about chewy chocolate cake
Why does this cake stay moist longer than other chocolate cakes?
The secret lies in the simple syrup and espresso powder combination. The syrup adds moisture while baking, and the espresso powder intensifies the chocolate flavor without drying out the crumb. Plus, the room-temperature butter creates air pockets that keep the cake tender for days.
Can I make this cake in a different pan size?
Yes! For a 8-inch pan, reduce baking time by 5-7 minutes (check at 25 minutes). For a 10-inch pan, increase time by 5-7 minutes (check at 40 minutes). Always use parchment paper to prevent sticking, and adjust oven racks to the middle position for even baking.
What's the best way to store leftovers?
Keep the cake in an airtight container at room temperature for up to 3 days—it actually tastes better as flavors meld. For longer storage, refrigerate for 1 week or freeze for 3 months. Thaw overnight in the fridge to preserve texture. The glaze stays fresh longer when stored this way.
Why did my cake turn out too dense?
Overmixing the batter develops gluten, making the cake tough. Mix dry ingredients just until combined (about 30-45 seconds) and avoid overbaking—check with a toothpick at 30 minutes. Cold butter or eggs can also cause density, so ensure they're at room temperature.
Can I add nuts or other mix-ins?
Fold in 1 cup chopped walnuts or pecans with the chocolate chunks, or try ½ cup crushed Oreos for extra richness. For a fruity twist, add ½ cup dried cherries. Just reduce baking time by 2-3 minutes