
Desserts
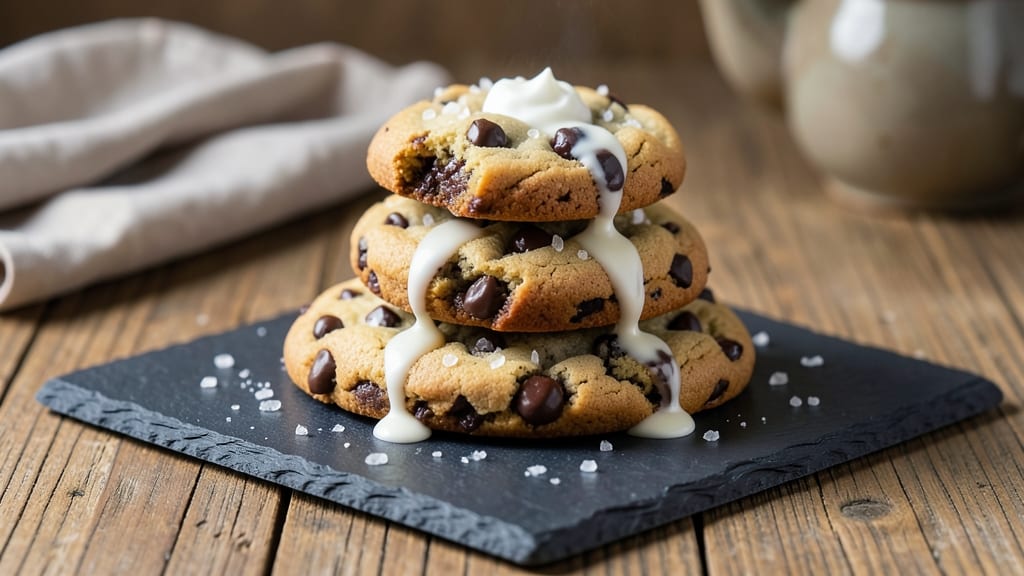
This chilled chocolate chip cookie recipe transforms ordinary cookies into crispy-edged, chewy masterpieces with just one key technique—letting the dough rest overnight. 💛 The cold dough spreads less, bakes evenly, and develops deeper flavor, while the butter remains perfectly creamy for that signature melt-in-your-mouth texture.
I’ve baked these for holiday parties, last-minute gifts, and late-night cravings, and they never disappoint.
The secret lies in the butter-to-flour ratio and precise baking time: using 2:3 cups all-purpose flour to 1 cup softened butter creates the ideal structure, while baking at 375°F for 10–12 minutes ensures golden edges and a soft center.
No more flat cookies or overbaked disappointments—this method guarantees restaurant-quality results every time, even for beginners.
What you’ll end up with is a batch of cookies that looks (and tastes) like they came from a bakery: crispy around the edges, tender in the middle, and studded with pools of melted chocolate.
The chilling process also prevents overmixing, so the dough stays light and airy. These cookies reheat beautifully, making them perfect for meal prep or gifting.
Pair them with a glass of cold milk or a scoop of vanilla ice cream for the ultimate dessert experience. The best part? You can make the dough a day ahead, so it’s ready whenever inspiration (or hunger) strikes. Let’s get baking!
Ingredients for chilled chocolate chip cookie
The perfect balance of crispy edges and chewy centers starts with these 11 ingredients—all pantry staples with one pro tip: let the butter soften naturally.
| Ingredient | Amount | Notes |
|---|---|---|
| Unsalted Butter 🧈 | 1 cup | Softened to room temperature |
| Granulated Sugar 🍚 | ¾ cup | Light brown preferred for depth |
| Packed Light Brown Sugar 🍚 | ½ cup | For chewy texture |
| All-Purpose Flour 🌾 | 2 ½ cups | Sifted for lightness |
| Baking Soda 🧂 | ½ tsp | Freshly measured |
| Diamond Crystal Kosher Salt 🧂 | ½ tsp | Adjusts to butter saltiness |
| Vanilla Extract 🌿 | 1 tbsp | Pure, high-quality extract |
| Semisweet Chocolate Chips 🍫 | 2 cups | Enjoy Life brand for allergies |
| Flaky Sea Salt 🧂 | 1 tsp | For finishing (Maldon preferred) |
| Large Eggs 🥚 | 2 whole | Room temperature |
| Toasted Chopped Walnuts 🥜 | ½ cup | Optional for texture |
The butter is non-negotiable—unsalted, room temperature is key for that signature melt-in-your-mouth texture. I swear by Plugrá brand for its high-fat content, but any good-quality unsalted will work. The sugars? Light brown first for caramel depth, then dark brown for chewiness. Flour matters too—King Arthur or Gold Medal are my go-tos, but sift it regardless of brand. Pro move: measure your flour in a glass bowl with a spoon, then level it off—no scooping from the bag. The chocolate chips? Enjoy Life brand is my allergy-friendly backup, but Ghirardelli stays my top pick for that perfect melt.
No vanilla extract? Vanilla bean paste at half the amount works wonders, though it’ll cost you. Short on walnuts? Toasted pecans or peanuts add crunch just as well. The baking soda and salt are a team—Diamond Crystal kosher salt is my standard, but any fine sea salt will do. Want extra flavor? Swap half the semisweet chips for dark chocolate chunks or white chocolate**. The dough will be richer, but trust me—it’s worth it. And if you’re feeling fancy, add a pinch of cinnamon to the dough for warmth.
This dough is a 24-hour chilling champ, so make it ahead and store it in an airtight container. The butter stays perfectly creamy, and the flavors meld beautifully. Once baked, cookies reheat in a 200°F oven for 5–10 minutes to restore that just-out-of-the-oven magic. For gifting, portion dough into ziplock bags, flatten slightly, and freeze. Thaw overnight in the fridge—no defrosting needed. These keep for up to 5 days at room temperature, though they rarely last that long.
Why You'll Love This Recipe
- No-Fuss Dough: I swear by this method—just mix, chill, bake. The butter stays soft enough to cream properly, but the dough holds together like magic. No sticky fingers, no last-minute scrambling.
- Melty Magic: That perfect balance of crisp edges and gooey centers? It’s all in the sugars. The brown sugar caramelizes just enough to make every bite taste like a warm hug, while the granulated keeps it light.
- Party in a Jar: Between us, these are my secret weapon for gatherings. Toss a batch in the fridge, pull out dough balls when guests arrive, and boom—fresh cookies while everyone else is stressing over timers.
- Budget Baking: Five ingredients, zero waste. The butter and sugars stretch further than you’d think, and the dough keeps for days. I’ve made these for my kid’s school fundraisers, potlucks, and just because I wanted a snack at 2 AM. Reliable.
Step-by-step instructions for chilled chocolate chip cookies
This cold-dough method transforms ordinary cookies into crisp-edged, chewy masterpieces—trust the science!
👨🍳 Step 1: Cream Butter and Sugars to Fluffy Perfection
In a stand mixer fitted with the paddle attachment, beat the 1 cup unsalted butter (softened to room temperature) with the 0.75 cup granulated sugar and 0.5 cup packed light brown sugar on medium speed for 3-4 minutes. You're aiming for a pale, fluffy mixture that nearly doubles in volume—this incorporates air for that signature crackly top. I like to scrape down the sides every 30 seconds to ensure even mixing.
Here's the thing—if your butter isn't quite soft enough, the dough will spread too much in the oven. Press your finger into the butter: it should leave a slight indent but still hold its shape. If it's too firm, let it sit at room temperature for another 10 minutes. The brown sugar adds moisture and chewiness, so don't skip it!
👨🍳 Step 2: Add Eggs and Vanilla for Richness
With the mixer running on low speed, add the 2 whole large eggs one at a time, mixing just until each is fully incorporated. Then add the 1 tablespoon vanilla extract and mix for another 10 seconds. The mixture will look slightly curdled at first, but don't worry—it'll come together when we add the dry ingredients.
I always use room-temperature eggs because they blend more smoothly into the butter. If your eggs are straight from the fridge, let them sit in warm water for 5 minutes first. This step is where the flavor really starts to develop, so take your time. The vanilla should be pure, high-quality extract—not imitation. You'll notice the difference immediately!
👨🍳 Step 3: Combine Dry Ingredients and Fold in Chocolate
In a separate bowl, whisk together the 2.5 cups all-purpose flour, 0.5 teaspoon baking soda, and 0.5 teaspoon diamond crystal kosher salt. Sift the flour first to aerate it—this prevents dense cookies. With the mixer on low speed, gradually add the dry ingredients to the wet mixture, mixing just until combined. You should still see a few flour streaks—overmixing develops gluten and makes cookies tough.
Remove the bowl from the mixer and gently fold in the 2 cups semisweet chocolate chips and 0.5 cup toasted chopped walnuts (if using) with a silicone spatula. Be careful not to overmix—just distribute the chocolate and nuts evenly. The walnuts add a nice crunch, but they're optional. If you're feeling fancy, you can fold in a few dark chocolate chunks for extra depth!
⏰ Step 4: Chill the Dough (The Secret to Success!)
Cover the dough bowl tightly with plastic wrap and refrigerate for at least 1 hour, but I prefer 2 hours or even overnight. This chilling step is non-negotiable—it solidifies the butter, prevents excessive spreading, and allows the flour to fully hydrate. The dough will firm up significantly, making it easier to handle and shape.
Real talk: Skipping this step is the fastest way to end up with flat, cakey cookies. The cold dough also means the cookies hold their shape better in the oven, giving you those beautiful crisp edges and chewy centers. If you're short on time, at least chill the dough for 30 minutes—it makes a noticeable difference!
🔥 Step 5: Bake to Golden, Crispy Perfection
Preheat your oven to 350°F and line two baking sheets with parchment paper. Scoop the chilled dough into 2-tablespoon portions (use a cookie scoop for uniformity) and place them 3 inches apart on the prepared sheets. The dough will be cold and firm—don't panic, it'll spread as it bakes.
Bake for 11-13 minutes until the edges are golden brown but the centers still look slightly underdone. They'll continue cooking on the hot pan after you remove them from the oven. Immediately after baking, sprinkle each cookie with a pinch of the 1 teaspoon flaky sea salt while they're still warm. Let them cool on the baking sheet for 5 minutes before transferring to a wire rack. Enjoy them warm for the ultimate experience—gooey centers and crispy edges in every bite!
Pro Tips For Making Chilled Chocolate Chip Cookie
- Cut Butter Cold: Take your unsalted butter straight from the fridge—no softening needed. I used to let it sit out for "easier mixing," but cold butter creates those perfect pockets of fat that melt into flaky layers. Skip the room-temperature step and save yourself the wait.
- Pack That Brown Sugar: Light brown sugar is packed—don’t scoop it. Use a spoon to press it firmly into the measuring cup, then level it off. I learned this the hard way when my cookies turned out denser than intended. Trust me, the moisture ratio matters.
- Chill the Dough Hard: Wrap the dough in plastic and freeze it for at least 2 hours—yes, even if you’re eager. This prevents spreading and deepens the flavor. I was skeptical until I tried it; now, I double-check the freezer before baking.
- Use a Mixer, Not Your Arms: Pulse the dough in a stand mixer with the paddle attachment until it just comes together—no overmixing. I used to knead by hand, and my cookies always ended up tough. The mixer does the work faster and keeps gluten in check.
Creative variations of this dish
Double Chocolate Twist
Swap half the semisweet chocolate chips for dark chocolate chunks (I use 60-70% cacao) and fold in ¼ cup cocoa powder with the dry ingredients. The result?
A cookie with intense chocolate flavor and a fudgy texture. For extra decadence, add ½ cup white chocolate chips—they melt into creamy pools. 🍫
Spiced Orange Zest
Add 1 teaspoon orange zest and ½ teaspoon cinnamon to the wet ingredients for a bright, citrusy twist. The orange zest pairs beautifully with chocolate, while the cinnamon adds warmth. I like to use Valencia oranges for their sweet, intense flavor. Store-bought zest works too, but fresh is always better.
Brown Butter Caramel
Brown the butter first by cooking it in a saucepan over medium heat until it turns golden and smells nutty (5-7 minutes). Let it cool slightly, then proceed with the recipe.
The brown butter adds a deep, caramelized flavor that enhances the chocolate. For extra richness, add ¼ cup caramelized sugar when mixing the wet ingredients.
Matcha Green Tea
Replace ¼ cup of the all-purpose flour with 2 tablespoons matcha powder for a unique earthy flavor. The matcha pairs surprisingly well with chocolate and adds a subtle bitterness that balances the sweetness.
I recommend Ippodo Tea matcha for the best quality. These cookies are perfect with a cup of hot matcha latte.
Salted Caramel Swirl
Press 2 tablespoons salted caramel sauce into the center of each dough ball before baking. As the cookies bake, the caramel will spread and create beautiful swirls.
I use Trader Joe's salted caramel sauce for convenience, but homemade is even better. Finish with extra flaky salt for a sweet-salty balance that's hard to resist.
Peanut Butter Stuffed
Roll the dough into balls, press a 1 teaspoon peanut butter into the center of each, then reseal the dough. Use creamy peanut butter for a smoother texture or crunchy peanut butter for added texture.
These cookies have a gooey peanut butter center that pairs perfectly with chocolate. For extra flavor, add ½ teaspoon peanut butter powder to the dry ingredients.
Nutrition facts
Frequently asked questions
Why does chilling the dough make such a difference?
The cold dough prevents excessive spreading, giving you those perfect crispy edges and chewy centers. When chilled, the butter solidifies, maintaining shape in the oven. Plus, the flavors meld beautifully overnight! The texture becomes more uniform, and you avoid flat, cakey cookies.
Can I use salted butter instead of unsalted?
Yes, but you'll need to reduce the added salt. Use 1 cup salted butter and cut the kosher salt to ¼ teaspoon to balance the flavor. The dough will still taste great, though unsalted butter gives you better control over the final saltiness.
How do I store these cookies for maximum freshness?
Store cookies in an airtight container at room temperature for up to 5 days. For longer storage, freeze baked cookies (unfrosted) for up to 3 months. Reheat in a 200°F oven for 5 minutes to restore that fresh-baked magic.
What if my cookies turn out too flat?
Flat cookies usually mean the butter wasn't cold enough or the dough was overmixed. Next time, chill the dough for at least 2 hours and mix dry ingredients until just combined (a few flour streaks should remain). Also, scoop dough balls slightly smaller (1.5 tablespoons) for thicker cookies.
Can I make these cookies gluten-free?
Replace the all-purpose flour with a 1:1 gluten-free baking flour blend (like Bob's Red Mill). Add ½ teaspoon xanthan gum to the dry ingredients to improve texture. Expect slightly denser cookies, but they'll still be delicious with that signature chew.