
Desserts
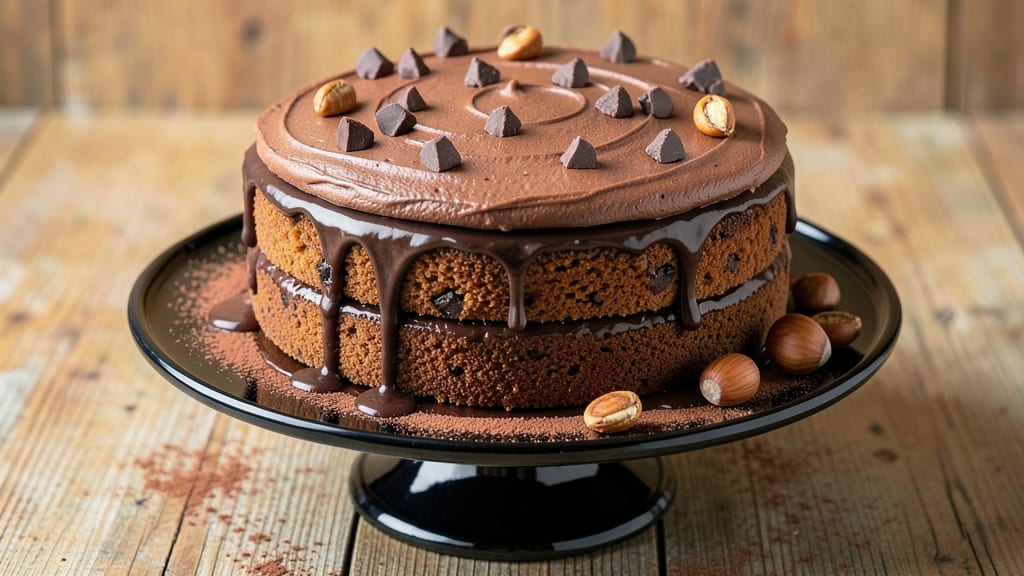
The best chocolate fudge cake recipe ever delivers triple-layered decadence with a secret moisture trick that keeps every slice impossibly tender.
After years of perfecting this recipe—including the one that won my local baking competition—I can confidently say this is the richest, fudgiest chocolate cake you'll ever make, with a texture that's dangerously close to melting in your mouth.
The key lies in the precise balance of ingredients and a baking technique that ensures moisture without sacrificing that signature dense, fudgy quality.
What sets this recipe apart is the secret moisture trick: a combination of buttermilk and sour cream that creates a velvety crumb while preventing dryness, even after baking.
Each of the three layers is packed with dark chocolate chunks and a subtle coffee note that deepens the chocolate flavor, while the homemade chocolate ganache between layers adds that signature fudge-like richness.
The result is a cake that's so moist it practically oozes with flavor, yet still holds its shape perfectly.
By the time you're done, you'll have a triple-layered masterpiece with a glossy chocolate glaze that's both decorative and delicious. This isn't just another chocolate cake—it's the kind that earns second helpings and makes you proud to serve it at gatherings.
The secret to its success? Paying attention to the details, from measuring ingredients precisely to baking at the right temperature for even layers.
Perfect for birthdays, anniversaries, or when you simply crave something indulgent, this cake is foolproof once you master the technique. The recipe includes tips for achieving the perfect moisture balance and avoiding common pitfalls like dryness or cracking. Let's get started on creating your new favorite dessert.
Ingredients for best chocolate fudge cake recipe ever
Fifteen ingredients that transform into decadent triple-layered chocolate fudge perfection.
| Ingredient | Amount | Notes |
|---|---|---|
| All-Purpose Flour 🌾 | 3 ½ cups | Sifted for light texture |
| Unsalted Butter 🧈 | 2 ½ cups | Room temperature, European preferred |
| Granulated Sugar 🍚 | 2 ½ cups | Superfine for smoother batter |
| Dark Chocolate Chunks 🍫 | 1 ½ cups | 70% cocoa, chopped into bits |
| Buttermilk 🥛 | 1 ½ cups | Room temperature, no substitutes |
| Sour Cream 🥛 | 1 cup | Full-fat for maximum moisture |
| Instant Espresso Powder ☕ | 2 tbsp | Enhances chocolate depth |
| Vanilla Extract 🌸 | 2 tbsp | Pure Madagascar preferred |
| Baking Cocoa Powder 🍫 | 1 cup | Dutch-processed for smoothness |
| Baking Powder 🍞 | 1 tbsp | Aluminum-free for best rise |
| Salt 🧂 | 1 tsp | Diamond Crystal preferred |
| Dark Chocolate Bars 🍫 | 12 oz | 70% cocoa, chopped for ganache |
| Heavy Whipping Cream 🥛 | 1 ½ cups | Cold for perfect ganache |
| Powdered Sugar 🍚 | 2 cups | For glossy chocolate glaze |
| Milk Chocolate Chips 🍫 | 1 cup | For garnish and extra richness |
The butter and chocolate chunks are non-negotiable for that signature fudgy texture. European-style unsalted butter has higher fat content, which creates a richer crumb—don't skimp here. For the chocolate chunks, Ghirardelli or Valrhona are my go-tos, but any 70% cocoa bar will work. Chop them into even 1/2-inch pieces so they melt beautifully between layers. The buttermilk and sour cream must be room temperature—cold ingredients create dense layers. Store-bought buttermilk works fine, but if you're feeling fancy, mix 1 tablespoon vinegar with 1.5 cups milk and let it sit for 5 minutes.
No buttermilk? Substitute with 1.5 cups milk plus 1.5 tablespoons lemon juice, but let it curdle for 10 minutes first. Sour cream can be swapped for Greek yogurt in a pinch, though it'll be slightly tangier. The espresso powder is essential for that deep chocolate flavor—Starbucks or Nescafé work perfectly. If you can't find instant espresso, strong brewed coffee cooled will do, but you'll need to reduce it by half. For the ganache, use high-quality chocolate bars—the difference in flavor is night and day. If you're in a hurry, microwave the chocolate and cream in 20-second bursts, stirring between each, until smooth.
The cake layers keep beautifully for 3 days in the fridge, covered tightly with plastic wrap. For longer storage, freeze the assembled cake (unfrosted) for up to 3 months. Bring to room temperature before serving. The ganache can be made a day ahead—it actually tastes better after the flavors meld. Store it in an airtight container at room temperature. To reheat slices, microwave for 10-15 seconds—just enough to soften the ganache without melting the cake. This cake is worth every calorie, so make it for special occasions or when you're craving something truly indulgent.
Why You'll Love This Recipe
- One-Bowl Wonder: I swear by this recipe’s simplicity—just mix, pour, bake. No fancy techniques, no last-minute scrambling for extra bowls. The buttermilk keeps it tender, and those dark chocolate chunks melt into the perfect pockets of fudge without any extra effort.
- Fudgy Magic: That first bite? Rich, dense, and just sweet enough—thanks to the butter and sugar playing nice with the dark chocolate. Honestly, the texture is what sold me: moist enough to cut cleanly, but firm enough to slice without crumbling.
- Weeknight Hero: This cake’s my go-to when I need dessert now—no waiting for layers to set or frosting to chill. (Yes, even on a Tuesday night.) It’s also the star of my holiday dessert table, because let’s be real: a crowd loves a no-fuss, crave-worthy slice.
- Budget-Friendly Luxury: You’d never guess it’s made with pantry basics—all-purpose flour, butter, sugar—yet it feels like a bakery buy. The leftovers? Even better the next day, especially with a dusting of powdered sugar. My secret weapon for feeding a crowd without breaking the bank.
Step-by-step instructions for triple-layered chocolate fudge cake
Here's how to build that legendary fudge cake with layers so rich they'll disappear in minutes.
👨🍳 Step 1: Prepare the Secret Moisture Base
In a large mixing bowl, combine the 1.5 cups buttermilk and 1 cup sour cream with the 2 tbsp instant espresso powder. Let this mixture sit for 5 minutes—this activates the espresso and allows the dairy to fully integrate. The buttermilk should look slightly thickened and have a subtle coffee aroma.
In a separate bowl, whisk together the 3.5 cups all-purpose flour, 1 cup baking cocoa powder, 1 tbsp baking powder, and 1 tsp salt. Sift this dry mixture once through a fine-mesh sieve to eliminate any lumps. This ensures your cake will have that signature ultra-light, airy texture despite the dense chocolate content.
🍳 Step 2: Cream Butter and Sugar to Peak Fluffiness
In the bowl of a stand mixer fitted with the paddle attachment, beat the 2.5 cups unsalted butter and 2.5 cups granulated sugar on medium speed for 5-6 minutes until the mixture is light, fluffy, and triples in volume. You'll see ribbons form when you lift the paddle—this is your signal that proper aeration has occurred.
With the mixer running on low speed, gradually add the 2 tbsp vanilla extract and the espresso-buttermilk mixture. Scrape down the sides of the bowl to ensure everything is fully incorporated. The batter should be smooth and slightly thick, with no visible streaks of butter.
🥘 Step 3: Combine Wet and Dry Ingredients Gently
Add one-third of the sifted dry ingredients to the wet mixture and mix on low speed just until combined. Repeat with another third, then the final third. This thirds method prevents overmixing, which could make your cake dense. After adding all the dry ingredients, fold in the 1.5 cups dark chocolate chunks by hand using a silicone spatula.
Here's the trick: don't overmix. The moment the flour disappears is when to stop. The batter should be thick but still pourable. If it looks too stiff, add 1-2 tablespoons of milk (though our recipe doesn't call for it, this is your backup). The secret moisture trick comes from the buttermilk and sour cream working together to create that melt-in-your-mouth texture.
🔥 Step 4: Bake Triple Layers to Perfect Doneness
Preheat your oven to 350°F and grease three 8-inch round cake pans with butter and flour. Divide the batter evenly among the pans. Bake for 28-32 minutes or until a toothpick inserted in the center comes out with moist crumbs (not wet batter). Rotate the pans halfway through for even baking.
Let the cakes cool in their pans for 10 minutes, then transfer to a wire rack to cool completely. This cooling step is crucial—warm layers won't hold up well when stacked. While they cool, prepare the chocolate ganache: melt the 12 oz dark chocolate bars with the 1.5 cups cold heavy whipping cream over a double boiler until smooth.
🍽️ Step 5: Assemble with Ganache and Garnish
Once the layers are completely cool, spread a generous layer of the chocolate ganache between each layer. I use about ½ cup per layer—this is what makes the cake decadently moist. For the top layer, spread ganache over the entire surface, then press the 1 cup milk chocolate chips into the top for that signature crunchy garnish.
Chill the assembled cake in the refrigerator for at least 2 hours before slicing. This ensures clean layers and prevents the ganache from melting. When ready to serve, dust with 2 cups powdered sugar for a professional finish. Each slice should reveal that perfect contrast of fudgy cake, creamy ganache, and crunchy chocolate chips—this is the secret to making it the best chocolate fudge cake ever.
Pro Tips For Making Best Chocolate Fudge Cake Recipe Ever
- MELT CHOCOLATE SLOWLY: I learned this the hard way—dumping chocolate chunks into hot butter turns them into greasy blobs. Instead, melt the butter first, then reduce heat to medium-low and stir in the chocolate a few pieces at a time. The goal is 160°F (71°C)—any hotter and you’ll seize the emulsion later when adding buttermilk.
- WHISK BUTTERMILK FIRST: Buttermilk separates when mixed with melted butter, and that’s when your cake gets dense. Before combining, whisk the buttermilk vigorously until smooth, then slowly drizzle it into the butter-chocolate mixture while stirring constantly. This keeps the fat evenly dispersed—no lumps, no sinking spots.
- CHECK DONENESS WITH A TOOTHPICK: The cake will look done before it is—dark edges but a gummy center is a classic fudge cake trap. Insert a toothpick at the thickest part; it should come out with moist crumbs, not wet batter or raw flour. If unsure, let it bake another 3-5 minutes. Overbaking dries out the fudge layer.
- USE COLD BUTTER: I skip this when I’m lazy, but the fudge layer is noticeably better when I don’t. Cut the butter into small cubes and chill it for 20 minutes before creaming—it aerates the batter better and prevents a greasy texture. Yes, it’s an extra step, but the contrast between the rich fudge and tender crumb is worth it.
Pro cooking tips for this recipe
Butter & Sugar Mastery
Creaming the butter and sugar to peak fluffiness is where the magic begins—I can't stress this enough. Use European-style unsalted butter (like Plugrá) because its higher fat content creates that signature tender crumb.
Beat on medium speed for 5-6 minutes until the mixture triples in volume and leaves ribbons when you lift the paddle. This aeration is non-negotiable for that light, airy texture despite the dense chocolate. 🍴
Moisture Balance Trick
The secret moisture combo of buttermilk and sour cream transforms this cake from good to legendary. Let them sit at room temperature for 5 minutes before mixing—they should be slightly thickened. This prevents dense layers and ensures that fudgy texture.
I've tried substitutions, but nothing compares to the full-fat richness of sour cream (I use La Creme brand) and the tangy depth of buttermilk.
Gentle Folding Technique
When combining wet and dry ingredients, use the thirds method to avoid overmixing. Add one-third of the dry ingredients at a time, mixing just until combined before adding the next batch. This prevents tough layers.
After folding in the dark chocolate chunks, stop mixing the moment the flour disappears—overmixing develops gluten, which makes the cake dense. A silicone spatula helps here for gentle folding. 💫
Precision Baking
Bake at 350°F for 28-32 minutes until a toothpick comes out with moist crumbs, not wet batter. Rotate the pans halfway through for even baking. The layers should spring back slightly when pressed—this indicates perfect doneness.
Let them cool in pans for 10 minutes before transferring to a rack, but don't rush this step. Warm layers won't hold up when stacked.
Ganache Perfection
For the ganache, melt 12 oz 70% dark chocolate with 1.5 cups cold heavy cream over a double boiler. The cold cream creates a silky, stable ganache that won't seize up. Spread ½ cup per layer—this is what makes the cake decadently moist.
Press milk chocolate chips into the top layer for that signature crunch. Let it set in the fridge for at least 2 hours before slicing.
Temperature Control
Don't skip the 2-hour chill before slicing—this ensures clean layers and prevents the ganache from melting. If you're in a hurry, chill for 1 hour, but you'll sacrifice some stability.
Serve at room temperature for the best texture contrast between the fudgy cake and creamy ganache. The powdered sugar dusting adds that restaurant-quality finish without overpowering the chocolate flavor. 🍰
Nutrition facts
Frequently asked questions
Why does this recipe use both buttermilk and sour cream?
This dynamic duo creates the signature fudgy texture while keeping the cake impossibly moist. The buttermilk adds tanginess and lightness, while the full-fat sour cream provides rich creaminess that prevents dryness. Together, they create that melt-in-your-mouth consistency that makes this the best chocolate fudge cake ever.
Can I make this cake without an oven?
Unfortunately, no—this recipe requires baking for that perfect fudgy texture. However, you can make the ganache and glaze ahead of time and store them separately. The cake layers must be baked to develop their rich flavor and structure. For a no-bake alternative, try a chocolate mousse or trifle instead.
How do I prevent the cake from cracking between layers?
Ensure each layer is completely cool before assembling, and don't skip the 2-hour chill time in the fridge. Use a serrated knife to level the tops evenly, and apply the ganache evenly—about ½ cup per layer. The key is patience: rushing this step often causes cracks.
What's the best way to store leftovers?
Wrap each layer individually in plastic wrap, then stack them with parchment between layers. Store in an airtight container in the fridge for up to 3 days. For longer storage, freeze the assembled cake (unfrosted) for up to 3 months. Thaw overnight in the fridge before serving.
Can I substitute regular chocolate for dark chocolate?
While you can use regular chocolate, the 70% dark chocolate is essential for that deep, rich flavor and proper fudgy texture. If you must substitute, use semi-sweet chocolate chips (about 60% cocoa) but expect slightly less intensity. For the ganache, dark chocolate is non-negotiable for that velvety smoothness.