
Desserts
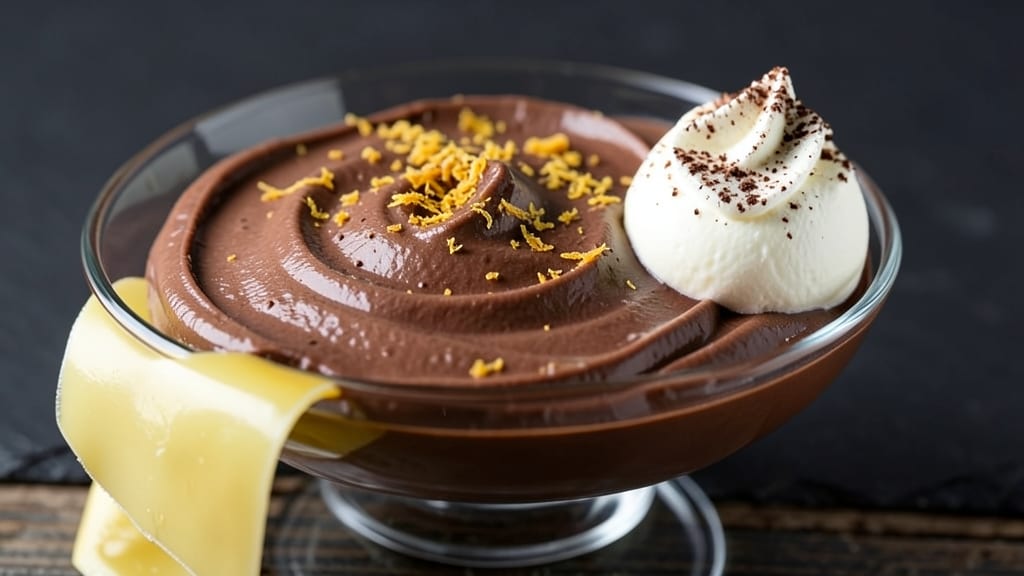
This bittersweet chocolate ganache recipe delivers velvety ribbons of silky-smooth decadence that elevate desserts from ordinary to extraordinary. 💛 The perfect 2:1 chocolate-to-cream ratio creates a glossy, pourable sauce with just the right balance of richness and bitterness—no graininess, no separation, just pure, luxurious chocolate magic.
What sets this ganache apart is its versatility—use it to layer tiramisu, drizzle over fresh berries, or even stir into cocktails for a sophisticated twist. The secret lies in precise temperature control and high-quality ingredients, ensuring every batch turns out perfectly smooth and glossy every time.
Once made, this ganache keeps beautifully in the fridge for up to 2 weeks or freezes for 3 months, making it the ultimate make-ahead dessert solution. Whether you're a home baker or a professional chocolatier, this recipe will become your go-to for adding that restaurant-quality finish to any sweet creation.
The best part? With just two core ingredients and a few optional flavor boosters like vanilla, espresso, or citrus zest, you can customize this ganache to suit any dessert theme or personal preference. Let's get started on creating your perfect chocolate sauce.
Ingredients for bittersweet chocolate ganache
Two core ingredients plus creative boosters—this is your gateway to restaurant-quality chocolate magic.
| Ingredient | Amount | Notes |
|---|---|---|
| Bittersweet Chocolate Chips 🍫 | 12 oz | 70% cacao minimum for balance |
| Heavy Whipping Cream 🥛 | 6 oz | Full-fat, cold from fridge |
| Unsalted Butter 🧈 | 4 oz | Room temperature for smooth blend |
| Pure Vanilla Extract 🌿 | ½ tsp | Optional for depth of flavor |
| Instant Espresso Powder ☕ | ¼ tsp | For mocha variation |
| Orange Zest 🍊 | 1 tsp | Freshly grated for citrus brightness |
| Kosher Salt 🧂 | ⅛ tsp | Balances sweetness |
| Granulated Sugar 🍚 | 1 tbsp | Adjusts texture if needed |
The chocolate and cream are non-negotiable for that signature velvety texture. Valrhona or Callebaut chocolate chips are my go-to—they melt perfectly every time. For the cream, organic full-fat from Whole Foods gives the richest results, but any heavy cream works. Pro tip: chill your mixing bowl first to prevent the cream from warming too fast. Butter is the secret weapon here—it adds body and prevents graininess, so don't skip it. If you're feeling fancy, European-style unsalted butter like Plugrá elevates the whole dish.
No vanilla? Vanilla bean paste works too—just use half the amount. Want a mocha twist? The espresso powder is your friend, but instant is key—it dissolves completely. Citrus lovers can go wild with orange zest, but lemon or lime zest works in a pinch. Need to adjust sweetness? The granulated sugar is your backup, but honestly, the chocolate should be the star. If your ganache seems too thick, a splash of warm cream can fix it—just don't overdo it, or you'll lose that glorious gloss.
This ganache is a make-ahead dream. Store it in an airtight container in the fridge for up to 2 weeks, or freeze for 3 months in portions. To reheat, microwave in 20-second bursts until smooth. For that restaurant-quality drizzle, let it sit at room temperature for 10-15 minutes—patience is key. And if you make a double batch? Trust me, you will. It disappears faster than you think.
Why You'll Love This Recipe
- Three-Ingredient Magic: I swear by this combo—chocolate, cream, butter. That’s it. No fussing with tempering, no waiting for tempered chocolate to behave. Just melt, pour, stir. (Yes, even on a Tuesday night when I’ve got a million things going on.)
- Deep, Dark Satisfaction: The espresso powder isn’t just a trick—it wakes up the bittersweet chocolate. Rich, complex, with that little coffee kiss that makes every bite feel like a grown-up treat. The vanilla? Just enough to tie it all together without stealing the show.
- Weeknight or Showstopper: Drizzle it over cake, fold it into ice cream, or pile it on toast with berries. It’s my go-to for last-minute desserts, but honestly? It’s just as good when I’m impressing guests. (Between us, they’ll never guess it took me 15 minutes.)
- No-Waste Luxury: Make a double batch—it keeps for days in the fridge, and you’ll reach for it again. Spread it on pound cake, stuff it in truffles, or just eat it straight from the jar. (My daughter picks out the butter chunks, but still asks for seconds.) Plus, bittersweet chocolate is cheaper than milk—so you get more for your money.
Step-by-step instructions for bittersweet chocolate ganache
Here's how to craft silky-smooth ganache with perfect texture and depth of flavor.
🍳 Step 1: Heat the Cream and Infuse the Flavor
Pour the 6 oz Heavy Whipping Cream into a medium saucepan and place it over medium heat. Let it warm gently until small bubbles form around the edges and the cream reaches 170°F (about 5-7 minutes). This temperature is crucial—too hot and you'll scorch the cream, too cool and the chocolate won't melt properly.
While the cream heats, combine the 0.25 tsp Instant Espresso Powder, 1 tsp Orange Zest, 0.5 tsp Pure Vanilla Extract, 0.125 tsp Kosher Salt, and 1 tbsp Granulated Sugar in a small bowl. Whisk until fully dissolved. This aromatic blend will infuse the cream with complex layers of flavor before it meets the chocolate.
Just before the cream reaches temperature, remove it from heat and stir in the spice mixture. Let it steep for 2 minutes to fully incorporate the flavors. The cream should now smell richly aromatic—like a mocha latte with a citrus twist. This infusion step is what transforms ordinary ganache into something extraordinary.
🍳 Step 2: Melt the Chocolate and Butter
While the cream infuses, place the 12 oz Bittersweet Chocolate Chips and 4 oz Unsalted Butter in a large, heatproof bowl. I use a stainless steel or glass bowl for even heat distribution. Set this bowl over a pot of barely simmering water (double boiler method), ensuring the bottom of the bowl never touches the water.
Let the chocolate and butter melt together, stirring occasionally with a silicone spatula. The chocolate should melt in about 8-10 minutes, creating a glossy, liquid mixture. You'll know it's ready when it reaches 110-115°F—just warm enough to flow like honey but not so hot it loses its chocolate character.
Here's the thing—don't walk away. Chocolate burns quickly, and once it seizes, you're starting over. Watch for the moment when the butter fully incorporates, creating a smooth, molten chocolate base. This is your foundation for velvety ganache.
🥘 Step 3: Combine and Whisk to Perfection
Remove both the infused cream and melted chocolate from their heat sources. Pour the warm cream in a slow, steady stream over the melted chocolate while whisking continuously. This gradual addition prevents the chocolate from seizing and creates the perfect emulsion.
Whisk vigorously for 2-3 minutes until the mixture becomes glossy and smooth. You should hear a gentle whooshing sound as the ganache thickens. The texture should transform from chunky to silky, with ribbons forming when you lift the whisk. If you see any lumps, gently press them through a fine-mesh sieve for that restaurant-quality finish.
This is where the magic happens. The fat in the cream coats the cocoa particles, creating that signature sheen and velvety mouthfeel. Real talk: if you skip the whisking or rush this step, you'll end up with grainy ganache. Be patient—those few minutes of whisking make all the difference.
⏰ Step 4: Rest and Adjust the Texture
Cover the bowl with plastic wrap, pressing the wrap directly onto the surface of the ganache to prevent a skin from forming. Let it rest at room temperature for 15-20 minutes. This resting period allows the ganache to thicken to the perfect pouring consistency—neither too thin nor too stiff.
After resting, give the ganache one final whisk to ensure smoothness. If it's too thick for your needs (like for filling), gently warm it over a double boiler for 10-15 seconds while whisking continuously. For a firmer texture (like for truffles), chill it in the refrigerator for 10 minutes. You'll know it's ready when it holds its shape but still flows easily when poured.
The ganache should now be at its peak—glossy, silky, and ready to transform your desserts. The flavor should be complex: rich bittersweet chocolate with bright citrus notes, a subtle espresso depth, and just enough salt to balance the sweetness. This is the ganache that will make your layered desserts truly decadent.
Pro Tips For Making Bittersweet Chocolate Ganache
- Temper the cream: Heat the heavy whipping cream just until it’s steaming—no bubbles, no boiling. I learned this the hard way after watching my ganache seize up like scrambled eggs. Use a thermometer if you’re unsure: aim for 160°F (71°C). Overheating breaks the fat in the cream, and your ganache will never recover.
- Chop the chocolate: Skip the chips—break the bittersweet chocolate into uneven chunks. The rough edges melt faster and more evenly, avoiding those stubborn pockets of unmelted chocolate that turn your ganache into a lumpy mess. A sharp knife works better than a blender here; you’re not making ganache smoothie.
- Don’t rush the butter: Let the unsalted butter cool to room temperature before adding it to the warm ganache. Cold butter creates a grainy texture, and you’ll end up with a product that looks like it was made in a food processor instead of a loving kitchen. Five minutes out of the fridge is enough—yes, even if you’re impatient like me.
- Bloom the espresso: Mix the instant espresso powder directly into the warm cream before pouring it over the chocolate. This ensures the coffee flavor is fully dissolved and distributed, not just floating on top like a sad, bitter afterthought. Stir it in like you’re making a latte, not just sprinkling it on.
Best sauces and condiments for this bittersweet chocolate ganache
Classic Ganache Uses
This bittersweet ganache shines as a tiramisu layering sauce—spread between coffee-soaked ladyfingers for that signature Italian elegance.
For a chocolate martini, drizzle 2 tbsp over vanilla ice cubes in a cocktail shaker for a sophisticated twist. 💛 I also love using it to glaze chocolate-covered strawberries or drizzle over warm brownies for that restaurant-quality finish.
Fruit Pairings
Bright citrus flavors cut through the richness beautifully. Try pairing with raspberries or blackberries—the tartness balances the ganache's depth. For a tropical twist, add ½ tsp lime zest to the cream before combining. A mango or passionfruit coulis alongside ganache creates a stunning dessert presentation.
Bakery Applications
Use this ganache to fill chocolate croissants or drizzle over éclairs for a showstopping finish. For chocolate cake layers, spread ½ cup between frosting layers and chill for 30 minutes before serving. The butter in the ganache adds a luxurious mouthfeel that separates it from regular chocolate glaze.
Savory Twists
Surprise your guests by using ganache as a dipping sauce for dark chocolate truffles alongside salty pretzels. For a chocolate-balsamic reduction, simmer ¼ cup balsamic vinegar with 2 tbsp ganache until thickened—perfect for drizzling over aged cheddar or prosciutto. The bitterness in the chocolate enhances the savory flavors.
Make-Ahead Hacks
Prepare ganache 2 days ahead and store in an airtight container in the fridge. Reheat in 10-second microwave bursts, stirring between each, until smooth. For truffle centers, chill ganache until firm, then roll into balls and dip in cocoa powder.
Freeze extras in ice cube trays for easy portioning—just pop out and melt as needed. ✨
Unexpected Uses
Stir 1 tbsp ganache into hot chocolate for a velvety upgrade. Use as a glaze for roasted nuts (almonds or pecans) by brushing warm ganache over them and chilling.
For a chocolate fondue, mix equal parts ganache with white chocolate** for a smoother, richer dip. The possibilities are endless once you master this versatile sauce!
Nutrition facts
Frequently asked questions
What's the ideal chocolate-to-cream ratio for silky ganache?
The perfect balance is 2:1 chocolate to cream—12 oz bittersweet chocolate to 6 oz heavy cream. This ratio creates that signature glossy, velvety texture without being too thick or too runny. The butter adds body, so don't skip it! Too much cream makes ganache too thin for proper layering.
Why did my ganache seize up and turn grainy?
This usually happens when chocolate cools too fast or water gets in. Always use room-temperature butter and melt chocolate gently over a double boiler. If it seizes, whisk in 1 tsp warm cream at a time until smooth. Pro tip: Keep your mixing bowl chilled while working to slow cooling.
Can I make this ganache without butter?
Technically yes, but it'll lack that luxurious mouthfeel. Butter adds fat content that prevents graininess and creates a richer texture. For a lighter version, use 2 extra oz of cream instead, but expect slightly less stability when chilled. The butter is what makes this ganache truly professional-quality!
How do I adjust the sweetness level?
Since we're using 70% cacao chocolate, it's naturally less sweet. For extra richness, add ½ tsp granulated sugar to the cream mixture. Need more balance? A pinch of salt enhances the chocolate flavor without adding sweetness. If your ganache tastes too bitter, try adding 1 tsp honey to the warm cream before combining.
What's the best way to store leftover ganache?
Store in an airtight container in the fridge for up to 2 weeks, or freeze in portions for 3 months. To reheat, microwave in 10-second bursts while stirring between each. For perfect drizzling consistency, let it sit at room temperature for 10-15 minutes before using. The key is preventing moisture exposure!