
Desserts
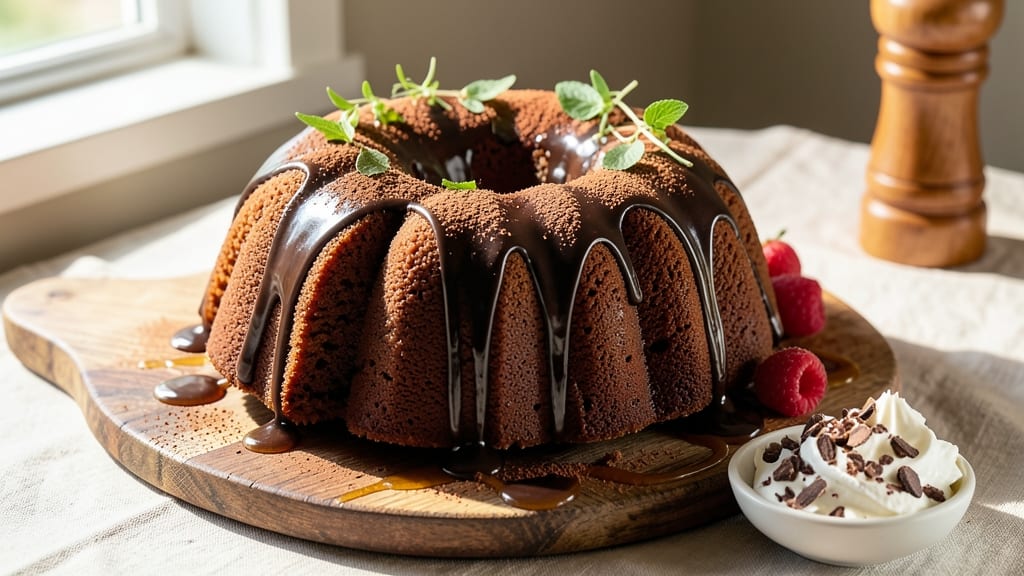
This bundt pan chocolate cake delivers the perfect balance of a crispy top and a fudgy core that melts in your mouth. 💛 The secret lies in precise baking techniques and a well-oiled pan that ensures easy release—no sticking, no stress.
I've perfected this recipe over years of testing, and it consistently impresses even the most skeptical dessert lovers.
The cake's magic comes from a simple yet effective batter that combines rich cocoa powder with just the right amount of buttery goodness. A touch of coffee enhances the chocolate flavor, while a sprinkle of nuts on top adds crunch without overpowering the fudgy texture.
The bundt pan creates those iconic ridges and peaks, making every slice look as good as it tastes.
Baking at the perfect temperature ensures a moist interior and a crackly top that's impossible to resist. This recipe delivers restaurant-quality results with minimal effort—no fancy equipment, just a standard bundt pan and a few simple ingredients.
The cake stays tender for days, making it perfect for gatherings or a special treat.
Once baked, you can serve it plain or with a dusting of powdered sugar, a drizzle of chocolate ganache, or fresh berries for a pop of color. The possibilities are endless, but the cake stands strong on its own as a decadent dessert that never disappoints. Let's get baking!
Ingredients for bundt pan chocolate cake
Just 13 ingredients transform your kitchen into a chocolate lover's paradise—crispy top, fudgy core, and that perfect bundt shape!
| Ingredient | Amount | Notes |
|---|---|---|
| All-Purpose Flour 🌾 | 2 cups | Sifted for light texture |
| Unsalted Butter 🧈 | 1 cup | Room temperature, full-fat |
| Granulated Sugar 🍚 | 2 cups | White or light brown |
| Cocoa Powder 🍫 | ¾ cup | Natural or Dutch-processed |
| Instant Espresso Powder ☕ | 2 tbsp | Enhances chocolate flavor |
| Large Eggs 🥚 | 2 whole | Room temperature |
| Vanilla Extract 🌸 | 1 tbsp | Pure, high-quality extract |
| Milk 🥛 | 1 cup | Whole milk preferred |
| Baking Powder 🧂 | 1 tsp | Aluminum-free preferred |
| Salt 🧂 | ½ tsp | Fine sea salt |
| Walnuts 🥜 | ½ cup | Chopped, toasted lightly |
| Powdered Sugar 🍚 | ¼ cup | For dusting, optional |
| Vegetable Oil 🫒 | 1 tbsp | For bundt pan coating |
The cocoa powder is where the magic happens—Ghirardelli or Hershey's Special Dark are my go-tos, but any natural cocoa works. For the walnuts, Trader Joe's or Costco sell them pre-chopped and toasted, saving you time. The butter needs to be room temperature (press it gently—if it leaves a dent, it's ready). Pro tip: Sift the flour and cocoa together to avoid lumps, and don't skip the espresso powder—it deepens the chocolate flavor without tasting like coffee. If you're feeling fancy, grab a 16-ounce bundt pan for that classic look.
No espresso powder? Instant coffee granules at half the amount work too, or skip it entirely—just add an extra pinch of salt. Running low on walnuts? Pecans or hazelnuts add a different crunch but still shine. The milk can be swapped for heavy cream for extra richness or almond milk if you prefer a lighter texture. For the butter, if you're in a pinch, vegetable shortening keeps the cake moist but loses that buttery flavor. And if you're worried about the cake sticking? Line the pan with parchment for foolproof release—no greasing needed!
This cake keeps beautifully for 4-5 days in an airtight container at room temperature, though it's best enjoyed fresh. For a showstopper, dust with powdered sugar right after baking while it's still warm. The nuts stay crispy for about 3 days if stored in a sealed container. Freeze portions for up to 3 months—just thaw at room temperature and warm in the oven for 10 minutes to restore that perfect crunch. Leftovers? Toss them in the freezer for quick chocolate cake pops later!
Why You'll Love This Recipe
- Same recipe, different vibes: slice it for breakfast with whipped cream or frost it for a birthday. Honestly, it’s my go-to when I need something impressive but don’t want to slave over it.
- No Mixer Needed: I swear by this—just cream butter and sugar, crack eggs, and fold in dry stuff. The bundt pan does all the work for you, so no stress over overmixing or uneven layers.
- Deep Chocolate Magic: That pinch of instant espresso powder? It’s the secret weapon—boosts the cocoa flavor without tasting like coffee. Rich, fudgy, and just sweet enough to make you forget it’s "healthy" (kidding, it’s not).
- Weeknight or Celebration: Same recipe, different vibes: slice it for breakfast with whipped cream or frost it for a birthday. Honestly, it’s my go-to when I need something impressive but don’t want to slave over it.
Step-by-step instructions for bundt pan chocolate cake
Here's how to bake a showstopper with a crackly top and decadent center—every slice will impress!
👨🍳 Step 1: Prep the Bundt Pan and Mix Dry Ingredients
Start by coating your bundt pan with 1 tablespoon vegetable oil, then dust it generously with 2 cups all-purpose flour, tapping out any excess. This creates a non-stick barrier that prevents sticking—trust me, it makes all the difference. In a medium bowl, whisk together the 2 cups granulated sugar, 0.75 cup cocoa powder, 2 tablespoons instant espresso powder, 1 teaspoon baking powder, and 0.5 teaspoon salt. Sift the 2 cups all-purpose flour through a fine-mesh sieve directly into the dry mix to prevent lumps. This step ensures your cake will rise evenly and have that perfect light texture.
I like to use a whisk for this part—it aerates the dry ingredients slightly, which helps create a lighter cake. The espresso powder might seem odd, but it deepens the chocolate flavor without adding bitterness. Give everything a good stir until fully combined and set aside. The walnuts can wait—they'll go in later for texture contrast.
🍳 Step 2: Cream Butter and Sweeteners
In a large mixing bowl, combine the 1 cup unsalted butter (make sure it's room temperature—it should be soft but not melted) with the 2 cups granulated sugar. Using a hand mixer or stand mixer on medium speed, beat for 3-4 minutes until light and fluffy. You'll see the mixture nearly double in volume and turn pale. This creaming process incorporates air, which is key for that tender crumb we're after.
Here's where it gets fun—toss in the 2 whole large eggs, one at a time, mixing well after each addition. Then add the 1 tablespoon vanilla extract and mix for another 30 seconds. The mixture should be smooth and slightly thick. If it looks curdled at all, don't worry—it'll come together when we add the dry ingredients. The butter should be fully incorporated with no streaks remaining.
🥘 Step 3: Combine Wet and Dry Ingredients
With the mixer on low speed, gradually add the dry ingredient mixture to the wet ingredients. Mix just until combined—you should still see some flour streaks. This prevents overmixing, which can make the cake dense. Scrape down the sides of the bowl with a spatula to ensure everything is evenly incorporated.
Next, add the 1 cup milk and mix again until smooth. The batter should be thick but pourable. Fold in the 0.5 cup chopped toasted walnuts by hand using a rubber spatula. I like to toast the walnuts first in a dry skillet over medium heat for 2-3 minutes until fragrant—this enhances their flavor and prevents them from tasting raw. Let the batter rest for 5 minutes while you preheat your oven.
🔥 Step 4: Bake to Golden Perfection
Preheat your oven to 350°F. Pour the batter into the prepared bundt pan and smooth the top with a spatula. Place the pan on a baking sheet (to catch any drips) and bake for 45-55 minutes. You'll know it's done when a toothpick inserted in the center comes out clean and the edges are pulling away from the pan slightly. The top should be crackly and golden brown—this is where the magic happens!
I usually start checking at the 40-minute mark because ovens vary. The cake is ready when it springs back slowly when gently pressed in the center. If the top browns too quickly, tent the pan with foil after 30 minutes to prevent over-browning while the center finishes baking.
⏰ Step 5: Cool and Serve with Finesse
Remove the cake from the oven and let it cool in the pan for 10 minutes. Then carefully invert it onto a wire rack to cool completely. This cooling process is crucial—it prevents the cake from cracking as it sets. While it cools, dust the top with 0.25 cup powdered sugar if desired (this is optional but adds that final touch of elegance).
Serve slices warm or at room temperature with a dollop of whipped cream or a scoop of vanilla ice cream. The contrast of the crackly top, fudgy center, and crunchy walnuts makes every bite unforgettable. Store leftovers in an airtight container at room temperature for up to 3 days, or freeze for up to 3 months. Enjoy your masterpiece!
Pro Tips For Making Bundt Pan Chocolate Cake
- Grease the pan right: Use 2 tablespoons melted butter + 2 tablespoons flour, rubbed in with a paper towel—don’t just spray. I learned this the hard way after my first Bundt cake stuck like glue. The flour prevents over-greasing while still releasing easily.
- Sift the cocoa powder: Skip the clumps—sift the cocoa powder with the flour before mixing. After burning three batches with uneven texture, I realized unsifted cocoa makes dense pockets. A quick shake in a fine-mesh sieve makes all the difference.
- Check doneness with a skewer: Insert a toothpick into the center—it should come out with moist crumbs, not wet batter. I’ve overbaked too many Bundts chasing a "dry" look, but this cake stays rich. Pull it when it’s just shy of perfect.
- Swap butter for brown sugar: Replace half the granulated sugar with light brown sugar (same weight) for deeper flavor. I was skeptical until I tried it—it adds moisture and caramel notes without altering texture. No extra effort, just swap and mix.
Make-ahead tips for this recipe
Prep Ahead
Mix the dry ingredients and cream the butter up to 2 days in advance, storing them separately in airtight containers in the fridge. The batter itself can be made 12 hours ahead—just cover it tightly and refrigerate.
When ready to bake, let it sit at room temperature for 30 minutes before pouring into the pan. This saves time on baking day and ensures everything comes together smoothly. 💛
Batter Storage
For maximum freshness, prepare the batter the night before and refrigerate it overnight. The cold temperature actually enhances the flavor development. When you're ready to bake, give it a quick stir to redistribute any settled ingredients.
I've found that batter stored this way yields a denser, more flavorful cake with a perfect balance of moisture and structure.
Bake Early
Bake your cake 2-3 hours before serving to allow it to cool completely and develop its signature crackly top. The cake continues to set as it cools, which is when that perfect texture forms.
If you're short on time, bake it 4 hours ahead and store it in an airtight container at room temperature. Reheat slices in the oven at 300°F for 5-7 minutes to restore that warm, gooey center.
Freezer Prep
For long-term storage, bake the cake and let it cool completely, then wrap it tightly in plastic wrap followed by aluminum foil. Place it in a freezer-safe bag and freeze for up to 3 months.
When ready to serve, thaw overnight in the fridge and reheat slices as mentioned above. The texture remains remarkably fresh, with only a slight improvement in moisture after thawing.
Portioning Tips
Slice the cake into 8 equal wedges while it's still warm for even portions. Store individual slices in airtight containers or wrapped in parchment paper. This prevents the cake from drying out and makes it easy to grab just one slice when you're craving chocolate.
I like to keep a few slices in the freezer for spontaneous dessert cravings—just pop one in the microwave for 10-15 seconds to warm it up.
Make-Ahead Mistakes
Avoid these common pitfalls: Don't refrigerate the batter for more than 24 hours—it can develop an off flavor. Never reheat cake directly from the fridge—always bring it to room temperature first.
And don't skip the cooling time—rushing this step leads to a gummy texture. The cake's magic happens during that patient cooling process, so trust the timeline and enjoy the wait! ⏰
Frequently asked questions
Why does my bundt cake stick to the pan?
The most common reason is skipping the proper greasing and flouring technique. Always coat your pan with 1 tablespoon vegetable oil, then dust with 2 cups flour, tapping out excess. For extra insurance, line the pan with parchment paper cut to fit. Never use butter or non-stick spray alone—they don't create enough friction for the flour to adhere properly.
Can I make this cake without nuts?
Simply omit the walnuts entirely or replace them with 0.5 cup chocolate chips for extra decadence. If you prefer a nut-free version, the cake's texture remains perfect without them. For a different crunch, try toasted coconut flakes or chopped pretzels—just reduce the amount to 0.3 cup to maintain balance.
How do I fix a sunken bundt cake?
Overmixing the batter or opening the oven too soon are the usual culprits. For next time, mix just until combined (visible flour streaks are fine) and avoid opening the oven door until 40 minutes have passed. If your cake is already baked, you can't fix it—but prevent future issues by ensuring your oven is properly calibrated (use an oven thermometer) and your batter isn't too wet.
What's the best way to store leftovers?
Wrap individual slices tightly in plastic wrap or store the whole cake in an airtight container at room temperature for up to 3 days. For longer storage, freeze slices (up to 3 months300°F for 5-7 minutes to restore moisture. Never refrigerate the whole cake—this causes condensation that makes the texture soggy.
Can I use this recipe for a bundt cake with a filling?
Yes! For a filled bundt cake, divide the batter into two equal portions. Bake the first layer for 25-30 minutes (until just set), then cool slightly. Spread 1 cup chocolate ganache or raspberry jam on the cooled layer, then add the second batter portion. Bake the combined cake for an additional 20-25 minutes. The total baking time increases by 15-20 minutes, so check frequently after the initial 25 minutes.